Today I will please you with a good guide and you will learn how to create primitive maps for CS: GO without spending a lot of time learning from video tutorials on YouTube. We will not be required to have programming skills or great knowledge of PCs. All we need is a small program already built into the Steam platform, with which we will learn to model our first map with me. This program is free and registered by Valve, so there is no need to be afraid of VAC ban and viruses.
1) Go to the Library.
2) Click on "Tools".

3) We are looking for "Counter Strike: Global Offensive - SDK" in the list. Download and run.

4) Click on the first button.

5) After, we will start a window. Click the "File" button in it.

6) Then - "New".

7) Bravo! You have created a blank map layout. At this point, you should see our main three buttons:

8) Since we are novice "map makers" - we will first make a regular square. Click "Browse" and choose any texture to your taste.


9) Now let's start drawing our layout. The screenshot explains how to do this:

10) Let's go through the controls: hover over the part with textures we have selected and click "Z" on the keyboard. Now you can view everything with the WASD buttons and the mouse.

11) Further, so that we can walk inside this square - Click on it, it will turn red.
12) Click on the right window with the right button and click "Make Hollow".

13) I advise you to put 64 in the choice of volume.

14) Now the very juice of the leadership. Click on the light bulb - we taste where our spawn will be

15) We direct the place, then LMB - a terrorist should appear. For CT, select a different area for spawn - press х2 LMB and in the Сlass column write "info_player_counterterrorist".

16) Go to the terrorist settings and enter "prop_dynamic", click "apply".

17) We are looking for the line "World Model" and go to "Search"

18) A window appeared with our textures. We click twice - the item appears on our map.

19) This should look like this:
Looking to become a pro in mapping but not sure where to start? Do you want to create the perfect site for yourself or your friends? Or just wondering how to create maps in CS: GO? Let's tell and show!
- Create a basic map
- Creating a room
- Spawn point placement
- Placing trunks on the ground
- Light setting
- What is important not to forget
- How to start the created map
What tools should you use
To create maps, we need a program called Hammer World Editor. She is the best thing for map makers. Simplicity and elementality are the factors that attract the creators of new playgrounds.
Where can I get this tool? To download a program for creating maps, you must:
- Go to the "Library" section on Steam;
- Select the line "Tools";
- In the list, find a line with the name Counter Strike: Global Offensive - SDK;
- Download the tool and run it.
After that, a window will appear on the computer from which we need to select the Hammer World Editor. Click on it - and voila! The editor is in front of you. You can start creating.
Create a basic map for CS
Now we are not going to create the most gorgeous map of the millennium. Our task is to understand exactly how the editor works. What to do with it to learn how to create maps. So now we are just creating a large room for two terrorists and two counter-terrorists. And we'll come up with a comic goal: just shoot each other. So let's get started!
Creating a room
Before creating our beautiful map, we must create a file in which we will work. To do this, click on File - New.
An empty layout has appeared. The upper left window shows the 3D model of the objects, and the following ones show the top, side and front, respectively.
Before drawing, we must define the location of the camera. To do this, select the third button in the left panel (Camera) and place it in the 2D-window by clicking on it and swiping in the viewing direction.
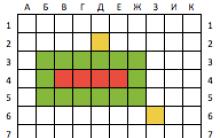
Now you can create a map. To create a box room, we need to draw a rectangle (brush) in the upper right window. For example, let's take the size 1152 (top edge of the rectangle) by 895 (side edge). Then, in the lower left window, mark the "height" of the box - the height of its ceiling. For example, let's set it to 64 in height and 895 in length. The projection will be created automatically in the last window.
The texture of the brush appears in the 3D viewport. If you click on it and then press the Z key, then using the mouse or the WASD control buttons, you can inspect it from all sides.
To make the created box empty inside, click on it in the upper left window, highlighting it in red. Then we click on the upper right window with the right mouse button. In the list that appears, select the Make Hollow line. A new window will appear in which you need to enter the number 64 and click on OK.
We move inside the box. Now this is a platform that you can safely start equipping!
Spawn point placement
The next step is to make sure that players can appear on the map we created at all.
To create a respawn point, you need to select the light bulb tool (the fourth button on the toolbar called Entity Tool). A selection will appear on the right near the bottom window. We need to create, for example, a terrorist spawn point. To do this, select the name info_player_terrorist from the Objects drop-down list (to create a counter-terrorist respawn, you need the info_player_counterterrorist command). Then we place the point anywhere on the map through the 3D window. You just need to click on the map.
After that, players will be able to appear directly on the map after the start of the game. The more points - the more players of a certain team can be entered.
You can even create a respawn for single player (info_player_start) or for DM mode (info_deathmatch_spawn).
Placing trunks on the ground
To put the weapon on the ground, the same tool is used as for creating spawn points. Click on the Entity Tool again if not already selected. Then enter the word Weapon in the Objects field. We will be shown all possible weapons. Choose any and place it on the floor.
Light setting
Again, we need the Entity Tool. Select the tool, and then enter the word Light in the Objects search. You can place light sources anywhere. But there are many of them, which one to choose? The simplest and most convenient:
- Simply Light is the simplest and smallest light source. It will help if you need to highlight a small part of the space;
- Light_spot - directional light source that illuminates a specific point;
- Light_environment - light from above, from the "sky" of the map.
After installing the light source, you can select it in the 3D view, double-click on it, and then set the parameters (color, brightness, and so on) in a new window.
What is important not to forget
So, we have created a basic map.
- put on lighting so that the participants can see at least something;
- do not forget to set the mission of the map by creating at least one plant or one hostage, as well as a place to withdraw it from the game;
- mark the respawn points T and CT. There must be a minimum of 32 points - 16 points for each team;
- look carefully at the created map - are there any holes in the textures where players can fall?
- remember that it is important not to forget to create a shop at the respawn points (or in any specific location) so that players can buy weapons and armor.
But this will be needed when we create more advanced maps. Now on our creation you can just have fun with your friends ... Or not yet? Exactly, you have to save!
How to start the created map
- Select File;
- Click on the Save As line;
- Save.
Then the project can be edited and changed. But we want to play. For this:
- Click on File;
- Select the Run Map item;
- Save the map in * .vmf format;
- Set all parameters in the next window to Normal;
- Click on OK.
After that, the card can be safely used like any other.
Looking to become a pro in mapping but not sure where to start? Do you want to create the perfect site for yourself or your friends? Or just wondering how to create maps in CS: GO? Let's tell and show!
- Create a basic map
- Creating a room
- Spawn point placement
- Placing trunks on the ground
- Light setting
- What is important not to forget
- How to start the created map
What tools should you use
To create maps, we need a program called Hammer World Editor. She is the best thing for map makers. Simplicity and elementality are the factors that attract the creators of new playgrounds.
Where can I get this tool? To download a program for creating maps, you must:
- Go to the "Library" section on Steam;
- Select the line "Tools";
- In the list, find a line with the name Counter Strike: Global Offensive - SDK;
- Download the tool and run it.
After that, a window will appear on the computer from which we need to select the Hammer World Editor. Click on it - and voila! The editor is in front of you. You can start creating.
Create a basic map for CS

Now we are not going to create the most gorgeous map of the millennium. Our task is to understand exactly how the editor works. What to do with it to learn how to create maps. So now we are just creating a large room for two terrorists and two counter-terrorists. And we'll come up with a comic goal: just shoot each other. So let's get started!
Creating a room
Before creating our beautiful map, we must create a file in which we will work. To do this, click on File - New.
An empty layout has appeared. The upper left window shows the 3D model of the objects, and the following ones show the top, side and front, respectively.
Before drawing, we must define the location of the camera. To do this, select the third button in the left panel (Camera) and place it in the 2D-window by clicking on it and swiping in the viewing direction.
Now you can create a map. To create a box room, we need to draw a rectangle (brush) in the upper right window. For example, let's take the size 1152 (top edge of the rectangle) by 895 (side edge). Then, in the lower left window, mark the "height" of the box - the height of its ceiling. For example, let's set it to 64 in height and 895 in length. The projection will be created automatically in the last window.
The texture of the brush appears in the 3D viewport. If you click on it and then press the Z key, then using the mouse or the WASD control buttons, you can inspect it from all sides.
To make the created box empty inside, click on it in the upper left window, highlighting it in red. Then we click on the upper right window with the right mouse button. In the list that appears, select the Make Hollow line. A new window will appear in which you need to enter the number 64 and click on OK.
We move inside the box. Now this is a platform that you can safely start equipping!
Spawn point placement
The next step is to make sure that players can appear on the map we created at all.
To create a respawn point, you need to select the light bulb tool (the fourth button on the toolbar called Entity Tool). A selection will appear on the right near the bottom window. We need to create, for example, a terrorist spawn point. To do this, select the name info_player_terrorist from the Objects drop-down list (to create a counter-terrorist respawn, you need the info_player_counterterrorist command). Then we place the point anywhere on the map through the 3D window. You just need to click on the map.
After that, players will be able to appear directly on the map after the start of the game. The more points - the more players of a certain team can be entered.
You can even create a respawn for single player (info_player_start) or for DM mode (info_deathmatch_spawn).
Placing trunks on the ground
To put the weapon on the ground, the same tool is used as for creating spawn points. Click on the Entity Tool again if not already selected. Then enter the word Weapon in the Objects field. We will be shown all possible weapons. Choose any and place it on the floor.
Light setting
Again, we need the Entity Tool. Select the tool, and then enter the word Light in the Objects search. You can place light sources anywhere. But there are many of them, which one to choose? The simplest and most convenient:
- Simply Light is the simplest and smallest light source. It will help if you need to highlight a small part of the space;
- Light_spot - directional light source that illuminates a specific point;
- Light_environment - light from above, from the "sky" of the map.
After installing the light source, you can select it in the 3D view, double-click on it, and then set the parameters (color, brightness, and so on) in a new window.
What is important not to forget
So, we have created a basic map.
- put on lighting so that the participants can see at least something;
- do not forget to set the mission of the map by creating at least one plant or one hostage, as well as a place to withdraw it from the game;
- mark the respawn points T and CT. There must be a minimum of 32 points - 16 points for each team;
- look carefully at the created map - are there any holes in the textures where players can fall?
- remember that it is important not to forget to create a shop at the respawn points (or in any specific location) so that players can buy weapons and armor.
But this will be needed when we create more advanced maps. Now on our creation you can just have fun with your friends ... Or not yet? Exactly, you have to save!
How to start the created map
- Select File;
- Click on the Save As line;
- Save.
Then the project can be edited and changed. But we want to play. For this:
- Click on File;
- Select the Run Map item;
- Save the map in * .vmf format;
- Set all parameters in the next window to Normal;
- Click on OK.
After that, the card can be safely used like any other.
Hello, in this tutorial I will tell and show you how to make a map from A to Z!
We need:
1 - Counter-Strike: Global Offensive
2 - Counter-Strike: Global Offensive SDK
3 - Hands (I hope you have them)
Go to the "LIBRARY" tab and see the "Tools" tab. Go there
__________________________________________________________________
We are looking for our SDK and download it!
The first steps!
First of all, you need to start the program, such a window will pop up, do not touch anything except (Hamer World Editor)
_____________________________________________________________________
And the program itself will actually start, Create a new project!
The working environment has opened, the first step is to set everything up!
We see "Camera" In the Top Left Square, click on it!
_____________________________________________________________________
We see "3D Shaded Textured Polygons" Click this so that we can see the Textures of our brushes
_____________________________________________________________________
Actually, let's go through the panels!
1. Cursor (you can select brushes, models)
2. Magnifier, you can Zoom in and out, but only by Front, Top, side
But she has a very effective replacement "Mouse wheel!"
3. Camera, with the help of it you can move to 3D Space, for example, on your map!
4. Entities, With this tool, you can put different models for example (bench trees, etc.)
5. And here is the brush itself, as I said, this is the basis of the map, with the help of it you can build Roads, landscapes, houses, etc.!
6. This tool is able to replace the texture of the brush, if you painted with a texture
You can also see there "Displacement" With this tool, you can create landscapes and bend brushes in every way!
7. This is also a kind of texture substitute, only it replaces the entire surface of the brush
8. This is a decal tool, for example, you can take a texture of blood, and put it in this tool, and there will be blood) 0))
9. This is the same, only this tool can be adjusted along the plane of the brush, do not forget to take into account the size of the texture that you put in the decal!
10. This tool can cut brushes!
11. This tool can resize another brush, in general it can also resize it! _____________________________________________________________________
Let's move on to the panels on the right side!
We see "Current Texture" Here you can choose the textures you need!
But this is not a convenient way! We see "Browse" Click, and here it will be much clearer where the textures are!
In field Filteryou can find any texture! For instance Stone, Grass, Glass, etc!
_____________________________________________________________________
You can also change the grid Front, Top, side
where the Grid is with a minus, Makes the grid smaller
Plus mesh makes the mesh bigger
Thus, with the help of these two buttons, you can adjust any enity along the brush plane!
_____________________________________________________________________
If you are not comfortable working in a small window, then put the cursor in the crosshair, hold down the button and drag!
Working with brushes!
So, let's start making a map, We do all the machinations that I wrote in "The first steps"
select the brush tool, select the texture!
Go to Top hold down the LMB and drag, then when you have set the desired size for the brush, click RMB and "Create Object"
Then with the help of the camera we can move to 3D Space in the upper left window!
We created the brush, now you can play and experiment! Now you have created a brush, painted in a different texture
And you need to crop it, Take the brush cut tool, and in the window "Top" Cut out!
Highlight the desired angle, and click "Enter"
You can also copy brushes, select the desired brush and click Ctrl + c Then Ctrl + v In the area where you want to attach it, in the windows Front, Top, side!
Now we will make pipes, triangles, arches, etc. from brushes!
We do the same procedure, create a brush, but in the lower right corner there will be Objects
Open the tab!
1. Arch - Arch
2. Block - Block (Set as standard - so that later there would be no questions but how to return)
3. Cylinder - Cylinder
4. sphare - Something like the Low Polygon circle
5. spike- Pentagonal Triangle) 0))
6. torus - With it you can make a tunnel
7. wedge - Wedge So you can do stone doors, tunnels, boulders, stones, etc.
__________________________________________________________________________
Let's take a look at another tool that changes the brush!
We select it, and points will be shown there, select one or several, and change the position, if everything is ready then click on the cursor!
Working with the Entity!
Let's say that we made the site, the houses, but how to make it possible for the door to open and how to add it in general, or make light on the map, or add it in the end Terrorists or Ktshnikov?
So how do you add light?
Click on the entity icon and put it on the plane of our brush!
We see the Terrorist spawned, but we don't need him)
We double-click on it, after taking the cursor, and we see a window has opened, we do not touch anything, except for the line Class
There will be a lot of everything, we do not touch anything, we write in the field "Light"
Click on Light! By the way, there is also Light_environment This is the Sun, but with it later!
Also there is Light_dynamic This is a dynamic light, that is, it can be attached to a car, and if it is driving, then the light will be with it, but the usual light will remain at the point where you moved it! Click apply!
We've got a light, and a lot of settings! I will explain only the necessary ones for the first time!
Name - This is the name of the object
Brightness - Colour
Appearence - So that the light blinks
Maximum Distance - glow distance
Click Apply, and close this window!
Now you can move it around Front, Top, side
Now another question is how to do it all the same A bench, or a tree?
Everything is the same, we put Entitygo into it and open the tab
And we find or prescribe "Prop_static"
Also some will have problems with statics, (that is, there will be black models)
There is a substitute “Prop_dynamic_ornament”
There are many settings there too.But we will bypass them for now, we need a setting "World Model"
Click on it, and we see from the right "Browse" click on it!
Such a window will open, now we will analyze it!
1. - This is the model itself
2. - These are folders with models
3. - In this window you can see the model
You can also find a model in the “Filter” field!
Let's say I liked this KAMAZ!
We also move it wherever we want!
______________________________________________________________________
How to make a ktshnik and a door?
With a ktshnik everything Very simple, but you will have to tinker with the door!
To put a Ktshnik, you need to create the same entity, go into it and type in the field
"Info_player_counterterrorist" For a terrorist, just put the entity or in the field enter "Info_player_terrorist"
Now the door, create an Entity and in the field enter Prop_door_rotating
Click "Apply" We don't touch anything yet
Looking for Customization "World Model" Press and "Browse"
And in search "Filter" We enter "Door" And we are looking for a suitable door for your taste!
You have found the door, we press "OK" And apply, you should have a door!
Now with customization! I will write only the necessary ones!
Name - Name
Rotation Distance (deg) - how much the door will open!
Speed - Opening speed
Delay Before close (-1 stay open) - How many seconds will it take to autoclose -1 means never!
Now it's time to get acquainted with the flags
Starts open - So the map will be open at start!
Starts Locked - Closed at start!
Door silent - Without a sounding door
Use closes - Usable
Ignore player - Ignores the player
Start breakable - Destroyed at start!
Now we see the points at 3D window It's just a blue circle, On Top you need to change the Point, where do we want the door to open!
It will also open to the other side of the password to the point you set!
And here is the final result!
Sun, Skybox, Displacement
And so, here I will tell how to make the landscape sun and skybox and I'll tell you what it is for!
Let's start with the skybox
The skybox is the most necessary part, although if your map is made so that the player cannot go out into the fresh air, then there is not much sense in it!
The skybox is needed to limit the map, and in fact it is a simple sky!
How can you do it?
It's just that I did something like a square
And now create a new brush and place it at the top (Here is an example)
The brush is located, but it needs a different texture, you know how to change it, go to "Browse"
And we write in the search Sky
And find the Texture "SKYBOX" We poke at her 2 times!
Now let's go to landscape A that is (Displacement)
Everything is easy here too
Create a Brush with any texture, rip it out, and click on the button where you can change textures!
Then we poke on the tab "Displacement"
Then we press the button "Create"Then a window will appear where it is written "Power" that is the strength, Maximum 4, this is something like polygons!
Push Okay
Then we press the button "Paint Geometry"
Another window will be displayed, without closing it, go to 3D Window, and there already deform our brush!
This is how I did it, ugly slides, well, you will succeed beautifully, I'm sure)
All C Displacementfinish, With it you can make all sorts of holes in the walls, etc!
____________________________________________________________________________
Let's go to the sun, what about the sky without the sun !?
Create an Entity again and go into it!
And we write in the field Light_environmentI hope everything is clear by setting
Then we press "Apply", close, and move wherever we want!
Create breakable objects!
And so, we make an object to be broken, it is very easy!
First of all, we create a brush, then send it to entity object
By pressing "Ctrl + T" Or as shown in the screenshot!
Then the window familiar to us will be highlighted, in the field we enter Func_breakable Click apply!
I will write just what I need for setting up!Name - Name
Parent - Snap to any object (Ditto for the rest of the Entities)
Strength - Strength (that is, hp)
Material Type - The type of material, for example Iron, wood, glass, etcWe also go to the Already familiar "Flags"
Break on touch - destruction with a touch!
well that's all! : Z
Water on the map!
Water is also very easy to create!
1. Create Brush
2. Change the texture to water (Water in the field you will see)
3. All: Z
Weather!
And so, what to do Snow? Or Rain? so or fog?
Let's start with the snow (although rain and snow are done the same!)We put Entity And we prescribe in the field "Func_precipitation"
And it's okay that the search won't find it, it's probably a bug, just copy the name and paste it into the field, then click "Enter"
And he will find it! By settings
Name - Name
Density - Intensity of Rain / Snow
Color - Particle color!
Precipitation Type - Type of precipitation (Rain or snow)
Minimum speed (snowfall only - only for snow) - Minimum speed of snowflakes
Maximum speed (snowfall only - For snow only) - Maximum speed of snowflakes ____________________________________________________________________________
Everything with Precipitation, Now the fog, (Fog is needed for both optimization and beauty)
How can you do it?
We put the intity “Env_fog_controller”By setting m
Fog Enable - Set to yes to show fog!
Fog Blend - Will the fog be two-tone?
Primal fog color - The first color of fog!
Secondsry fog color - The second color of fog!
Fog start - The distance from the player at which the fog is displayed!
Fog end - The distance from the player at which the tumab will be thicker!
Far z clip plane - The distance from the player at which the game space will cease to be displayed by the engine!
All sizes are in units!
Player standing size - 73
unit!
Player Squat Size - 46
unit!
Player size wide - 33
unit!
A simple high jump - 45
units!
High jump with squat - 64
unit!
Long jump with squat - 99
units!
Long jump while walking - 109
units!
Running long jump - 239
units! The maximum height from which a player can fall without losing health is 218
units!
The maximum angle of inclination of the wall on which the player can stand - 45
degrees!
The maximum angle of inclination of the wall, which he can climb 70
degrees!
How do I add my own textures?
First you need a program "Pakrat"
And the program
And for "Pakrat" needs "Java"
Once you've downloaded, decide on the texture
Launching the Program
Clicking "File" And than "Emport"
A window will open!
Where the arrow can be indicated (resize)
Then you save it to a place convenient for you
Then click on the button shown in the screenshot
We need to find our files and open the file exactly "VMT"
We opened the file, erase everything from the line indicated in the screenshot (in no case erase the quotes)
And replace it with the name of our texture!
And save, close the program!
Then we go to our files, copy them!
Go to the game folder
Drive: \\ where steam is installed \\ Steam \\ steamapps \\ common \\ Counter-Strike Global Offensive \\ csgo \\ materials
[
And we throw these two files there!
That's all!
But from here the question is, Why pakrat?
It is needed to sew a texture into the map, so that other players would see it when entering the map!
And so, launch the pakrat!
And we are looking for our map!
Another window opened
Push "Add"
We go into the game and see that everything works: W
Add sounds to the map
To add sound to the card, you need to put entity go into it and write in the field Ambient_generic
I will go through a lot of settings on the important ones!Name - name
Volume - Volume
Sound name - Sound file name (You can select by clicking on the button "Browse")
Max Audible Distance - Maximum distance at which the sound will be heard!
Sourse Entity Name - The name of the object from which the sound will be heard! Let's go to the flagsPlay Ewerywhere - Sound all over the map
Start Silent - Does not start at startup
Is NOT looped - Sound plays only once
Texture you can walk through
We put the brush (Let's say it's a wall) send it to entity "Ctrl + T" And write in the field "Func_illusionary"
Everything!
How to make a door (brush) on a timer?
Let's start with the fact that many did not understand what is written at the top.
"Door (brush)" What does it mean? this means what we will do from brush the door!A brush door is very easy to make!
There are two types of brush doors!
it "Func_door" The usual one that moves along X, Y, Z
AND "Func_door_rotation" This door Opens like a regular door! I will not explain "Func_door_rotation" I think everything is clearLet's go through the setting m
Name - Name
Move Direction (Pitch Yaw Roll) The direction in which the door will move
Lip - This setting specifies how many units the open door will stick out of the wall!
Delay before reset - Time in seconds after which the door will close itself (default -1)
Start sound, Stop sound - Sounds of opening and closing doors! Flags
Start open - At the beginning of each round, the door will be open!
Use Opens - Door Opens by pressing "E"
Touch Opens - The door opens when touched! ____________________________________________________________________________
Tver by timer
All the same, we put the brush, send it to the entity "Ctrl + T" Or as shown in the screenshot!
We make a door out of it "Func_door" or "Func_door_rotation" No difference
Well and, accordingly, we adjust to our own discretion!
And no matter how you name your door, in the future we will need to bind to this name timer!
Named done, now you need to put the entity "Logic_timer"
Do not touch anything in the x setting!
Go to the tab "OutPuts"
And then we do everything according to the gif
My output named - Output name, that is, now we put "Activate timer"
Targets entities named - the name of the entity (well, that is, our door)
After a delay in seconds of - How many seconds must it take for the door to open!
Create windows!
To create windows, you can and (even needed) Use a tool like “Carve”
As shown in the gif, the object is placed in the object, and the brush does not fall into 3 parts!
Thus, you can do something like a window! Then, accordingly, put the brush inside and paint over with the glass texture!
You can also make the window breakable!
We already know how to make a breakable object!
OutPut system
On this system, the very functionality of the map, visually let's say you made a map, and you need terrorists to spawn, doors to open by taimeng, so that blocks move, or let's say a weapon spawns when a stone is broken, etc.!
All this can be done using the system "OutPut""OutPut"
Here you can configure the actions that this entity performs while performing an action on it. For example, you need to make a light bulb turn on when a window is broken.
My output named - action on entities, during the execution of which will occur OutPut(window breaking - OnBreak)... You can enter it manually if you are sure that it will work.
Targets entyties named - the name of another entity to perform some action on it (the name of the light bulb).
Via this input - action on this entity (turn on the light bulb - TurnOn).
With a parameter override of - additional parameters (in this case they are not needed - none).
After a delay in second of - delay in seconds before execution OutPut.
Fire once only - this action will be performed only once (i.e. when the window is split again, the light will not turn on, in this case we do not need it, since the window can only break once)
Additionally!
Here I will write additional tutorials like
- Mines
- A train
- Health replenishment zone
- Equipment purchase area
- Weapon respawn
- Create wires
- Game account change
- Bonfire
- Card on the knives. We take away weapons from the player
___________________________________________________________________________
1 - Mines
We create a brush, give the shape of a mine (or not, just mask it under the floor / ground), send it to the entity, where we select func_breakable. Now we place the env_explosion entity right above it and give it a name, for example mina
Health - set it to 0 so that no one can destroy the mine prematurely by shooting at it from afar
Material Type - the material from which the mine is made (this value will affect its pieces when it explodes, sound and decals when fired at it)
Pressure Delay - the time after which the mine will explode after it is stepped on
Don't forget to check the Break on Pressure checkbox. Now, in the OutPuts tab, add a new output: OnBreak - [name env_explosion] - Explode. Where [name env_explosion] - we substitute our own (in my case, mina). That's all. Compiling and blowing up on our mine
__________________________________________________________________________
2 - Train
First, you need to make a model train. We put prop_dynamic in the right place (not prop_static, but prop_dynamic!) And select the required train model!
Now, somewhere “inside” our train, we create a brush covered with NODRAW, after which we send it to the entity - func_tracktrain. Set the train speed in the Initial Speed \u200b\u200bparameter, change the Height above Track value to 0, then check the No Pitch and Fixed Orientation check boxes. Enough settings for now.
Next, we are looking for the blue ball on our func_tracktrain. In its location we put the path_track point entity, which we give a name to. We must also enter this name into the First Stop Target parameter of our func_tracktrain.
Where we put the entity path_track is the beginning of the train path. In the end, we must also put this entity, give it a different name, which must be entered into the Next Stop Target parameter of the first path_track.
But that is not all. The final touch - we give a name to our func_tracktrain (the Name parameter) and enter this name into the Parent parameter of the prop_dynamic entity
____________________________________________________________________________
3 - Health replenishment zone
Where there will be a zone of health replenishment, create a brush that completely covers this area, then cover it with TOOLS / TOOLSTRIGGER texture, then send it to the entity, where we select trigger_hurt. We configure 2 parameters for it:
Damage We set the value, this value will replenish the player's health every second until it reaches 100. Do not forget to put a minus in front of the value, otherwise health will be taken away!
Damage Type For the trigger to replenish the player's health, change to CRUSH. If you leave Generic, then armor protection will increase
That's all.
___________________________________________________________________________
4 - Equipment purchase area
Just like in the last lesson, we create a brush where we will have a zone for buying equipment, cover it with TRIGGER and send it to the func_buyzone entity
In the Team parameter, we indicate who will be purchased in this purchase zone - terrorists or special forces. The equipment shopping area is ready!
_________________________________________________________________________
5 - Respawn weapons
First of all, we first put the weapon in the place where it should appear and give it a name, for example weapon. Now, at any point on the map, we create a point_template entity, give it a name, for example respawn, then enter the name of our weapon (in this case, weapon) in its Template 1 parameter. Now we create a button somewhere, turn it into a func_button, set the Don’t move checkbox b add an output: OnPressed - [name point_template] - ForceSpawn. In this case, the name is respawn, i.e. will be like this: OnPressed - respawn - ForceSpawn.
_________________________________________________________________________
5 - Create wires
Adding wires and ropes to the map is easy. Move_rope is responsible for the starting point of the wire, keyframe_rope is responsible for the end and its further continuation. So, to where we will have the beginning of the wire, set move_rope, in the Next KeyFrame parameter, specify the name of the end of the wire, which will be the keyframe_rope.
The move_rope entity has several settings for the appearance and functionality of the rope / wire:
1. Slack - sagging rope
2. Type - what the rope is: an ordinary rope, a rigid rope that will sag weakly and a “straight stick” that will not sag regardless of the Slack parameter
3. Width - rope thickness
4. Start Dangling - whether the rope will be broken at its end at the beginning of each round
5. Collide with world - whether the wire will contact the outside world: the player, grenades, etc.
6. Breakable - is it possible to break the rope (with a grenade, shot or any other impact)
__________________________________________________________________________
6 - Changing the game account
Sometimes it is necessary to add (or subtract) frags to the player who performed some action, usually this is done on the maps for the passage. There is a special point entity for this - game_score.
Create game_score anywhere on the map, give it a name, for example, score. In the Point to add parameter, we indicate the number of frags that will be added to the player at a time (or subtracted if you put a minus in front of the number). If you have the frags taken away, check the Allow Negative flag so that the player's frags can be negative (if this flag is not, then the minimum number of frags for the player cannot be less than zero).
Now we put the func_button button somewhere, set the Don’t Move flag to it and add an output to it: OnPressed - score - ApplyScore, if you gave game_score a name other than score, then replace it with your own. Done. When the player presses this button, the number of frags that you set at game_score will be added (or subtracted)
___________________________________________________________________________
7 - Bonfire
A bonfire can be useful on night or forest maps (or if you need a fire), in my opinion, there is nothing difficult in creating it. The env_fire entity is responsible for fire. Create an env_fire point entity where a bonfire is needed, set its Size and Attack parameters, which are responsible for the size of the bonfire and the damage it causes, respectively.
We set the Infinite Duration checkboxes (the fire will burn forever, otherwise it will go out after the number of seconds specified in the Duration parameter), Start On and Start Full (so that our fire is turned on at the beginning of the round). Everything.
Wait a minute, where is the light from the fire? And the sound of burning ?? And what about firewood / boards or what should we be burning? We must add all this! The ambient_generic entity is responsible for the sound
Added sound? Great, now the light, it's even easier: set light and adjust the color similar to the color of the fire, for example, orange. You can add light jumping effects to the light in the Appearance parameter. Well, now it remains to add firewood, coals and other details for realism. There is prop_static for this.
__________________________________________________________________________
8 - Card with knives (We take away the weapon from the player)
Do you need players to have only certain types of weapons? For example, a knife for a card with knives. Or AWP sniper rifles with a Desert Eagle pistol. All this is not easy, but very simple (compared to the previous tutorial). The game_player_equip entity is responsible for the weapons on the map. Place it anywhere on the map.
__________________________________________________________________________
Teleport
In the place where the player will teleport, set info_teleport_destination. This is an intitia in the form of a player, its placement does not differ from the placement of info_player_terrorist - at least 1 unit above the ground. We give this entity the name teleport
Now, where the players will teleport from, place the brush trigger trigger_teleport, enter teleport in its Remote Destination parameter. Done. When the player touches the trigger, it will be moved to the point info_teleport_destination.
You can make it so that only one player teleports, and the others look at him with hatred, add an output to the trigger: OnStartTouch -! Caller - Disable - 0.01
The second option is already more complicated and requires some experience, plus this option - only one entity is used. We set the trigger trigger_once (so that the teleport works only once) or trigger_multiple (so that many times; do not forget to change the Delay Before Reset to 0) and add an output to it: OnStartTouch -! Activator - AddOutPut - origin xyz, where x, y and z are coordinates , to which the player will be teleported!
How to start a map in CS?
Have you made a map? Then you will surely have a question - “How can I start / For testing a card in CS?
Everything is very easy here!
In the program itself, open the "File" tab And at the bottom we see "Run Map" Click!
A window will open, click "Ok" And wait for the card to start! (Ks will open itself)
How do I add my sounds to the map?
To add our own sounds, we again need the "PakRat" program
The sound must be placed in the folder with the game and the path is: Your drive: \\ where the steam is installed \\ Steam \\ steamapps \\ common \\ Counter-Strike Global Offensive \\ csgo \\ sound Create a folder there (name in English) We throw our sound there!
We already know how to insert files into a card!
well, of course, we also know how to set sounds! Everything, the sound in the game is happy! But some will have problems with the sound, namely, it will not be played
There are a couple of ways to fix this (but this is not accurate) 1 - Try changing the format
2 - Try changing the audio bitrate
3 - In the game itself, write the command “snd_updateaudiocache” in the console. Then restart the game and listen!
WHAT CAN BE ERRORS?
1. There is no player start. Map error!
This error can be ignored
2. Invalid texture “texture name”. Map error
One of the brushes has no texture. You can go to the brush by clicking the "Go to error" button in the error correction window. The brush that caused the error will be completely white. Can be ignored if you add texture later. In the game, the wrong texture will be displayed as an emo mesh
————————————————————————————————————————–
3. Texture axic perpendicular to face. Map error This error occurs for two reasons:
1. If you rotated the object with the "Texture lock" option turned off, and the texture became perpendicular to the side of the object;
2. There is an irregularly shaped object on the map, obtained as a result of manipulating with vertices or using the Carve function. In both cases, it is easier to delete the object and create a new one.
————————————————————————————————————————–
4. Invalid solid structure. Map error An error means that the map has an irregularly shaped brush resulting from manipulation of vertices. Try to fix the given object, or delete and create a new one.
————————————————————————————————————————–
5. Solid entity “entity name” is empty. Map Error An error means that the brush entity object has no shape (that it is empty). It is difficult to say why this error occurs, but it has been noticed that sometimes an entity object itself becomes a brush, but the editor still considers it an entity object. And when we re-transform the brush into an entity-object, this error occurs. So, most likely, this is due to glitches of the editor itself. In any case, it is better to get rid of such errors, even though they do not affect compilation in any way, and getting rid of them is quite easy. Click, in the window that appears, select the line "Solid entity ... is empty" and click the "Go to error" button. Look at the size of the object (in the status bar), if you see something like: -1999998w, then press Delete (i.e. just delete this object). Do the same with other "empty" objects. Note: when you go to an "empty" object, it will not be visible on the map, but the editor still goes to it and allows you to delete it.
————————————————————————————————————————–
6. Unmatched ‘target’ field “name”. Map error
The Target parameter of one of the objects contains the name of a non-existent object. To fix the error, go to the object using the "Go to error" button and delete / correct the entry in the "Target" parameter, or create an object with the name specified there. Doesn't affect compilation, but the erroneous object may not work in the game
————————————————————————————————————————–
7. Entity “object name” has unused keyvalues. Map error
The specified entity contains unused parameters. The error is corrected with the "Fix" button. Does not affect compilation, but this object may not work in the game
————————————————————————————————————————–
8. Entity “object name” contains duplicate keyvalues. Map error
The specified object contains several of the same parameters. The error is corrected with the "Fix" button. Also does not affect compilation.
————————————————————————————————————————–
10. Solid contains duplicate planes. Map error
An error means that some brush has two planes superimposed on each other. To fix the error, click the "Go to error" button, delete the object and create a new one.
This is not a complete list of errors. There are also logical errors, some of which are also map errors. But I hope you won't reach them soon.
TOTAL
Well this guide has come to an end, I hope you enjoyed it. Leave your comments!
Hello dear users and guests of Play`N`Trade, Matros is with you. Most likely each of us at least once wanted to create our own map in the CS. Now I will tell how to create a map in cs go.

How to create a map in cs go
To create a map in cs go, you must definitely buy CS: GO. It is necessary. Next, you will need to download and install the free CS: GO SDK World Editor. To do this, go to the "Library", then to the "Workshop". After that, we are looking for this programat. If you just bought the game, then you need to go into it and play for at least two minutes. This is a must. After that, half of the work has already been done.
Further, in order to create the map itself, you need to open this program and click on the Hummer World Editor. It will take a very long time to tell. There are many guides for creating a map on YouTube. Now you only need to find a person who explains everything in the most accessible way. I'll make it easier for you to find. *click here*
On this I would like to conclude my article. Hope I helped you create your map. After creating it, you can send it to the workshop and other people can play it by adding it to yourself.


Cartography and Geoinformatics
Cartographer - who is he and what does he do, where to study and work?
Simple rules for solving the Rubik's cube
Description of 36 cards solitaire
Drunk Roulette game rules Drunk Roulette game in Russian buy