Liked our site? Your reposts and ratings are the best praise for us!
This guide contains all the necessary information for the fastest and most comfortable pumping in Black Desert.
How to level up faster in BDO? Grind or quests?
By far the fastest way to level up in Black Desert Online counts as a grind, but if you're downloading the first character, we strongly recommend that you go through the storylines (up to about level 56) in order to get to know the game properly. At first, BDO seems very difficult, so accelerated leveling is only recommended for those who are confident in their abilities. It should also be noted that some quests (for example, from the Black Spirit) are mandatory for each character. As a reward for them, you can get additional slots in bags, knowledge points, energy and influence. If you miss important quests, you will still have to return to them later. That is why we advise you not to rush and upgrade at least one character on quests.
Leveling up in BDO with the help of friends
If your assistant has a high attack stat and you have all the experience buffs, leveling up to level 56 takes only 2 hours. And again, if you are leveling the first and main character, this method will not work for you, because this way you will not earn the required number of skill points and you will not be able to get talents. In other words, this leveling method should only be used if your friends are eager to help you further. Otherwise, you will be left without money and skill points.
You also need to remember that if the level of the assistant exceeds your own by 10 or more units, you will not receive loot.
Introduction
After creating a character, the game will offer you to go through training and visit different locations for beginners. If you are not playing for the first time, you can skip the tutorial. Training takes a lot of time and gives practically nothing (with the exception, perhaps, of movement skills).
If you are not in a hurry, you can buy yourself a wagon or complete the quest for a wagon in Velia. The wagon can hold potions and loot so you can grind in peace without having to return to town too often.
In addition, we recommend buying 2-3 pets from the in-game store. Pets will collect loot automatically and save you a lot of time. In fact, a pet is a prerequisite for a successful grind. If you don't have extra real money, try to buy a pet at the auction.
All points for pumping indicated in this guide have been repeatedly tested on European, North American and Russian servers. The characters were pumped without enchantments on equipment and without any special bonuses, so any other player can safely follow our recommendations. The equipment was obtained as it was pumped, that is, it fell from the killed monsters.
We also want to remind you that some classes (for example, the Valkyrie) level more slowly than others, so it would be wiser for them to look for a group.
- Use maximum experience buffs:
- +200% look for a channel with an activated bell
- +100% weekend bonus
- +50% war volume
- +30% premium set bonus
- +10% suit
- +200% for 1 hour or +100% for 2 hours - daily buff from achievements
- Some pets give +5% experience
- Events in the game, mainly related to holidays.
- Various consumables (sweets, bouquets, tea, beer). Basically, all this is taken at auction.
- Experience increases at night
- If this is your first character, then be sure to try to get a vehicle as soon as possible. It can be bought at the auction or received as a reward for one of the Starting Quests.
For the fastest pumping 1-60, use the items highlighted in green
Level 1 - 15
Level 1 - 9: Training
Once created, the character appears in a village called Olivia. If this is your first character, be sure to complete the introductory quests with them. To enable auto run, press the T key and set a point on the map. Sooner or later you will come running to the right place and you will be able to start training. Some players do not understand what to do in tutorial quests. In fact, everything is simple - you need to go to the mannequin and follow the instructions that are written at the top of the screen, that is, press the desired keys.
After that, the Black Spirit will give you another quest and send you to kill bugs. Open the Black Spirit's menu by pressing the "/" key. By this point you should be at level 5.
Reset the quest and run to the Western guard camp, killing all the monsters in your path. This will get you to level 9. If you don't know where the West Guard Camp is, look at the map:
Level 9 - 13: Hermit's Grove

- Monsters: Weak Treant (Melee), Mature Treant (Ranged), Young Treant (Melee)
- Experience: 3/5
- Difficulty: 1/5
- Mining:
- Tree Spirit Branch
These monsters pose no threat and are easy to kill. The ancients live mostly on the hills. Tree Spirit Branches can be sold to the merchant at the left entrance to the guard camp. Right click on an item in your inventory to see the merchant's location on the map.
After reaching level 13, return to the West Guard Camp and take the quest from Jareth Domongart, who is in the tent. Complete the quest - it will allow you to awaken the Black Spirit and upgrade items.
Level 13 - 15: Heidel Mine

- Monsters: Imp Miner (Melee), Lesser Imp Miner (Ranged)
- Experience: 4/5
- Difficulty: 2/5
- Mining:
- Rough Pickaxe
- Valuable amber [Crit. hit]
- Ain Garnet [Damage]
These are also very easy opponents. They stand comfortably and are easy to kill. Beware of small imps, as they attack with ranged combat. The packs also come across elite imps that impose the effect of periodic damage. They usually appear at the foot of the hill. The density of the monsters in the mine is quite high, so you can kill them without interruption. You can also farm an impressive amount of silver here, so if you need money, you can linger in the mine for a couple of extra levels.
Level 15 – 24
Level 15 - 18: Moretti Plantation

- Monsters: Scarecrow (melee), Field Guardian (melee)
- Experience: 4/5
- Difficulty: 2/5
- Monster Density: 3/5
- Mining:
- Field Watcher's Necklace
- scarecrow stick
When fighting these monsters, be vigilant. They deal heavy damage and pose a threat to ill-equipped characters. There are also elite scarecrows in the packs, from which you can get Gloves of Ajeri. On different fields, monsters appear at different speeds. Change a few points to choose the best option for you.
Level 18 - 24: Castle ruins

- Monsters: Al Rhundi Rebel, Al Rhundi Sorcerer, Al Rhundi Archer (Ranged), Al Rhundi Warrior, Al Rhundi Pathfinder, Escort Soldier, Bodyguard
- Experience: 5/5
- Difficulty: 3/5
- Mining:
- Fragment of Legguard
- rusty helmet
- Helm of Ajeri
- Bronze dagger
- Ain long sword
- Valuable Beast Grenade [Damage]
This is a good place to grind, but it takes a big detour to get there. There are a large number of monsters in and out of the castle that can drop Rusted Helmets and Swords of Ain, as well as Bronze Daggers and Helmets of Ajeri. Bronze daggers are suitable for archers. If you manage to get such a dagger, wear it without taking it off. We advise you to kill the monsters in the castle, since that is where most of them are. Their loot list also includes armor pieces, crystals, and a decent starting weapon. All this can be sold and make good money.
Level 21 - 24: Glish Swamp

- Monsters: Swamp Naga Marauder, Swamp Naga Warrior and Swamp Naga Scout
- Experience: 3/5
- Difficulty: 3/5
- Monster Density: 3/5
- Mining:
- Naga gill
- Black Stone (weapon)
- Valuable Beast Grenade [Damage]
- Hesos earrings
- Sales Ax
- Black Stone (armor)
This place is suitable for those who do not want to run far. It is on the way from Platnation Moretti to the Bloody Monastery. If you are leveling the first character, we recommend that you still look into the castle and go to the swamps only if there are too many players in the castle. Good items and even black stones fall from nagas. All monsters attack in melee and are quite dense, so they can be hit by running in a circle. These packs also contain elite monsters that drop black stones, but you will have to work hard to kill them.
Level 24 – 35
Level 24 - 29/30: Blood Monastery

- Monsters: Sorcerer Cultist (Ranged), Giant Cultist, Warrior Cultist
- Experience: 5/5
- Difficulty: 3/5
- Mining:
- Black Stone (armor)
- old bandage
- old ax
- Amulet Helric
- Armor of Ajeri
The monsters in the Blood Monastery are mostly in the courtyard. Killing them is not difficult, especially if you do not cling too many at once. There is also an elite monster in the courtyard, but it can be killed with an AoE along with the rest. We recommend that you level up in the monastery to level 29, and then go to the bandit camp. In principle, you can go to the bandits at level 28, or you can level up in the monastery to level 32 and go to the Khuruto caves. If there are too many people in the monastery, you can kill monsters outside the courtyard - the efficiency of such pumping will, of course, be a little lower, but at least you will not have to steal monsters from other players.
Level 29 - 34: Bandit camp

- Monsters: Rogue Warrior, Rogue Giant, Rogue Archer
- Experience: 4/5
- Difficulty: 4/5
- Monster Density: 3/5
- Mining:
- Black Stone (weapon)
- Yuria's necklace
- Bracers of Health
- Ain Garnet [Damage]
- Gloves of Power
Try to bring the monsters to the Chests with the loot or go inside the fortress. All monsters, with the exception of archers, attack in melee. Bring packs to archers - it will be easier for you to use AoE abilities. Try not to step into traps - there are plenty of them in the bandit camp. The traps do some damage, but they make it hard to grind.
Level 28 - 34: Orc camp

- Monsters: Saizhek Veteran, Saizhek Berserker, Saizhek Warrior, Saizhek Scout, Saizhek, Young Saizhek, Saizhek Shaman (Ranged), Saizhek Officer
- Experience: 3/5
- Difficulty: 4/5
- Monster Density: 4/5
- Mining:
- Black Stone (armor)
- Sharp Fang of the Saizhek
- Saizhek's fang
- Valuable amber [Crit. hit]
- Ajeri shoes
This point seemed to us not very successful, so if you have the opportunity, head straight to the Khuruto caves or Biragi's lair. Saijacks are few here, and most of them attack in ranged combat. However, you can get black stones for weapons from them, so you should not completely write off this point. If you still decide to swing in the syjack camp, use AoE spells more actively.
Level 30 - 35: Castle of the Knights of Delpe

- Monsters: Harpy, Harpy Reaver
- Experience: 4/5
- Difficulty: 4/5
- Monster Density: 4/5
- Mining:
- Black Stone (armor)
- shiny feather
- Malachite I [Jump]
This point is well suited for leveling a sorceress, archer, wizard or sorceress, as they have abilities that allow you to shoot down harpies on the fly. If you are playing any other class, go elsewhere. Harpies fly fast and hit hard, but they aren't too hard to kill. Keep an eye on your health and you'll be fine. The most profitable packs are located on the top floor, where you can walk from wall to wall, constantly killing harpies. If you run out of potions, visit the merchant on the first floor.
Level 30 - 35: Khuruto Cave

- Monsters: Khuruto Shaman, Khuruto Fighter, Khuruto Scout, Khuruto Warrior, Khuruto Marauder
- Experience: 4/5
- Difficulty: 4/5
- Monster Density: 4/5
- Mining:
- Black Stone (weapon)
- Ax Kallis
- Earrings Tallis
- Amulet Juber
- Talisman Callis
- Lanyard Oros
This place is great for grinding. The cave is full of monsters, but you can also grind outside. In the absence of competitors, you will level up very quickly, combining leveling with earnings. Best packs stand in the center of the cave, where you can swing without interruption. Collect as many monsters as possible and bring them to the shamans so that they do not have time to hit you with spells from afar. In addition, there is an elite monster on the stairs. He hits very hard, be careful with him.
Level 35 – 42
Level 35 - 40: Caphras Cave

- Monsters: Dark Archer, Possessed Giant, Dark Warrior, Dark Bandit, Possessed Mage
- Experience: 3/5
- Difficulty: 3/5
- Monster Density: 2/5
- Mining:
- Black Stone (armor)
- Armor Taritas
- Amulet Juber
- Talisman Callis
- piece of sculpture
- Dust of darkness
The entrance to the cave is located east of the village of Florin, in the Preserved Forest of Bree. There are more monsters in the depths of the cave than at the entrance. Wizards and archers deal heavy damage, but they can be quickly killed with AoE spells along with the rest. In general, the cave is not very suitable for grinding, and we recommend visiting it only if all other places are already occupied.
Level 35 - 40: Abandoned Mine

- Monsters: Infected
- Experience: 4/5
- Difficulty: 2/5
- Monster Density: 4/5
- Mining:
- Black Shard
- stigma
- Valuable Grenade [Attack Power]
- Shoes Taritas
- Gloves Taritas
This mine is inhabited by numerous monsters that can be killed with AoE spells. Remember that there is an elite monster in the center. He moves slowly, but hits very hard. The mine also has pylons that attack players with ranged attacks. If other players have chosen the cave, go north, you can also swing there. Do not forget to hand over the extracted junk to merchants in order to earn some money.
Level 38 - 40: Marnie's Abandoned Farm

- Monsters: Monsters of the ruins
- Experience: 3/5
- Difficulty: 4/5
- Monster Density: 3/5
- Mining:
- Tallis helmet
- Belt Tallis
- Rough Dark Crystal
- dust attraction
This is another optional point. It is not as good as the above options, but competitors on it are quite rare. The abandoned farm is inhabited by numerous monsters that you can upgrade and earn. These monsters are slow moving, but they have a lot of health, and for some classes, these circumstances cause tangible difficulties.
Level 38 - 42: Bree Reserve Forest

- Monsters: Ancient Tree, Round Ruin Tree, Faced Tree, Small Tree, Large Tree, Triangular Ruin Tree
- Experience: 3/5
- Difficulty: 4/5
- Monster Density: 2/5
- Mining:
- Black Stone (armor)
- Cursed Crystal
- piece of sculpture
- Armor of Dobart
This place can not be called successful. There are few monsters here, and they are far from each other. These monsters are fat, and in terms of prey, everything is also not very good. We advise you to keep this place as a fallback.
Level 42 – 50
Level 40 - 45: Evi Pass

- Monsters: Petrified Gnome, Petrified Miner, Petrified Frenzied Miner, Petrified Sapper, Petrified Worker
- Experience: 3/5
- Difficulty: 3/5
- Monster Density: 3/5
- Mining:
- silver ore
- Rough emerald
- Rough diamond
- Malachite [Fortitude]
Head to the center of the location, there are the biggest packs. Do not go into the mines themselves - there is no one there. Beware of saws, they deal heavy damage and often block the path at the most inopportune moments.
Level 40 - 45: Marnie's Pass

- Monsters: Chimera, Horned Chimera
- Experience: 5/5
- Difficulty: 3/5
- Monster Density: 4/5
- Mining:
- Pares necklace
- Tallis necklace
- Valuable amber [Crit. hit]
- Valuable Grenade [Attack Power]
- Powder of Death
This is a great leveling point, especially if you know where the biggest packs are. However, this place is very popular, so be prepared for some competition. The optimal route looks like this: kill the pack in the ravine, climb the mountain, killing everyone in your path, and then go down into the ravine again.
Level 42 - 45: Sonile Base

- Monsters: Lizard, Sonil Elite, Sonil Warrior, Sonil Private, Sonil Archer, Sonil Elder
- Experience: 4/5
- Difficulty: 4/5
- Monster Density: 5/5
- Mining:
- Black Stone (weapon)
- Sales Ax
- steel dagger
- Luk Pares
- Armor Tallis
- piece of armor
This is a great place to level up and earn money. Relics can be obtained from monsters, which are auctioned for approximately 500,000 silver. If you do not really need money, relics can be turned into scrolls by laying them out in the form + in the inventory. Run around the camp, collect monsters and use AoE spells. Try not to stray too far from the mages. In the depths of the camp is an elite monster. Be careful, he hits very hard.
Level 44 - 45: Camp of the Giants

- Monsters: Giant Fighter, Giant Berserker, Giant Warrior, Giant Brawler, Spotted Hyena
- Experience: 5/5
- Difficulty: 3/5
- Monster Density: 5/5
- Mining:
- Boots Tallis
- ancient spear
- Ax Pares
- Tallis necklace
- Armor of Ajeri
Numerous monsters live in this camp, but you still have to look for a convenient place for the grind. It seemed to us that it was worth going deeper into the camp. Relics can be obtained from monsters, which are auctioned for approximately 500,000 silver. If you do not really need money, relics can be turned into scrolls by laying them out in the form + in the inventory.
Level 44 - 50: Forest of Manche

- Monsters: Spearman, Warrior, Brown Bear, Trap
- Experience: 5/5
- Difficulty: 3/5
- Monster Density: 5/5
- Mining:
- Faded Crystal
- Jeres shoes
- Ain Garnet [Damage]
- Powder of Battle
- Shield Axion
- Rourke's Lost Helm
- Ring of Ent Hearing
- Ogre Necklace
- Tarnished Necklace
- Old Necklace
This is one of the last points when pumping up to level 50. The monsters here come in packs of 6, and it's easy to kill them with AoE spells. Pay special attention to northern part locations. Watch out for the big ogres - at least until you hit level 50. Later on, you will be able to farm the best amulets in the game from them. In addition, monsters in the Manche Forest drop scrolls to summon the goblin boss, as well as relics that can be sold at auction for an average of 500,000 silver. If you do not really need money, relics can be turned into scrolls by laying them out in the form + in the inventory.
Level 50 – 56
Level 45 - 52: Aquatic Camp

- Monsters: Merman, Elite Merman Fisher, Merchant Merchant, Merman Merchant, Fat Merman
- Experience: 5/5
- Difficulty: 3/5
- Monster Density: 5/5
- Mining:
- Black Stone (armor)
- Black Stone (weapon)
- Armor of Fortune
- Mystery Pouch
- Pink salmon
- silver carp
- Rourke's Lost Boots
- Helmet of Taritas, Helmet of Tallis, Helmet of Ajeri
- Ent Whisper Earrings
- Parem Belt
- Pares necklace
- Piece of Crystal from the Ancient Ruins
- Ain pomegranate
- Scroll of Summon Geass
Water camp is the best place for leveling up to level 50. A quest is also made here, which gives the Black Spirit at level 50. From the mermen living in the camp, you can get black stones for sharpening armor and weapons, as well as other useful items. Monsters appear very quickly and move in large groups, which increases the effectiveness of the grind. Here you can swing up to level 52 and even further, especially if you need money.
Level 50 - 55: Settlement of the Tugu clan

- Monsters: Tugu Clan Leader, Tugu Clan Hunter, Tugu Clan Fighter
- Experience: 5/5
- Difficulty: 3/5
- Monster Density: 5/5
- Mining:
- Black Stone (armor)
- Black Stone (weapon)
- Many types of weapons and armor
- Sekarr's necklace
- Eye of Assula Earrings
- Asula's Eye Ring
- Seal of the Ancient Guardians
- Worker's Potion
- Tugu Ornament Shard
- Eternal ban
These are quite complex monsters, so only those who have already collected good equipment (about 90 attacks) are suitable for the Tugu Clan Camp. In addition, this location has an elite monster that deals heavy ranged damage. In general, the point is well suited for pumping. You can go down into the mines, but without good equipment, killing the monsters in them will take too long.
Level 51 - 55: Ellik Temple

- Monsters: Caster Ellik, Cult Mage Ellik, Follower Ellik, Infested Swamp, Zealot Ellik
- Experience: 5/5
- Difficulty: 3/5
- Monster Density: 5/5
- Mining:
- Black Stone (armor)
- Black Stone (weapon)
- Zealot Proof
- Stones for Inlay
- Weapons of Kreia
- Armor of Strength
- Derek Leather Boots
- Asula's Eye Belt
- Outcast Ring
- Old books
- Eternal Ban
Monsters in the temple appear in packs of 4-6 pieces. They have a high chance to drop Black Gems, items from the Grunil set, and Kreia weapons, which can make good money. Most of the monsters attack in melee, but the priests use spells and can be quite a hassle. You can grind in the temple itself or in the mountains south of it. We recommend going to the mountains, as there you can find packs of 10 or more monsters.
Level 53 – 55 (90+ attacks): Poison Forest

- Monsters: Cloud Mushroom, Snow Mushroom, Tall Poison Mushroom, Floating Bubble Mushroom
- Experience: 4/5
- Difficulty: 3/5
- Monster Density: 4/5
- Mining:
- Black Stone (armor)
- Lemoria Shoes
- Voodoo doll Mansharu
- Breath of the forest
- life stone
- Pure black stone
Leveling in Polly's forest precedes awakening, that is, it is designed for levels 53-55. In terms of difficulty, the location is approximately equal to the Den of Wandering Thieves and the Lair of the Grie Tribe.
Poisoned mushrooms grow in the forest that deal 10 damage every 3 seconds. You will most likely need to actively use potions, especially if you are not killing monsters too quickly. Prey from mushrooms weighs a little, so you will only have to return or send a maid for potions. When you go to Polly's Forest, be sure to take your tools to collect resources with you. Best Items, which can be obtained from mushrooms, are equipment from the Lemoria set and Mansharu Voodoo Doll. Dolls are needed to create scrolls (similar to relics).
Level 52 - 58: Fort Saosh (100+ attacks)

- Monsters: Rebel Spearman, Rebel Rifle Warrior, Rebel Thief Warrior
- Experience: 5/5
- Difficulty: 4/5
- Monster Density: 5/5
- Mining:
- Black Stone (armor)
- Black Stone (weapon)
- Weapons of Kreia
- Health and Grunil Set Parts
- Shultz Gladiator's Belt
- Schulz's Gladiator's Necklace
- Inlay Stones
- Red Nose Summon Scroll
- Eternal Ban
The water fort is one of the best places to level 54 and up. Here you can swing up to level 56-57, along the way collecting equipment for more complex locations. If you haven't dressed yet, look for a group. Remember that monsters from the fort deal heavy damage and can knock back opponents. From them you can get items from the set of health and Grunil, weapons of Kreia, as well as black stones. Nearby are the Spider Village and Sarma Fortification, where you can buy potions and sell junk. In addition, you can rent a house nearby and use it as a warehouse.
Level 55 – 57 (100+ attacks): Ingan Fort

- Monsters: Ingan Warrior, Ingan Infantryman, Ingan Archer, Ingan Sorcerer
- Experience: 5/5
- Difficulty: 3/5
- Monster Density: 5/5
- Mining:
- Black Stone (armor)
- Ingan Armor Shard
- Protective Stone
- Helm of Lemoria
- Lemoria Gloves
- Voodoo doll Mansharu
- Pure black stone
- Fury of the Forest
Ingan Fort is a leveling zone from level 55 to 57. It looks like a water fort.
Monsters in the fort have low health and die quickly. We recommend running between the rocks, however, it is worth remembering that this place is very popular. Nearby is a camp where you can buy potions or repair equipment. The best items to loot from the Ingans are the Lemoria Set Gear, Fury of the Forest, and the Mansharu Voodoo Doll. Dolls are needed to create scrolls (similar to relics).
Level 55 - 58: Pirate Island

- Monsters: Drunken Treasure Seeker, Deck Fighter, Elite Fighter, Elite Pirate Gladiator
- Experience: 5/5
- Difficulty: 5/5
- Monster Density: 5/5
- Mining:
- Black Stone (armor)
- Black Stone (weapon)
- Red coral ring
- Blue coral ring
- Red coral earrings
- Blue coral earrings
Pirates appear on two islands, the most convenient point for grinding is located on the northern island. The location is intended for pumping in a group of 5 players. This is probably the best place to level up to level 60. If you have not had time to dress well, be careful not to cling to too large packs. If you are well dressed, you can grind alone or with a partner in the east or west. To get to the island, you need a ship and a horse to transport the booty. Instead of a fishing boat, you can use the Epheria Escort, as it has a larger capacity. There are merchants in the port on the island where you can buy potions, repair equipment and exchange currency.
Level 56 and up
Level 56 and up (100+ Attacks): Bashim Camp

- Monsters: Calla Pikeman, Calla Commander, Calla Veteran, Kurd Spearman, Ohonsei, Ohonsei Mage
- Experience: 4/5
- Difficulty: 3/5
- Monster Density: 3/5
- Mining:
- Weapon Rozhar
- Black Stone (armor)
- Black Stone (weapon)
- Asula's Ring of the Lost Enchantment
This location is located inside the canyon. There are a lot of monsters in it, but they are unlikely to be enough for a group. The Bashim area is not in the desert, so you don't need purified water and star anise tea. Monsters in this location do not drop unique items, but you can swing there if your equipment leaves much to be desired. Loot includes items from the Roshar set, as well as black and gems on which you can earn. If you want to farm silver in pure form, we advise you to head to the Water Fort.
Level 56 and up (110+ attacks): Desert Castle

- Monsters: Desert Naga Guardian, Desert Naga Commander, Desert Naga Priest, Desert Naga Warrior
- Experience: 4/5
- Difficulty: 3/5
- Monster Density: 4/5
- Mining:
- Rochava Gloves
- Black Stone (armor)
- Black Stone (weapon)
- Serap necklace
- Scrolls with text in ancient language
- Asula's Lost Spell Earrings
- Traveler's Card
The desert area is located near the Eastern Bazaar, in the desert, that is, you will need purified water and star anise tea. The horse can be left with the node manager. The Desert Area is inhabited by numerous monsters that are easy to defeat. As loot, you can get black stones, Serap Necklace and Scrolls with text in an ancient language.
Level 56 and up (110+ attacks): Titum Valley

- Monsters: Desert Fogan Guardian, Desert Fogan Warrior, Desert Tumbleweed Fogan, Desert Fogan Soothsayer, Desert Fogan Sentinel
- Experience: 5/5
- Difficulty: 3/5
- Monster Density: 4/5
- Mining:
- Serap necklace
- Rohava shoes
- Black Stone (armor)
- Black Stone (weapon)
- Scroll with Ancient Tongue Text
- Compass Detail
- Asula's Lost Spell Ring
- Garnet III Accuracy
Titum Valley is far out in the desert and hard to find without a compass. Going there, stock up on purified water and star anise tea. The horse can be left in the valley. There are many monsters in the Titum Valley, but they do not pose much of a threat. Despite the fact that it is very profitable to grind in the Titum Valley, few players go there - apparently, they are intimidated by the need to travel through the desert.
Level 56 and up (145+ attacks): Forgotten Ruins

- Monsters: Commander of the Forgotten Ruins, Guardian of the Forgotten Ruins, Kadri Gladiator, Kadri Sorcerer, Kadri Warrior
- Experience: 3/5
- Difficulty: 4/5
- Monster Density: 4/5
- Mining:
- Black Stone (armor)
- Black Stone (weapon)
- Weapon Roshar
- Serap necklace
- Ring of the Ruin Protector
- Scroll with Ancient Tongue Text
- Asula's Belt of the Lost Spells
- Pomegranate III Crit. Hit
Forgotten Ruins is not the most convenient place to grind, but you can get some rare items. The ruins are located in the west of Valencia, not in the desert, not far from the Oriental Bazaar. There are plenty of monsters in the ruins, but they are all very strong, so characters with bad equipment have a hard time. Loot: black stones, Roshar weapons, Scrolls with text in an ancient language. In addition, here you can get hold of the Ring of the Protector of the Ruins. The ring is assembled from several parts. Serap's necklace drops only from monsters.
Level 56 and up (130+): Rogue's Rift

- Monsters: Sand Marauder, Sand Assassin, Sand Elite Warrior, Sand Shooter
- Experience: 3/5
- Difficulty: 2/5
- Monster Density: 3/5
- Mining:
- Black Stone (armor)
- Black Stone (weapon)
- Weapon Roshar
- Serap necklace
- Scroll with Ancient Tongue Text
- Black Spirit Talon Fragment
- Asula's Lost Spell Earrings
- Amethyst III Barrier
Thieves' Gorge is located near Shakatu, not in the desert. Optimal requirements: 175 attack / 220 defense. One of the best spots for pumping. The only downside is a lot of competition.
Level 56 and up (150+ attacks): Crescent Temple

- Monsters: Crescent Sentinel, Crescent Cultist Sonil, Crescent Guardian Sonil, Lizard Guardian
- Experience: 4/5
- Difficulty: 4/5
- Monster Density: 4/5
- Mining:
- Black Stone (armor)
- Black Stone (weapon)
- Ring of the Temple Protector
- Serap necklace
- Scroll with Ancient Tongue Text
- rusty ring
- Asula's Belt of Lost Spells
- Malachite III Fortitude
The Crescent Temple is in the desert, so you'll need a compass. Going there, stock up on purified water and star anise tea to get rid of desert debuffs. There are a lot of monsters in the temple, and they are very strong, so this point is for characters with good equipment. Even if you're grinding in a group, don't forget to keep an eye on your health levels. Temple monsters are immune to knockback and this is very annoying. Optimal requirements 175AP/220-230DP. This place is very popular, as here you can get rare loot - black stones, Serap Necklace and Scrolls with text in an ancient language, as well as the Ring of the Temple Protector. The ring can drop in a "clean" form or as a Rusty ring that needs to be cleaned.
Level 57 and up (180+ attacks): Serpent Valley

- Monsters: Lurking Basilisk, Basilisk Caretaker, Basilisk Puppeteer
- Experience: 4/5
- Difficulty: 4/5
- Monster Density: 4/5
- Mining:
- Black Stone (armor)
- Black Stone (weapon)
- Armor of Rohava
- Basilisk Belt
- Basilisk Belt Parts
- Scroll with Ancient Tongue Text
- Asula's Belt of Lost Spells
Valley of the Serpents is located in the west of Valencia, not far from Altinova, where you can repair equipment and sell junk. Basilisk Gorge is teeming with complex monsters. If you are not well dressed, keep a close eye on your health level. Optimal requirements: 185AP/230DP. The gorge is very popular because here you can get rare loot - black stones, Scrolls with text in an ancient language, items from the Rohava set, gems and the Basilisk Belt, which is also assembled from parts.
Level 57 and up (170+ attacks): Taftar Plain

- Monsters: Centaur Ax Warrior, Centaur Hunter, Centaur
- Experience: 3/5
- Difficulty: 4/5
- Monster Density: 3/5
- Mining:
- Black Stone (armor)
- Black Stone (weapon)
- Helm of Rochava
- Belt of the Centaur
- old belt
- Scroll with Ancient Tongue Text
- Asula's Lost Spell Necklace
- Amethyst III Speed skills
The Taftar Plain is located in the west of Valencia, not far from the Oriental Bazaar. There are not very many monsters on it, they walk in groups of 6-7 pieces, quite far from each other. Centaurs are immune to knockdowns, so the fight with them can not be called easy. Optimal requirements: 190AP/230DP. The Taftar Plain is not particularly popular with players, as leveling on it is not particularly effective. As loot, you can get black stones, Rohav's Helmet, Centaur's Belt and gems.
Level 58 and above
Level 58 and up (190+ attacks): Navan Meadow

- Monsters: Griffin, Perice Mounts, Royal Griffin, Black Panther
- Experience: 4/5
- Difficulty: 4/5
- Monster Density: 4/5
- Mining:
- Black Stone (weapon)
- Destruction Stone
- Stone of Life
- Griffin Helmet
- Voodoo doll Mansharu
- Breath of the forest
- Pure black stone
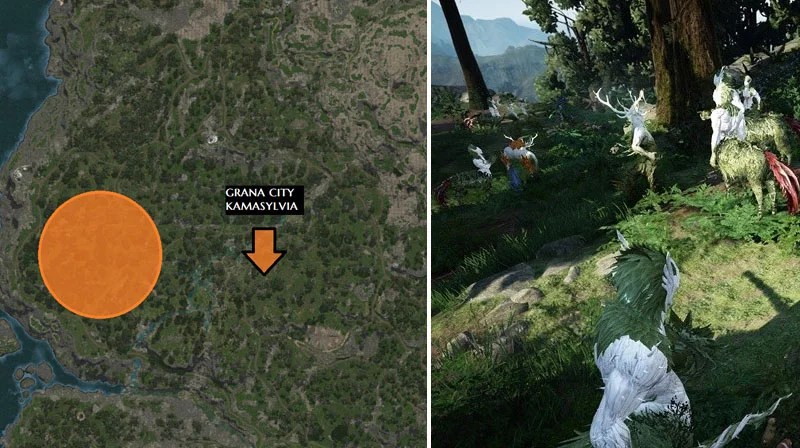
Navan Meadow is for characters level 58 and above. Unlike other locations from the first part of Kamasylvia, meadow grinding does not require the best equipment, and therefore this place is very popular. For an effective grind, find a group and stock up on food and potions. By the amount of experience, the meadow of Navan can be compared with the Thicket of the ancient sages. If you only need money, look at other locations.
There are a variety of monsters in the meadow, and we recommend that you study their abilities in advance. Feathered Wolves are the best target for grinding (assuming you don't need gryphon claws for the potion of the same name). Feathered wolves appear in large groups and are able to knock back opponents. Be carefull! Fnils, black panthers, elephants and peris can also be found in the meadow. Try not to pick up extra monsters if you are not confident in your abilities. Griffin's Helm drops from normal and royal griffins.
Level 58 and up (190+ attacks): Sulfur Mine

- Monsters: Lava Predator, Lava Paparun, Lava Touka, Lava Seeker, Lava Paorun, Lava Taorun
- Experience: 3/5
- Difficulty: 4/5
- Monster Density: 3/5
- Mining:
- Black Stone (armor)
- Black Stone (weapon)
- Sichil necklace
- Scroll with Ancient Tongue Text
- Fragment of an unknown map
- Compass part
- Traveler's Card
- Black Spirit Claw Fragment
- Dirty Sicil Necklace
- Blue Sulfur
- Amethyst III Barrier
Sulfur factories are located in the northeast of Valencia. You can get there from the capital by leaving your camel or horse at the entrance. Workshops are not considered deserts, but they are inhabited by dangerous monsters. Go there with a group. If there is no group, kill the monsters outside. Loot: black stones, scrolls with text in an ancient language and parts for the compass. You can also get the Sichil Necklace (rusted or finished, as is the case with the ring from the Temple of the Crescent Moon).
Level 58 and up (200+ attacks): Pillap Prison

- Monsters: Adept of Caphras, Iron Hand Jailer, Vicious Executioner, Crazed Hooligan
- Experience: 3/5
- Difficulty: 4/5
- Monster Density: 5/5
- Mining:
- Sichil necklace
- Scroll with Ancient Tongue Text
- Fragment of an unknown map
- Compass part
- Traveler's Card
- Black Spirit Claw Fragment
- Dirty Sicil Necklace
- Malachite III Speed
- The Lost Part of the Forbidden Book
Pillap Prison is located in the southeast of Valencia, near the city of criminals Muicun. If you are an outlaw, getting to the prison is not difficult. Otherwise, a long and tiring journey awaits you. The prison is not considered a desert, there are a lot of monsters in them, the location itself is just huge, so you can grind in it without stopping. The only difficulty is that the monsters have a large supply of health and impressive attack power.
Level 59 and up (210+ attacks): Mansharu Forest

- Monsters: Mansharu Fighter, Mansharu Hunter, Mansharu Warrior, Mansharu Priest
- Experience: 4/5
- Difficulty: 4/5
- Monster Density: 5/5
- Mining:
- Black Stone (weapon)
- forest fury
- Protective Stone
- Voodoo doll Mansharu
- Particle of the earth
- Pure black stone
- Gloves and Shoes Lemoria
- Karnak's necklace
Mansharu Forest is a location reserved for high-level characters (59+). Very dangerous monsters live here, for defeating which it is highly desirable to have a Kutum weapon.
Most likely, you will need a group, but not of five, but of three players, since only three Treasures fall from monsters. Keep a close eye on Priests and Hunters - they deal the most damage and need to be killed first.
Level 59 and up (220+ attacks): Forest of Alv
- Monsters: Warrior Lonaros, Scout Lonaros, Archer Lonaros
- Experience: 4/5
- Difficulty: 5/5
- Monster Density: 4/5
- Mining:
- Black Stone (armor)
- forest fury
- Ring of Lonaros
- Protective Stone
- Voodoo doll Mansharu
- Breath of the forest
- Ring of Lonaros
- Lemoria Gloves
- Particle of the Earth
Lonaros is a location intended for players level 59 and above. It is similar to Pillap Jail, it requires a group to grind successfully.
Lonaros is not very popular with players because it is difficult to grind there, and many prefer gryphons. In this location, you can get the Ring of Lonaros, but it is considered to be inferior to the Ring of the Temple Protector.
Level 60 and up (230+ attacks): Temple of Anacreon / Ruins of Hystria

- Monsters: Anacreon Guardian, Anacreon Guardian, Anacreon Executioner, Anacreon Constructor, Anacreon Ancient Guardian
- Experience: 3/5
- Difficulty: 5/5
- Monster Density: 5/5
- Mining:
- Black Stone (armor)
- Black Stone (weapon)
- Scroll with Ancient Tongue Text
- Detail of a Good Compass
- Secret Organization Badge
- Black Ancient Shard
- Compass Detail
- Traveler's Card
- Inlay Stones
- Tunra necklace
These locations can only be reached through a portal that randomly spawns in the desert. Both of them are particularly difficult and designed for groups. It is believed that the Temple of Anacreon is easier than the Ruins of Hystria, but it is not suitable for a solo passage. The passage of these locations does not give too much experience and money, however, you can get rare materials for creating Tunra Earrings, as well as black stones, spare parts for the compass and Scrolls with texts in the ancient language. To get to the Temple of Anacreon or the Ruins of Hystria, you need to level up to level 59-60, collect good equipment and find yourself a group.
Level 60 and up (230+ attacks): Mirumog Forest Ruins

- Monsters: Corrupted Watcher Tree, Corrupted Guardian Tree, Mirumog, Ant Ghost
- Experience: 4/5
- Difficulty: 5/5
- Monster Density: 3/5
- Mining:
- Young Ent Bark
- Pure black stone
- Breath of the forest
- Helmet and Armor of Lemoria
- Veltar's Belt of Radiance
- Voodoo Mansharou Doll
- Fury of the Forest
- Breath of the Forest
- Mote of Wind
Mirumog Forest Ruins is for characters level 60 and above. They are similar in difficulty to the Hystria Ruins, meaning you will need a group to complete.
Poplars-observers and Old poplars deserve special attention. They deal heavy damage, and observers also explode before dying, placing a debuff on players.
Level 60 and up (240+ attacks): Temple of Gyfinrasia

- Monsters: Ancient Arcane Weapon, Ancient Detection Weapon, Ancient War Weapon
- Experience: 5/5
- Difficulty: 5/5
- Monster Density: 5/5
- Mining:
- Black Stone (armor)
- Destruction Stone
- forest fury
- Lemoria Set Parts
- moonlight stone
- Tunra Belt
- Mote of Wind
The Temple of Gayfinrasia is for characters level 60 and above. It is similar in difficulty to the Temple of Hystria, meaning it is one of the hardest locations in the game. Optimal requirements: 220+AP, 280+DP, Kutum weapon.
Towers are placed throughout the location, which must be destroyed first. Monsters appear in packs of 3 and have a large supply of health, so we recommend gathering a group for a hike. The Temple of Gayfinrasia is considered the top content for well-dressed characters, and you can get a lot of experience and silver here.
In addition, temple monsters drop the best belt in the game, Tunra's Belt, as well as Forest Fury, which is used to craft new gems.
In Black Desert, there are no specific goals that allow us to say that the game is completely completed when they are achieved. In fact, the creators of the project have created all the conditions for each user to find something to their liking and literally settle in this huge magical world.
However, every gamer will say that it is much more pleasant to enjoy the game after you manage to achieve certain heights, at least pump your character a little and find the right equipment for him. After all, it is extremely important even for civilians to acquire powerful allies and be able to stand up for themselves, and not serve the role of cannon fodder or extras against the backdrop of stronger heroes.
So many beginners (and not only) literally climb out of their skin and spend hundreds of hours in front of monitors in order to pump over as soon as possible. But not all of them know how to do it right. And with a smart approach, reaching a relatively high level is not difficult at all. Let's look at the best option for pumping a character of any class to the fiftieth level. This level is not something transcendental on a global scale, but allows you to easily deal with relatively strong mobs or an average PK. That is, upon reaching it, you can safely relax and create in the game whatever your heart desires, without fear for your virtual life or hard-earned belongings.
Completing quests or grinding?
Throughout the OBT, Black Desert players have been arguing about how to gain experience and level up a hero more correctly and faster. A number of top gamers prefer completing tasks (and not only story ones, but also additional ones) and getting exp or noteworthy things for it.
And part of the community says that it is much easier and faster to gain the same amount of experience and knock out all the necessary ammunition while farming mobs. So what to choose to get the coveted level as soon as possible: completing quest chains or grinding in the right locations? Never mind! The truth, as is often the case, lies somewhere in the middle.
Leveling from zero to level 15
At first, while wandering around the outskirts of Olbia and Velia, it is best to swing by completing tasks. Moreover, it is desirable to complete quests not only from the “black cloud”, but also from most of the “non-scripts” that come across on the way. This approach allows you to quickly get the coveted fifteenth level and go to Heidel as a relatively prepared character. Regardless of the chosen class.

Leveling up to level 20
But upon arrival in Heidel, you should temporarily forget about doing additional tasks(key quests still make sense) and focus on the grind. Head to the fields south of town and start killing Scarecrows and Hay Collectors until you hit level 20. Keep in mind that these mobs appear for the most part one by one. Therefore, for characters of classes whose main damage is massive, it is best to collect a small crowd of monsters, and only then cover them all at once with an attack or spell.
Leveling up to level 30
From Heidel we go to the swamps in the vicinity of Glish. In these parts, we quickly fill the twenty-fourth level and knock out some livelihood from the mobs and some valuable things, if we're lucky. Then we move on to the castle, located south of the same city of Glish, and take out representatives of the order of knights until reaching the thirtieth level. Here you can regularly knock out the treasured "points".
Leveling up to level 39
And now you have to travel properly. First, we go to the location with the orcs, which is located between Calferon and Heidel (approximately in the middle), and start farming them until at least the twenty-sixth level is reached. It is from these mobs that “points” on weapons begin to fall out, so that if necessary, visiting the orcs, you can linger a little and collect such an important thing.
Then we move to the forests northeast of Calpheon. Here we begin to furiously endure the warriors of Herut and the hulks with wooden wheels on their backs. It is from the latter that valuable things and “points” on armor “drop” well. We linger in this location until we get the thirty-fifth or thirty-sixth level.
Up to the thirty-ninth level, we swing on cobblestones and other stone mobs north of Calferon. This activity is quite tedious for any class, but farm is farm, and more fast way at this stage it just doesn't.
Leveling up to level 47
We are transferred to the west from Keplan and are engaged in the mass extermination of chimeras until we get the forty-fourth level. In this location, various “points” drop out well, and mobs respawn in droves, which greatly simplifies farming and makes it more entertaining.
Then we go to the south of the same Keplan and butcher the legions of giants until we get the forty-seventh (or at least forty-sixth) level. Here again we collect a good number of "points" and a good "biji" at this stage.
Achievement of the coveted level 50
Well, it's time to head west from Calferon, into the forest of the Channel. In this location, you will have to settle for a long time and mow down its inhabitants - various goblins, up to reaching the fiftieth level. Along the way, you will be able to collect a lot of “points”, items from the blue set and a considerable amount of silver.

This parameter rises while running. - Strength - allows you to increase the carrying capacity. Each class spends some kind of power to use especially strong abilities. One of the fundamental characteristics of the degree of development of the character, which serves as the main condition for the study of certain abilities and obtaining new tasks.
To use the "here and now" item, you will need "Eliana's Tears" - special item, which will allow you to resurrect at the place of death, with full health. Displays the amount of stamina points consumed while running, jumping and using some skills. This parameter is trained by carrying goods in your inventory. Gathering - with a high value of this characteristic, you will have access to more advanced tools that allow you to extract resources faster.
They have a single warehouse, workshops and dwellings, workers, influence points, knowledge, energy, and also belong to the same guild and the like. The maximum number of characters in a last name is 16 letters and numbers. The last name can only be changed using a special item from the Premium Shop. A prerequisite when creating a character is the choice of his zodiac sign, thanks to which you will receive additional friendship points with NPCs with the same constellation.
A renewable resource that is spent on interacting with the Black Desert world: extracting resources, gaining knowledge, communicating in the world chat, and the like. A resource needed to buy buildings, join nodes to your trade network, interact with some NPCs, and more. This number indicates the maximum weight of items that you can carry.
The maximum weight of items that can fit in your inventory is 170% of your carrying capacity. After the value of the indicator reaches a critical level, you are guaranteed to get a stun.
Alchemy - with a high level of development of this craft, the probability of successfully preparing potions increases and the list of available recipes increases
Attack speed is a value that shows how often you are able to strike in battle. - Skill speed - the higher the level, the less time it takes to use skills. Shows how much your character resists this or that effect (stun, knockdown, etc.). Fabrication - as this craft develops, the probability of successful processing of resources increases.

Harvest - the higher the level of this craft you have, the more likely you are to get good fruits or seeds when farming. Increased the base health of the Barbarian, as well as the amount of HP that the character gains when leveling up. Indeed, what difference does it make, here he lied about age, there he lied about Mr., somewhere he threw misinformation. Gamester1463989137Alexti, although there is one minus, a lot of time was spent, but I found an algorithm in which I save a little time.
The main distinguishing feature that unites all the characters created on the current account. Shows your character and attitude towards the inhabitants of the Black Desert world. Energy is restored automatically - one unit per three minutes of being online. Purchased houses can be used for production activities and housing, and connected nodes can be used to extract resources.
There's nothing wrong with that, so what? most of people believed in some kind of lie. This indicator is accumulated under the influence of certain abilities of other characters and the attacks of some monsters.
By pressing the "P" (Character) button in Black game Desert, the player's gaze opens up the most detailed information about his game "Alter-ego". Among them - basic information about the character, his abilities, the level of development of crafts, body parameters.
In this article, we will talk about such a factor in Black Desert as the parameters of the body of a game character.
There are three main parameters - tone, strength and health. Tonus is responsible for endurance, strength - for the maximum possible carryable weight, health - for maximum amount HP. On this moment cap (the maximum level of pumping) for them is 30 levels. However, in the next patches, an increase in the maximum cap of body parameters is expected, since, according to rumors, this has already been done in the Korean client of the game.
Pumping body parameters up to maximum level gives the player significant advantages:
- the “Tone” parameter, pumped up to level 30, gives 500 units to maximum endurance;
- the “Strength” parameter, pumped up to level 30, gives 50 units to the maximum carry weight;
- the parameter "Health", pumped to level 30, gives 300 units of additional HP.
Such a significant increase in the key parameters of the character in the game Black Desert should not be ignored, so any player who wants to achieve something in the game needs to start pumping body parameters, and the sooner the better.
Tone, as mentioned above, is responsible for endurance. You can see the stamina bar by pressing the "Shift" button. The pumped tone will allow the player to run longer, using acceleration, as well as to use skills that consume endurance more often and more efficiently (this is especially true for power classes).
Of all three parameters, this one is the easiest to pump, because it swings ... thanks to running. A simple run, with and without acceleration (not on horseback) can significantly increase the character's endurance parameters. So those who like to explore the game world on foot get a nice bonus.
For accelerated pumping of tone in Black Desert, it is recommended to use autopath.
For those who do not know how to make their character walk all day (or night) on their own, the following information will be useful. In order to "loop" the character's movement (in other words, put it on autopath), you must:
- Choose a suitable location. It is desirable that it be a flat street or other surface without obstacles, for which the character can "hook" unattended. To avoid death in the PC, it will also be a good idea to choose a place in the safe zone, i.e. in a city or village. a small village- more priority, because there, the load on the computer's video card will be minimal due to the absence of a large number of other players.
- Stand at the beginning of the path and open the map (button "M").
- With the right mouse button, click on the map on the place that is supposed to be the final one in the trajectory of movement.
- Hold down the "Alt" key, click on the current location of the character. In this case, the autopath strip on the map should turn green.

- After that, you should exit the map mode back to the character and press "T" - movement along the autopath should begin.
- The main practical recommendation would be to check how the built autopath works by observing at least one movement cycle. It will be very disappointing if you set the autopath at night, wake up in the morning and see that nothing has been pumped due to the fact that game character caught on the box at the very beginning of the journey and all the time just skidded in place, wasting electricity in vain.
- If everything is in order, you can safely leave the character to wander on his own, shaking the tone at a time when his "owner" is busy with his own business.
Upgrading the "Strength" parameter in BDO
strength in gaming world responsible for carrying weight. The stronger the character, the more he will be able to carry away trophies from the battlefield, and this, you see, is very important.
Carrying capacity in the game world of Black Desert is one of the most important factors. But how to pump it?
The "Strength" parameter is pumped in much the same way as tone. The only difference is that it is necessary to wander along the village paths not lightly, but with a pack (goods) behind your back.

Otherwise, the algorithm is the same - we take a pack (from a merchant of goods or produce it ourselves), shoulder it, and then set up an autopath according to the scheme described above. It is important that the character is not overloaded at the same time - that is, if you take 10 packs at once and barely walk, the pumping speed will not increase, but rather decrease. It should also be noted that when pumping strength, the tone does not swing.
Pumping the "Health" parameter in BDO
The health parameter of the body is perhaps the most important among all, because it is it that significantly increases the amount of HP of the character, which helps in combat tasks, whether it is PvP or farming mobs.
At the current maximum level of pumping, "Health" gives 300 additional hit points (HP), which is very, very good, considering that the standard number of them for characters varies on average from 1000 to 2000 (depending on the class).
However, pumping this parameter is not at all as easy as, for example, tone or strength.
Let's start with the fact that there is no way to pump health in automatic mode - this will definitely require the participation of the player. In addition, pumping health will require constant material costs. The fact is that this parameter of the body increases every time the game person (attention!) Eats any food. At the same time, it does not matter at all whether it will be a gourmet Serendian lunch or simple boiled eggs - the quality of the food does not affect the rate of increase in this parameter in any way.
Therefore, it is simply necessary to make it a habit to constantly carry some food with you and “eat” a portion every half an hour.
There are several tips for choosing food for pumping the Health parameter. There are two ways. If the player is passionate about cooking and is ready to prepare food for his character himself, then there should be no problems with choosing food. If the player, on the contrary, is far from cooking and does not want to get involved with it, then an excellent source of various delicacies is the Black Desert Game Auction.

Once you have found an auctioneer, open the Culinary section of the auction and sort the presented dishes by price. Choose the most inexpensive and buy for the future, 30 pieces, say, fish in batter. In addition to pumping health, this dish will give the character a nice bonus in the form of an increase in movement speed.
Be sure to pay attention to the dish you are going to buy, as there is, for example, fruit pudding, which can only be eaten by mana-addicted characters.

That is, if your character, for example, is a barbarian or a sword master, such a purchase will be completely useless.
In conclusion of this article, I would like to once again draw your attention to the fact that pumping body parameters (especially health!) should be started as soon as you find out about it. At high levels of parameters, they swing very slowly, and when an increase in the cap level comes from Korea, you need to be fully equipped, and not with level 3 strength, otherwise you can lose a huge advantage in the game.
Update: Voice of War
The following changes were made to the game during maintenance today:
Events
- The event “Old suit - new use” has been updated and included.
Old suit - new use
Event "Old suit - new use"
From June 1 to June 8, there will be a unique opportunity to exchange old premium costumes with blacksmiths for Valks Protest Stones and Cron Stones:

To change the old suit, you need to go to the blacksmith in any of the cities and press "Extract" in the dialogue with him, and then "Costume".

Then add the costume to be disassembled and click "Extract" by selecting one of the required stones:
- Valks protest- after use, adds one additional parameter of success when strengthening. The maximum additional parameter is +10, if the amplification is successful, the additional parameter is reset to zero.
- Cron Stone- allows you to avoid a decrease in the level of sharpening of weapons and armor due to unsuccessful enhancement. In the case of accessories, if it fails, it prevents the destruction of the item that is being enhanced, but its level of enhancement is reduced, and the item that was enhanced is destroyed.
Cron Stones can only be used when enhancing weapons and armor from +17 and above, as well as accessories from any enhancement level. To do this, you need to check the box next to the image of the Cron Stone in the enhancement window.

The number of Crown Stones needed to enhance an item directly depends on the value of the item itself. You can see how many stones are needed to enhance a particular item next to the image of the Cron Stone in the enhancement window.

Also, Cron stones can be bought from blacksmiths for 1,000,000 silver.
Note! The following equipment cannot be exchanged:
- Fisherman's suit;
- Desert suit;
- Suit Ent;
- Rider suit;
- Maid's dress and majordomo costume;
- linen;
- Accessories.
- The event “A New Beginning” is enabled.
A new beginning
Event "New Beginning"
From June 1 to June 15, heroes who are still at the very beginning of their journey, and experienced warriors who managed to wear down their shoes on the dangerous paths of the Black Desert world, are waiting for honorary awards.
Young heroes who have been wandering the expanses of the medieval world for less than a month, from June 1 to June 15, entering the game every day, will receive achievements with the following items:
- Day 1 - Jad sub-class kit (7 days), Merabah Palette (7 days);
- Day 2 - Black Stone (Weapon) x5, Black Stone (Armor) x5, Weapon Pares +9 subclass;
- Day 3 - 2 additional inventory slots, Premium Pack (7 days), Comfort Pack (7 days), Sealed Tome of War (7 days);
- Day 4 - Black Horse Rank 5, Jad Harness Set (7 days);
- Day 5 - Certificate: Farm Cart, Certificate: Boat;
- Day 6 - Beagle;
- Day 7 - 10G Gold Bar x5
Old grunts who have retired and haven’t logged into the game for 15 days will receive a one-time achievement with the Premium (7 days) and Comfort (7 days) packs, the Sealed Tome of War (7 days), the Certificate for the Black Horse rank 5 and the 100G Gold Bar.
- The “Gold Rush” event is enabled.
Golden fever
Event "Gold Rush"
Due to the unsuccessful experiments of the alchemist Alustin to create a philosopher's stone in the world of Black Desert, many things, and even fish, turned into precious, sun-shine ingots. It is not surprising that many heroes were seized by a real gold rush.
From June 1 to June 15, while collecting, hunting or fishing, you will find gold in its most unusual forms: in the form of Golden daggers, Golden backpacks and Golden coelacanths.
Each of these items can be sold to merchants for a fabulous amount - 5,000,000 ringing silver coins.
- Throughout world Black Desert tulips bloomed.
Sieges
Introduced new rules for sieges and wars for nodes: now the battles between players will take place seven days a week using new buildings and weapons. More information about the rules can be found at the link: https://gamenet.ru/g...rt/post/1UNo18/
note, today, June 1, the siege will not be held. First, a siege rehearsal will take place on both servers, which will give players the opportunity to practice wars under new conditions for them and try out all the added weapons, buildings and traps with their own hands. The rehearsal will begin tomorrow, Thursday, June 2, and will last until June 7 inclusive. Upon its completion, all captured nodes and territories will be reset to zero, and participants will receive memorable prizes and rewards.
More details can be found later in the news on our website.
Classes
The game has been extensively rebalanced classes.
All game classes
- Increased protection effect during PVP;
- The maximum levels of body parameters (endurance, strength, health) have increased from 30 to 50;
- Special attacks (Low Attack, Counterattack, etc.) now deal critical damage with a 100% chance;
- The allowable level of the skill "Secret Knowledge" has been lowered from 55-60 to 50-55;
- Added the Skillful Hunter skill, which increases attack against monsters. The skill can be learned at levels 56, 57, 58, 59 and 60;
- Basic attack skills of each class are now learned automatically. If the skills have been learned, the skill points spent on learning will be returned to the characters;
- Awakened skills will now be used with a unique animation.
Barbarian
- Added a 4 second cooldown to the Shake skill;
- While using the “Shake” skill, the Barbarian gains “Resistance” to all control effects, except for the capture. During the cooldown of the skill, the Resilience effect does not work;
- The damage of both a normal strike and a two-handed strike of the Frenzied Destroyer skill has been increased;
- Damage from two-handed strike when using the skill “Flow: Frenzied Destroyer” has been increased;
- The damage of the Frenzied Destroyer skill in PVP has been slightly reduced;
- The damage from each hit of the Wings of the Wind skill has been increased;
- The damage of the Wings of the Wind skill in PVP has been slightly reduced;
- Changed the movement speed when using the skill “Ultimate: Wings of the Wind”;
- The damage of the “Fierce Attack” skill and its range have been increased;
- The damage of the “Beast Attack” skill has been increased;
- The “Predator Hunt” skill will be applied faster if it is used right after the knee strike in the “Beast Attack” skill;
- The chance of inflicting critical damage with two successful hits of the “Predator Hunt” skill has been increased;
- The damage from each type of attack of the “Beast's Wrath” skill has been increased;
- The damage of the “Body Throw” skill has been increased;
- Now, in order to learn the “Body Throw” skill level 1, you must first master the “Grapple and Punch” level 1;
- The damage from the slashing blow of the “Beast's Rage” skill has been increased;
- Improved the animation when switching from the Beast's Rage skill to the Beast's Rage skill;
- The damage of the skill “Flow: Wing Strike” in PVP has been slightly reduced;
- Lightning Fury cooldown increased from 12 seconds to 14;
- The damage of the skill “Wrath of Lightning” has been increased;
- When using the Stone Strike skill, the defense mode is activated: all attacks from the front are blocked. During the cooldown of the skill, the defense mode is not activated;
- Now the skill "Stone Strike" can be correctly used after the skill "Wrath of Lightning";
- The use of the Predator Hunt skill has been changed: now, in order to perform a series of jumps, you need to hold "LMB" or "v + F";
- Fixed a bug where the Barbarian, without capturing the enemy, performed the "Brutal Massacre" skill to the end;
- Fixed a bug where after using the Grab and Strike skill on an enemy, he could immediately get up from the ground.
Warrior
- Some warrior skills will trigger more slowly when used from the hotbar;
- A warrior can deal standard damage with a basic attack if his stamina drops to zero;
- When using the Sword Counterstrike skill, stamina is no longer consumed.
Archer
- The skill “Flow: Flying Feather” has an 8-second cooldown added;
- The skill “Flow: Flying Feather” no longer restores stamina during use;
- Fixed the animation of the skills "Flow: Wind Shot" level 1, 2;
- Reduced the damage of the skill "Flow: Wind Shot" level 1, 2;
- Increased the damage of the skill "Wind Shot" with the accumulated Rage of the Black Spirit (100%) in PvP;
- Reduced depreciation of all equipment;
- Increased the cooldown time of the skill "Flow: Sky Explosion";
- The skill "Flow: Sky Explosion" cannot be interrupted during normal use. If the skill is used repeatedly during cooldown, it can be interrupted;
- Reduced the mana cost for all skill levels of Flow: Wind Shot and Will of the Wind, as well as for the Steady Edge skill level 2 and above.
- Fixed the skill "Flow: Wind Shot" level 1-2: now it does not give the effect "Knockback during knockdown";
- The charging of the “Lethal Forces” skill has been accelerated;
- The skill “Dagger of Darkness” now restores more mana;
- The skill “Evasive Attack” now restores more mana;
- The skill "Moving Flame" now restores more mana;
- Skill “Search weaknesses” now restores more mana.
Witch
- The cooldown of the "Shadow Deal" skill has been reduced from 1 minute to 25 seconds;
- The amount of health spent when using the Shadow Deal skill has been changed to 10% at all levels;
- The speed of applying the Shadow Deal skill has been increased;
- Fixed tutorial video for Shadow Deal skill;
- The attack radius of the skill "Bloody Mess" is increased;
- The damage from the Bloody Mess skill has been increased both during normal use and with accumulated Black Spirit's Rage;
- Shadow Eruption damage increased;
- The damage of the skill "Flow: Shadow Eruption" is increased;
- The damage of the “Hellfire of Darkness” skill in PVP has been slightly reduced;
- The skill "Shadow Waves" now corresponds to the combination indicated in the description for the application.
Wizard and Sorceress
- The speed of applying the skills "Lightning Strike", "Fireball", "Frost Mist" is increased;
- Increased the damage of the Lightning Strike skill level 1;
- The speed of the projectile fired by the Frostbolt skill has been increased;
- The Hail of Arrows skill can now be re-cast while it is on cooldown, but its damage will be reduced.
- The Arcane Missile skill now knocks monsters down.
- Fixed a bug with displaying the neck of the Sorceress.
Mystic
- Changed general principle calculating the damage of Mystic skills, as a result of which the parameters of many skills have also been changed:
- Increased the damage of the "Leaf Slash" skill level 2-10;
- Increased the damage of the Falling Leaf skill while riding the Black Lion;
- Increased the damage of the skill "Lightning Bolt" level 1-4;
- Increased the damage of the Thunderbolt skill in PvP;
- Increased the damage of the skill "Otherworldly Strike" level 1-3;
- Increased the damage of the skill "Otherworldly Strike" in PvP;
- Increased the damage of the Hail of blows skill level 1-4;
- Increased the damage of the skill "Evasion Attack" level 1-3;
- Increased the damage of the skill "Leap from above" level 1-3;
- Increased the damage of skill “Strike of heaven” level 1-3;
- Increased the damage of the “Flash” skill level 1-4;
- Increased the damage of the skill “Flash: Pierce” level 1-3;
- Increased the damage of the skill “Flash: Spin” level 1-2;
- Increased the damage of the “Lightning Field” skill level 1-4;
- Increased the damage from the Black Lion's special attack when using the Lightning Field skill;
- Increased the damage of the skill "Black Lion: Cat's Paw" level 1-3;
- Increased the damage of the skill “Black Lion: Claws” level 1-4;
- Increased the damage of the Black Lion: Burn Throat skill level 1-3;
- Increased the damage of the skill "Black Lion: Lion's Roar" level 1-6;.
- Increased the damage from the explosion of the skill "Black Lion: Lion's Roar" level 1-6;
- Increased the damage of the skill “Black Lion: powerful wave” level 1-6;
- Increased the damage of the skill “Black Lion: Whip Strike” level 1-5;
- Increased the damage of the skill “Black Lion: Whip Strike” in PvP;
- Increased the damage of the Black Lion: Paw Uppercut skill level 1-5;
- Increased the damage of Black Lion: Paw Uppercut when used with Black Spirit's Rage;
- Increased the damage of the first and second hits of the skill “Black Lion: Earth Lightning” level 1-4;
- Increased the damage of the third hit of the skill “Black Lion: Earth Lightning” level 2-4;
- Increased the damage of the skill “Black Lion: Earth Lightning” while riding the Black Lion;
- Increased the damage of the Black Lion: Dread Strike skill level 1-6;.
- Increased the damage of the Black Lion: Dread Strike skill in PvP;
- Increased the damage of the first and second hit of the skill "Chosen" level 1-2;.
- The work of the “Mobile Evasion” skill has been changed:
- Now you can use the “Mobile Evasion” skill by double pressing the “” , “v”, “ ”, “^” keys.
- You can no longer use the combination “Shift+”^”+LMB” continuously.
- Added a new movement skill - “Divine Walk”;
- The work of the “Chosen One” skill has been changed: now it can be used by pressing the “F” key directly while using the “Black Lion: Dread Strike” skill;
- Changed Black Lion's fur to be less transparent.
Sword master
- Swordmaster will no longer become invulnerable when using the "Mobile Evasion" skill during its cooldown;
- The skill "Mobile Evasion" will now consume both stamina and mana;
- When using the "Mobile Evasion" skill level 2, no error messages appear;
- Added keyboard shortcut "Shift + Q" to the description of the skill "Flow: Rise of the Dragon";
- The Dismemberment skill is now correctly canceled by the Mobile Evasion skill;
- PvP class balance improved.
Maeve
- Maeve will no longer become invulnerable when using the "Mobile Evasion" skill during its cooldown;
- Stamina consumption when using the "Mobile Evasion" skill has been reduced;
- The "Mobile Evasion" skill will now consume both stamina and FP;
- The range of the "Mobile Evasion" skill level 1 is reduced by 20%;
- Slash Bounce can now be used from a quick slot.
- The amount of health and rage gained for each character level has been increased;
- The base value of protection has been increased;
- PvP class balance improved;
- Fixed a bug with the display of the neck.
Auction
Betting system
The bidding system is a handy new feature that allows you to buy rare and popular items that are not currently on the auction, without constantly contacting the auctioneer.
The essence of the system is that the player makes a bet on an item of interest to him, which is currently not on the auction. If, when an item appears, the player's bet turns out to be the largest of all declared, he receives it by in-game mail.
To place a bet, you need:
- Go to the auctioneer in any region and open the auction interface;
- Select the desired item that is not currently on the auction;
- Place a bid indicating the amount you are willing to pay for the item (it must be higher than the maximum auction value of the selected item).
After that, the amount you specified will be withdrawn from your account in inventory or in the warehouse and transferred to storage in the auction. As already mentioned, if your bid is the highest when an item appears on the auction, it will be sent to you by mail. Otherwise, the money will be returned back to your account.
We draw your attention to several important aspects of the betting system:
- To place a bid, you must have a sufficient amount of silver in stock or inventory;
- You can only place one bet per account;
- If several players have made the same maximum bid for a certain item, then it will be sold to the player who made the maximum bid first;
- When any player bids on an item, a sell message for that item is shown to all players who bid on the same item;
- When selling the item, the seller of the item, in addition to the value of the item set by him, will also receive a certain amount of silver. The auction commission will be applied according to the usual rules;
- There is a chance to register an item with the "Bids Only" tag if at the time of registration there were no such items for sale at the auction;
- You can view your bid by clicking the "Manage bids" button in a conversation with the NPC "Auctioneer";
- You can cancel a bid on an item in the "Manage bids" menu when talking to the NPC "Auctioneer" in the region where the bid was made;
- If the bet is canceled, the reserved amount of silver will be returned in full;
- You cannot bid on purchases of Premium Items.
Prices
The auction prices have been changed for the following items:
- piece of iron;
- Ingot of iron;
- Pure ingot of iron;
- a piece of lead;
- Lead ingot;
- Pure ingot of lead;
- A piece of copper;
- Ingot of copper;
- Pure ingot of copper;
- a piece of tin;
- Tin ingot;
- Pure ingot of tin;
- A piece of zinc;
- Ingot of zinc;
- Pure ingot of zinc;
- Ingot of brass;
- Ingot of bronze;
- Ingot steel;
- A piece of vanadium;
- Vanadium ingot;
- Pure Vanadium Bar;
- Piece of titanium;
- A piece of silver;
- Ingot of silver;
- Pure ingot of silver;
- Piece of gold;
- Gold bar;
- Pure ingot of gold;
- A piece of platinum;
- Ingot of platinum;
- Pure ingot of platinum;
- Opal;
- health stone;
- A piece of cupronickel;
- Melchior ingot;
- Pure ingot of cupronickel;
- Rare opal;
- Moon Opal;
- Ruby;
- Rare ruby;
- Special ruby;
- Sapphire;
- Rare sapphire;
- Special sapphire;
- Topaz;
- Rare topaz;
- Special topaz;
- Emerald;
- Rare emerald;
- Special emerald;
- Diamond;
- Rare diamond;
- Special diamond;
- Red coral;
- Blue coral;
- Pink coral;
- Blue coral.
The price of the following items has been increased in the Auction House:
- Elixir of Energy;
- Alchemy table 2;
- Alchemy table 3;
- Plate 2;
- Plate 3.
- Cream;
- Butter;
- Egg.
The price of the following items has been reduced in the Auction House:
- Weapon Steed green quality.
At the same time, the cost of the same weapon from NPCs is increased.
In addition, prices have been changed for many materials and consumable items.
Number of items
- The number of the following items that can be auctioned at a time has been reduced:
- Pure ingot of iron;
- Pure ingot of lead;
- Pure ingot of copper;
- Pure ingot of tin;
- Pure ingot of zinc;
- Pure Vanadium Bar;
- Pure ingot of titanium;
- Pure ingot of silver;
- Pure ingot of gold;
- Moon Opal;
- Strong board from an ash-tree;
- Sturdy maple board;
- Sturdy pine board;
- Strong board from an alder;
- Sturdy cypress board;
- Sturdy cedar board;
- Sturdy palm wood board;
- Strong board of elderberry;
- Strong fir board;
- Sturdy acacia board;
- Soft top quality leather;
- Thick leather of the highest quality;
- Top quality hard leather;
- Fine leather of the highest quality;
- Thick fur of the highest quality;
- Variegated fur of the highest quality;
- First-class lightweight nib;
- First class luxury pen.
- The number of elixirs that can be auctioned at a time has been reduced from 100 to 20.
Weapons and armor of white quality
It is no longer possible to auction white quality weapons and armor.
Item registration time
Slightly reduced the delay when registering an item in the auction.
New PvP Mode: Duel
In the new PvP:Duel mode, a player or group of players can challenge another player or group of players by clicking the appropriate icon in the character interaction menu. If the challenge is accepted, a one-on-one, one-on-one, or group-on-group duel will begin. During the battle in this mode, no penalties for death apply, and the resurrection of players occurs instantly.
Areas for dueling are marked with borders. You can see them by clicking on the button in the upper right corner of the screen. If the borders are red, the character is already in the duel zone. If green - the character is out of it. In the latter case, in order to clash with an opponent in a duel, you just need to cross the green border.
To exit the duel, just right-click on the icon in the upper left corner of the screen.
Please note that during Sieges and Node Wars, it is not possible to challenge to battle in the new mode. All active duels at the start of mass battles will be terminated automatically.
Monsters and Bosses
Monster Changes:
- The amount of karma received for killing monsters has been increased;
- The amount of combat experience gained by the character for killing monsters has been increased;
- The amount of skill experience gained by the character for killing monsters has been increased;
- The health of all monsters is lowered;
- The damage of all monsters is reduced;
- The chance of items dropping when killing monsters has been increased;
- The chance of items dropping when killing guild bosses has been increased.
- Desert Fogan Warrior and Basim Cutthroat monsters are now immune to capture.
- The monsters “Wako Fighter”, “Black Harpy”, “Saizek Officer” have been lowered by one level.
- The following elite monsters have been lowered one level:
- A wild boar;
- Scarecrow;
- Red psychrophyte;
- Cult Warrior;
- Horned lizard;
- Black psychrophyte;
- Archer Al Rundi;
- Fogan captain;
- Imp Rider;
- Bes-rudoko;
- Altar Imp Fighter;
- Khuruto fighter;
- Varagon;
- Infected Butcher;
- Ruin Golem;
- Possessed giant;
- Ruins monster;
- Petrified foreman;
- Experimental orc;
- Officer Sonil;
- Giant berserk.
- Increased the movement speed of the following monsters:
- Private Basim;
- Desert Fogan;
- Lizard Warrior;
- Desert Naga.
- The location of monsters in the locations "Camp of the Basim clan", "Furqan Gorge", "Nest of Waragons" and "Titum Valley" has been changed;
- The number of monsters in the “Ship Wharf” location has been increased;
- From the monster "Stone Waragon" now with a small chance you can knock out "Amber III [Fortress]";
- In the Titum Valley location, monsters will drop parts of the Ancient Explorer's Compass. If it is collected, the player will be able to navigate the desert on the map;
- In the "Desert Castle" location, the Traveler's Card will drop from the monsters. Using which, the character will move to the nearest settlement;
- The number of items “Fragments of Memories” in the chests “Treasures of the Head of Sonil”, “Gift of the Skeleton King”, “Magram's Treasury” has been increased.
- For the group, the chance of dropping the item "Fragments of Memories" from bosses has been reduced.
Boss changes:
- Attack damage from quest bosses reduced;
- Reduced damage from the normal attack of world bosses:
- Giant ancient;
- Red nose;
- Cowardly Bheg.
- Now, when Kzarka, Nouver and Royal Whale appear in the world, they emit a resounding roar and howl to the entire channel, announcing their coming;
Knowledge and Quests
- Increased all experience gained by the character for completing tasks.
- Added new starting quests from the Black Spirit:
- Basic training;
- Advanced workout.
- Increased the number of items "Seal of Promise" and "Sign of Promise" from 1 to 2, which are given as a reward for the following tasks:
- Hexa Cemetery;
- Order of Shadows;
- Necklace of Sealed Enchantment 1;
- Necklace of Sealed Enchantment 2.
- Added tasks for pumping the craft of hunting. The chain starts at the NPC "Daphne" in the location "Forest of Balenos".
- A new quest "The Art of Taming" for taming a horse has been added by NPC Banasil. You can take it by first completing the “Catch a Horse” task from the same NPC or by having a character level from 25 to 32;
- The new task “Desert Compass” appeared in the location “Barkhan Gate”;
- Changed the NPC for completing the Calpheon Enter Report quest from Christopher to Brego.
- NPCs in Calpheon now have quests to complete the Plot of Giants and Manche daily quests. By completing them, you can get a worthy reward and new knowledge, but the opportunity to take the indicated daily tasks again will disappear;
- NPCs in Mediah now have quests that complete the daily quests "Tashia Tribe", "Tugu", "Closed Mine" and "Gahrat Clan". By completing them, you can get a worthy reward and new knowledge, but the opportunity to take the indicated daily tasks again will disappear;
- New knowledge appeared at NPC Acha Labericco;
- Energy for the category “Citizens of Altinova” can now be obtained with 11 open knowledge, instead of 13.
Items
- The following items can now be used while riding:
- Nutritious feed;
- Abundant food;
- Expensive food;
- Good food;
- Organic feed.
- Added new elixirs and knowledge for them:
- Potion of the student;
- Potion of the diligent student;
- Potion of the rider;
- Potion of a skilled rider;
- [Co-op] Apprentice Potion;
- [Co-op] Potion of Diligent Student;
- [Co-op] Rider Potion;
- [Co-op] Skilled Rider's Potion.
- The item “Mark Reagent” has been changed:
- Partially changed the formula for the production of the item: instead of storm oil, now you need to use the blood of a sinner;
- The experience gained by the character in the production of the item has been changed;
- The price of registering an item at the auction has been changed.
- Elixir icons have been changed: elixirs with the same effects will have the same colors;
- The Jewelery Shop has been added to the game, as well as a new special ingredient for it - Agate, which can be bought from the Crystal Merchant. The new workshop is located in the houses "Altinova 5-8" and "Valencia 2-6". It can craft the following jewelry pieces:
- Sun Earrings [Ruby];
- Sun earrings [Sapphire] ;
- Earrings of the sun [Topaz];
- Sun Ring [Ruby];
- Sun Ring [Topaz];
- Sun Necklace [Ruby];
- Sun Necklace [Sapphire] ;
- Sun Necklace [Topaz];
- Sun Necklace [Emerald];
- Sun Necklace [Diamond].
- If there is free space in the inventory, the following chests will open automatically upon receipt:
- Asvol weapon chest;
- Militia weapons chest;
- Elsie's weapon chest;
- Weapon Chest Steed;
- Weapon chest Extra Steed;
- Bastio's weapon chest;
- Bastio's Ultimate Weapon Chest;
- Aid Weapon Chest;
- Weapon box.
- The work of the items "Memory of the Master" and "Fragments of Memories" has been changed:
- When repairing an item with the help of "Master's Memory" and the same item, 30 durability points will be restored to it
- When repairing an item using Master's Memory and Memory Fragments, the amount of durability restored will depend on the quality of the item. Thus, a white quality item will be restored to 30 durability points, green - 15, blue - 6, and yellow - 3.
- The assortment of goods at some blacksmiths and gunsmiths has been changed: instead of militia weapons, they began to sell Steed weapons, and instead of Replas armor, Dobart armor;
- Changed the cost of horses when selling to a groom;
- Blacksmiths have been given the item “Cron Stone” worth 1,000,000 silver. It allows you to not lose the level of equipment enhancement on failure when you make an increase of +17 and above;
- The light range of the flashlight has been increased, and its brightness has been fixed so that it does not depend on environmental conditions;
- During the “Old Suit - New Use” event, information will be added to the description of the suits on how many stones of “Valks Protest” and “Cron Stones” they can be dismantled.
- The price of the “First Grade Wine” item has been increased from 50,000 silver to 100,000;
- All sub-weapons that provide a bonus to Defense and Accuracy (does not provide a bonus to Attack) will gain +1 Damage each time they are empowered, starting at +8;
- Increased the amount of experience gained when polishing alchemy stones with high-level materials.
Fishing
Improved fishing system:
- Fish habitats have changed;
- Fish habitats have become visually visible: fish are splashing in the water, and seagulls are hovering above them;
- The chance to catch a good fish is now greater, the farther the character sailed from the shore;
- At sea, the quality of the fish caught will depend both on the depth of the place where the fish was caught and on the distance from the shore;
- Added new types of fish;
- The fishing energy bar has been improved;
- The maximum value of accumulated energy for fishing is now 10.
- The tasks of the "Fishing" category have changed;
- Fishing knowledge is classified according to the type of fish.
Guilds
- The item allows you to use the training gun not during the siege;
- To use, you will need special training equipment;
- The damage of the gun is insignificant, but this does not hurt to fully study the feature of shooting;
- The deployed cannon is available for 30 minutes.
- The skill adds 100 HP for 10 minutes to all members of the guild.
Arena of Blood
Added "Restricted Game" mode to the Arena of Blood, each battle in which takes place with the following restrictions:
- Attack limitation;
- Protection restriction;
- Restriction on attack and defense.
Players who have reached level 50 can fight in the battles of the new mode, whose damage and defense values correspond to the restrictions of a particular battle.
Rules of the "Game with restrictions" mode
- The battle lasts 20 minutes. You can join it within the first 10 minutes;
- While in a group, it is impossible to join the battle in the Arena;
- While waiting for a channel change, it is not possible to join the battle in the Arena;
- Having one of the parameters above the set limit, it is impossible to join the battle in the Arena;
- If your parameters are too small for the battle, they will be balanced. For example, if you join a battle with defense limits of 150 and attack of 200, having lower values of these parameters, the difference will be added to you by the system automatically. In this case, this bonus will not be displayed in the character window;
- By killing opponents, you get points - half of the number of points of the killed character;
- The minimum number of points for killing an enemy is 1;
- When you die, you lose a quarter of your points;
- The team that gets large quantity points;
- Winners get 5 Arena Seals and skill experience, losers get 1 Arena Seal and skill experience;
- You will not receive a reward if there is no free space in your inventory;
- You can leave the battlefield by pressing the "ESC" key.
beauty album
A new functionality has been added to the character creation menu, the main menu (ESC menu) and the beauty salon - Beauty Album. With it, players can quickly upload their character designs to the public, share them with each other and create bright, unusual characters with a minimum of effort.
To upload your character layout to the public, you need to:
- Open the Beauty Album in the main menu (ESC menu), in the character creation menu or in the beauty salon;
- Press the "Save to file" button;
- Take two shots representing your character in all its glory;
- Add a layout name and select one of the categories for it: Beautiful, Original, Celebrities, Unpleasant, Other;
- Select a registration point in the public domain and write a brief description of the layout (optional);
- Press the "Save" button;
- Confirm saving the layout.
To try on a layout from a common base on yourself, you need:
- Open the Beauty Album in the character creation menu or beauty salon;
- Select the tab "User layouts";
- Find your favorite layout;
- Select it and click the "Apply" button.
Interface
IN black interface Desert has received many changes to improve the visual style of the game, as well as make some aspects of it more convenient and enjoyable to use:
- In the horse market, a filter by gender has been added;
- In the stable, the order of the buttons responsible for actions with the horse has been changed;
- Fixed display of the appearance of the horse for other characters;
- Changed the interface of the game store when choosing an item;
- The tutorial video interface has been improved;
- Changed interface size for channel selection;
- The interface of the "Find NPC" function has been improved. Now it's easier to find the main NPCs;
- The interface size can now be changed depending on the screen resolution:
- When the screen resolution is less than 721p, the interface size can be set within 50-90%;
- When the screen resolution is from 721p to 1080p, the interface size can be set within 50-100%;
- When the screen resolution is from 1080p to 1600p, the interface size can be set within 100-140%;
- When the screen resolution is more than 1600p, the interface size can be set within 140-200%.
- Changed the design of the "Video Tutorials" button to the left of the mini-map;
- Party members' icons will now show on the minimap, indicating where they are located;
- Added "Auction" button for the main menu (ESC key);
- When registering expensive goods, the chat indicates the time of registration;
- Changed the method of payment at the auction, the blacksmith and other merchants: now the default will be payment from the warehouse, and not from the inventory;
- Changed the payment method at the workers' auction: now the default payment will be from the warehouse, and not from the inventory;
- In PVP mode, the PVP icon has been added to the right side of the character's name;
- Fixed display of the character icon of the "TOP 1" rank on the Red Arena;
- If there is a siege or a battle for nodes on any channel, then this will be written in the channel selection menu;
- Ratings A, B, C, D in the ratings window are now displayed in different colors;
- You can now set hotkeys for the camera. This can be done by calling the main menu with the "ESC" key and opening the "Settings" section, the "Input" subsection;
- Changed the display of the state of hunger in the pet menu;
- The call pet button will now be disabled when the breeding window is opened;
- Added sound effects for calling the main menu (ESC key), changing the channel, auction and the Red Arena;
- Added a sound notification about receiving a task from the Black Spirit;
- Changed the background music during node capture and sieges;
- The window with the knowledge theme that appears when talking to NPCs has become larger;
- The Knowledge menu can now be opened at any time;
- In the "Mail" menu, the "Take All" function has been added, with which you can get all attachments from all incoming letters at the same time;
- Added a choice of animation speed to the game settings when opening the world map;
- Added a description of Influence Points to the nodes menu on the world map;
- Added an icon for the Node War area to the top right of the world map.
- On the world map, the size of the search window for workshops in cities has been increased;
- On world map Added button for automatic loopback autopath. The button becomes visible only when the autopath is laid;
- The function “Enable/Disable World Map Animation” has been added to the game settings;
- On the world map, it is now possible to filter nodes by tax rank and by days of battles for nodes;
- On the world map, the display of icons of some grooms and storekeepers of Valencia has been fixed;
- When you first create a character on an account and enter the game, you now need to adjust the graphics and autopath settings for yourself;
- Chat category names now have their own color;
- The color of each chat category can now be changed in the chat window settings;
- The following filters for system messages have been added to the chat options:
- personal items;
- Group items;
- Auction;
- workers;
- Harvest.
- When placing furniture / planting plants, the message now appears: "Press space to install";
- In the friends list, a friend's sign-in information for the last 24 hours will be displayed as "Today".
Other
- New titles added:
- Private Killer;
- Corporal Massacre;
- General Slaughter;
- Black Star;
- Hero;
- court hunter;
- Wind hunter;
- Life for the hunt;
- Spreading my wings;
- The heart of the beast.
- Some settlements have changed their location:
- Gianni Farm moved from Calpheon to Keplan
- Moved Forest Guard Post from Calpheon to Trent Village.
- The topographical features of the locations "Camp of the Basim clan", "Furqan Gorge", "Nest of Waragons" and "Titum Valley" have been changed. All characters who were there at the time the update was installed were automatically moved outside of these locations.
- The movements of pets have become more natural and smooth;
- When crossing pets, you can now choose appearance their offspring;
- Increased the maximum amount of health for horses;
- The cost of the following skills for mounts has been reduced:
- Kick I;
- Hoof strike II;
- Fast start;
- Caution.
- The chance of saving energy points while gathering is increased for characters with a low level of craft;
- Simple alchemy and simple cooking no longer consume energy points;
- When repairing equipment, you can now use silver from the warehouse;
- Overview mode is now automatically turned off when you are attacked;
- In the video clip "Resurrection of Velmorn", the appearance of the NPC has been improved;
- Improved graphics in the "Echo Land" location;
- Improved the designation of hostile guild characters at low graphics settings;
- Forts in sieges will now change their appearance depending on the amount of damage they received;
- The character will exit browser mode if he is attacked;
- An in-game attack control system has been added: with prolonged, continuous attacks, players will be subjected to the "Stun" effect;
- Items attached to a letter can now only be obtained in the safe zone;
- Through the maid, you can now take silver from the warehouse by clicking on it with “LMB” and selecting the desired amount;
- Having fallen from the boat, the character assumes a position for swimming;
- When falling from a great height, it is now impossible to use items;
- Donkey movement speed increased;
- Elephant basic attack damage with tusks and forepaws reduced;
- Elephant-mounted damage to barricades increased;
- The damage dealt by riding an elephant to other elephants has been increased;
- Elephant mounted damage to siege buildings reduced;
- Damage dealt to characters while riding an elephant has been reduced;
- The time required to greet an NPC is now the same for all classes.
Translation
Translation edits have been made.


Lost Sector, turn based game, Jagged Alliance style, Fallout Jagged alliance 2
The key to the game sea battle submarine war
H1Z1: King of the Kill review
Online game League of Legends fantasy genre in Russian Interface and controls
New registration in tanks online World of tank online create a new account