In this practical article, we will consider services that help download maps from the OpenStreetMap online service for subsequent conversion into other cartographic formats to use them offline without an Internet connection.
It is summer now, and for many, this is the main time to travel. Therefore, it's time to get navigators, or put special navigation software on tablets and smartphones, so as not to get lost in unfamiliar places. Moreover, there is no shortage of such programs in the current era of GPS and mobile devices. It offers users both geographic Internet services like Google Maps and Microsoft Bing, and specialized software like 2GIS with its own maps.
The latter option with local maps, which users pre-download and install for their navigation software, in many cases is not only more convenient, but also the only possible solution. Since the Internet in a particular area may be expensive or not work at all. But at the same time, the required offline maps of a specific area may also be missing.
Below we will consider options for downloading map data from the OpenStreetMap (OSM) online service with the subsequent purpose of converting this data into a specific map format for your navigation program. We have already covered the OpenStreetMap project in detail. It is an open-source web mapping service, similar to Google Maps, whose data is collected by the users themselves and is available to everyone under an open license. In the article, as an example, we will consider the conversion of OSM data for the OsmAnd program for Android devices, which we also examined in detail on the KV website.
OSM official website
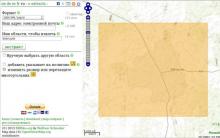
So, we need to download OpenStreetMap map data for a specific area. First of all, this can be done from the official website of the service www.openstreetmap.org.
Directly on the online resource map there is a link "Export", when you click on it, the data export panel will appear. Here, using the blue button "Manually select a different area" (manual selection of a special area), you need to select a rectangle of the desired territory on the map, then select "OpenStreetMap XML Data" from the list of formats and press the "Export" button.
As a result, a file with the osm extension will be loaded. This is a text xml file with map data, which can then be converted to other formats.
However, the official site imposes restrictions on the amount of downloaded map data. The loaded map must not contain more than 500 nodes. And any city - it will always be more than 500 nodes. But there are other services that allow you to download the desired geographic area without such restrictions.
Whole planet

Here you need to select the desired area on the OSM map, and in the special fields indicate your e-mail address and specify the name of the selected map. It is important that the service makes it possible to download a map not only in OSM format, but also convert it to ready-made formats Garmin, Navit, Esri.
Since the "drawing" of a specific terrain map on the service comes from planet.osm, this takes some time. The result will be ready in 15-30 minutes, depending on the size of the map area and the load on the service. As soon as the card extraction process is completed, the user will be notified to the e-mail address left by him.
Converting
Thus, having received the cartographic data of a specific region in the form of a text osm file, you can start converting it into a ready-made map format with vector or raster graphics for a navigation application. For example, for the OsmAnd software GPS navigator, you need to convert OSM map data to OBF format.
There is a special converter OsmAndMapCreator for this. This application is written in Java and is cross-platform. It is launched after unzipping, depending on the operating system, by the sh or bat script. But the program has a graphical interface.

You need to convert the osm file through the menu "File" - "Create obf file from osm file". After that, a file with the obf extension will appear in the pre-specified folder, which must be transferred to the Android device in the / sdcard / osmand / directory. Now the map of this area will be available in OsmAnd in offline mode.
Using OsmAndMapCreator, you can create OBF maps using data from other online map services. But an overview of these program features is beyond the scope of this article.
Mikhail ASTAPCHIK
There is nowhere without navigation, especially considering the condition of our roads. Notice that your navigator is unstable? Then you need to download OSM maps for Navitel as soon as possible. They contain all the necessary information about the settlements of the country, POI objects such as restaurants, bars, and places for cultural recreation are marked on these maps.
OSM maps for Navitel are more than just navigation. This is a project that is created by enthusiasts with their own hands. The service provides raster maps of the area, and navigation services based on them create the maps we are used to. This approach makes it possible to organize navigation as accurately as possible.
The OSM project is a completely non-profit project. This suggests that all cards are provided free of charge under a general public license. Moreover, Open Street Map acts as a wiki, which allows everyone to make changes to the maps, and this makes OSM even better, better quality and more popular.
Why is OSM worth using?
Open Street Map has several advantages over other projects of a similar nature:
- accuracy;
Navitel OSM maps are so detailed that with a 99% probability every hump and uneven terrain that is on the maps will be encountered in real life. This is due to the fact that maps are constantly being improved by the OSM community on the Internet. As a result, edits are made, old versions are updated, and new maps are improved.
- free distribution;
The project is funded by a donation. This made it possible to absolutely download all OSM maps for Navitel. At the same time, the quality will be far from worse than that of paid services.
- wide girth;
Unlike most projects, OSM maps for Navitel cover the entire globe. Therefore, using them, you are guaranteed to know how to get to the place you need in an unfamiliar country or continent. Moreover, OSM outperforms some of its paid counterparts - TomTom / Tele Atlas in accuracy. According to research, the accuracy of Open Street Map exceeds these maps by 27%.
- convenient use;
Maps can be imported in any convenient format - PNG, JPEG, SVG, PDF or PostScript. Also, it is possible to load them into Garmin, GisRussa.
The WIKI format allowed OSM to create a unique cartographic project. After all, the fact that the maps are being finalized by the inhabitants of the area, gives undeniable advantages. Firstly, the accuracy is extremely high, and secondly, the reliability is ensured. And thirdly, it is the general availability of the OSM map for the Navitel. You can download them on our website for free and without SMS.
Read how to install maps.
Overview map of Russia (Russia-overview)
Altai (Russia-AL)
Altai Territory (Russia-ALT)
Amur Region (Russia-AMU)
Arkhangelsk Region (Russia-ARK)
Astrakhan region (Russia-AST)
Bashkiria (Russia-BA)
Belgorod region (Russia-BEL)
Bryansk region (Russia-BRY)
Buryatia (Russia-BU)
Chechnya (Russia-CE)
Chelyabinsk region (Russia-CHE)
Chukotka Autonomous Okrug (Russia-CHU)
Chuvashia (Russia-CU)
Dagestan (Russia-DA)
Ingushetia (Russia-IN)
Irkutsk Region (Russia-IRK)
Ivanovo region (Russia-IVA)
Kamchatka Territory (Russia-KAM)
Kabardino-Balkaria (Russia-KB)
Karachay-Cherkessia (Russia-KC)
Krasnodar Territory and Adygea (Russia-KDA)
Kemerovo region (Russia-KEM)
Kaliningrad region (Russia-KGD)
Kurgan region (Russia-KGN)
Khabarovsk Territory (Russia-KHA)
Khanty-Mansi Autonomous Okrug (Russia-KHM)
Kirov region (Russia-KIR)
Khakassia (Russia-KK)
Kalmykia (Russia-KL)
Kaluga region (Russia-KLU)
These are unofficial, free maps. They are created by the Internet community OpenStreetMap (OSM)... Another unconditional plus is that they are made by more than one person, each registered user can make changes to the map. They are constantly updated and in many regions have more relevant information at the moment than official maps.
Instructions for installing OpenStreetMap maps for Navitel Navigator:
1. Make a copy of the memory card (just in case)
2. Copy the necessary * .nm2 files to any folder on the device or memory card (for example / sdcard / NavitelContent / Maps / AtlasOSM). If the regions do not border each other, then in order for the route to be correctly laid, add a file with an overview map of Russia (Russia-overview-osm-nm2) to the folder with the selected maps.
3. In the Navitel program, open Menu - Settings - Map - Open Atlas - middle icon with a folder at the bottom - select a folder and press "ok" (green checkmark)
4. After the indexing process is completed, the maps will be available for navigation.
IMPORTANT! OSM project maps are created in the only NM2 format, they work fine with the navigation program Navitel Navigator version 5.0.3 and lower (better in version 3.5) without failures and restrictions. OSM maps also work well on Navitel Navigator versions up to 9.10.xxxx
(literally " open street map"), Abbreviated OSM- a non-commercial web cartographic project for the creation by the community of Internet users of a detailed free and free geographic map of the world.
To create maps, data from personal GPS trackers, aerial photographs, video recordings, satellite images and street panoramas provided by some companies are used, as well as the knowledge of the person drawing the map. Using services like Google Maps to create maps is not possible without the permission of the copyright holder.
OpenStreetMap uses a wiki principle to create a map. Each registered user can make changes to the map.
Now we will begin our story about how to make changes and additions to this rather detailed, evolving and easy-to-use map.
First you need to go to the official OSM website http://www.openstreetmap.org/. You can enter the site either using your personal mailbox, or by linking an existing account in various communities, the icons of which are shown in the figure:
After entering the site, we will have the same picture as in the title photo of the blog. The page header contains the main menu with all the supported commands and provided capabilities.
Now a completely natural question arises: how can you edit the map?
The map can be edited both online, using two online editors: iD and Potlatch 2 - and offline, using the editor installed on the computer. The second method is convenient for those who have a very low Internet speed or there are restrictions on the traffic used, where all changes can be made on your computer, and then sent to the OSM server. Edits are sent as an XML file, so they won't have a significant impact on traffic.
In this article, we will edit the map online using the iD editor, because the principle of work of editors iD and Potlatch 2 is the same, only Potlatch 2 allows you to map a larger number of different classes of objects and because of this it is more inhibited. A fast iD editor is sufficient for drawing and editing on the road map.
In the upper left corner we have three highlighted items "Edit", "History" and "Export". Moreover, the "Edit" item is inactive. When you hover the mouse cursor over it, a hint appears that you need to zoom in for editing

After enlarging the map to the desired scale, the "Edit" button will become active, when you click on it, a pop-up menu will appear, where you can select the required map editor.

Select the iD editor and start working with the map. You can make changes to the map either manually, using satellite images provided by the OSM service, or by plotting paths obtained from the traversed tracks saved in the navigator. The following image shows the editing window for the map by the iD editor. Editing will become available only after zooming in, and the scale must be very large. The figure shows the extremely small scale that is available for editing. As you can see, this scale is not very suitable for drawing objects from space images, but it can be used for drawing roads using GPS tracks.

As you can see, the editor is very simple and allows you to draw only three types of objects on the map: point, line and polygon. As you might guess, a point is the name of a certain place or a point object, a line is roads, a polygon is various areas (forests, settlements, houses, etc.).
On the right-hand toolbar, only two buttons are of interest:
 setting the background. Those. what will be displayed on the map (Google image, OSM map, etc.)
 card data. With the help of this button, GPS tracks are loaded from the editor, and also select those classes of objects that should be displayed or hidden on the map during editing.
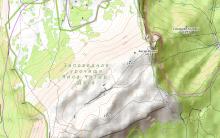
Now let's figure out how to put objects on the map. I saw that during the ride, the route passed in places along forest roads that are not on the OSM map. It is necessary to correct this shortcoming. To do this, download a real GPS track from Rafael and start mapping roads using a real GPS track. In this example, I want to paint a beautiful forest path that we had before stopping at the lake. Here is a photo of this track:

The track is loaded, now we need to draw this road.

In the figure, the loaded real track is shown in pink, the white line along the track is the road plotted on the map. Any applied object can be edited. To do this, simply select it with the mouse cursor. The object doesn't have to be yours. To complete drawing a line on the map, click on the last point. The start point and end point of the line are important because they determine the direction of movement. This is especially important when drawing one-way roads and rivers. But at any time, the direction of movement can be changed by selecting the appropriate icon that appears after the activation of the object. On an existing object, you can change the position of existing points, add your own (drag the arrow located between the points), and delete points. Those. there is nothing complicated here.
When you select a newly drawn object, the object type menu appears on the left side of the screen.

We have a road, so we choose it. After that, a list of possible roads will appear. We have a forest road, so we choose it.

After that, we enter the necessary attributes of the forest road. These attributes are important for the OSM map, because in the future, automatic navigation is made using them, depending on the selected vehicle, as well as the ability to display an object on the map, when discarding unnecessary objects (for example, a Ferrari will not go along a forest road, so the driver of such a car will not want so that field and forest paths litter the map and participate in automatic routing).
For the created road, I entered the following attributes:
Coating: unpaved
Width: 3m
Legal access: bicycles, motor vehicles, riders, pedestrians
Country road type: Rather soft: rolled soil with admixtures of hard materials
Passage: Strong wheels: hybrid bikes, cars, rickshaws
The difficulty of the mountain bike trail: 0: smooth gravel / trampled ground, unobstructed, wide turns
Difficulty climbing mountain bike: 0: Medium rise<10%, гравий/утоптанная земля, без препятствий
Any action can be undone before the data is sent to the server. If you forgot to define the type of object or assign attributes to it, but at the same time reached the step of entering a comment, the last step can be canceled (pressing "Save") by closing the comment input window, while the unsaved object will not disappear anywhere.
2) Vectors available in editors and for download as files
For orientation on the terrain, maps must be loaded into the device with which you will go to this terrain - capable of receiving a GPS signal, drawing a map and your position on it. If the device can still plot a route, it's generally good.
Today we will talk about converting OpenStreetMap maps for displaying them in Russa or Navitel Navigator programs. Accordingly, these maps can be loaded into devices where one of these programs is running.
Generally speaking, you can download ready-made maps of some regions of Russia and some other countries, however, these maps do not cover the whole world and are not always made as we would like. By converting the card yourself, you can achieve much more, if not a pity for the time, of course.
Briefly and for those in the know, the conversion looks like this: .osm -> .mp -> .rus / .nm2
Disclaimer - I describe the method that I use myself. If you know the easier way - you are welcome to write in the comments.
Well, now - in detail:
1) Download.osm
.osm is the vector map format for OpenStreetMap. It is based on XML i.e. actually textual.
You can get the .osm file in the following ways:
1. Download by editors: JOSM or Merkaartor. Just download the map rectangle you need from the server and save it to a file. I personally prefer to use JOSM, but Java needs to be installed for it.
2. Download a ready-made map of a certain region from one of the hosting, for example:
- geofabrik.de - continents as a whole and cut by country, some countries are chopped into provinces / states / regions
- cloudmade.com - the whole world by country, some countries are chopped into provinces / states / regions
Just download the file and extract bz2.
3. Download manually via XAPI
To work with XAPI, you need to compose an HTTP request to the server, nothing complicated, the link says everything.
2) Cut .osm into pieces(If you want to)
.osm files, especially those prepared by country, can be quite large and do not go through subsequent conversion (see below). Therefore, they have to be cut.
For cutting, I use splitter, by default it makes .osm files somewhere around 120 MB, which then almost always go through the subsequent conversion. The splitter can be configured with command line parameters if required.
The splitter requires Java to work.
Also, keep in mind that in Russa, routing works only with one loaded map. Those. if the map of one country is cut into pieces and loaded into Russa as an atlas, the routing will not work.
3) Convert .osm to .mp
.mp is an ancient Polish format for storing maps. It is good because it is textual and quite human-readable, well, and a lot of programs understand it.
For conversion I use osm2mp program. Unfortunately, the program requires Perl to be installed and is not very easy to use.
One way or another, after installing and configuring Perl (described by the link) and downloading osm2mp, the program can be used.
An arbitrary .osm file must also be pre-ordered - processed by the attached osmsort.pl script
Then you need to call osm2mp.pl specifying the conversion parameters.
Through lengthy experiments, I wrote a set of .bat files for myself, for example, a standard conversion with a scope for Russa:
echo Start% date%% time% >> std_err.log echo% 1 >> std_err.log perl.exe osmsort.pl% 1> temp_del.osm 2 >> std_err.log perl.exe osm2mp.pl --header header_russa. tpl temp_del.osm>% 1.mp 2 >> std_err.log echo Finish% date%% time% >> std_err.log
You need to call such an .bat file with 1 parameter - the name (and full path) of the .osm file
The 1st line writes to the std_err.log file the date and time of the start of the conversion
2nd line writes the name of the .osm file to the std_err.log file
3rd line executes osmsort, information about the process (and errors) goes to the std_err.log file
4th line executes osm2mp, information about the process (and errors) goes to the std_err.log file
5th line writes the date and time of the end of the conversion to the std_err.log file
(The path to perl.exe must be written either on the system or in your .bat file)
To convert maps of foreign countries, it is advisable to turn on transliteration - otherwise the names. For example, adding the following parameters "--nametaglist int_name, name: en, name, name: ru, ref, int_re f, addr: housenumber, operator --translit" right after "osm2mp.pl"
To convert with a scope for Navitel, you need to download a set of osm2navitel configuration files, rename the files there respectively to header_navitel.tpl, poly_navitel.cfg and poi_navitel.cfg; and add the parameters "--osmbbox --navitel --disableuturns --header header_navitel.tpl --cfgpoly poly_navitel.cfg --cfgpoi poi_navitel.cfg" to the osm2mp.pl call
For other conversions, you can also prepare poly * .cfg, poi * .cfg and header * .tpl
A large card may not convert - for example, 32-bit Perl is limited to 2GB of RAM, as a result, osm2mp cannot cope with .osm files of anywhere from 700MB, and sometimes crashes with a memory error on significantly smaller cards. In this case, the card must be cut (see step 2).
4) Convert .mp to .rus (or .nm2)
For this purpose there is an excellent program GPSMapEdit, which, as the name suggests, is also an editor. It is enough to load the .mp file into GPSMapEdit and export to the required format.
But there are several pitfalls:
- Files .rus (and .nm2) saved from GPSMapEdit have a size limit of 16MB. According to my estimates, this corresponds to about 120MB of the .mp file, or about 600 MB of the .osm file.
- .nm2 files for Navitel 3.2. * Versions are very demanding on the absence of errors on the map, so if "Export failed" occurs, you will have to correct the error on the displayed map, or choose a different format, or convert the map with different settings (see step 3).
P.S. , and then convert to .rus or .nm2.


Satellite map of the world online from Google The newest satellite map online
Interactive map of pripyat
The history of playing cards, who invented
Satellite map of the world online from Google
Combat Arms has seven game servers in total