What is Kamaloka
Kamaloka- this is a special location for swing, which is a room completely hidden from prying eyes. Access to Kamaloka is carried out with the help of special NPCs (they will be discussed below). There is a monster in the center of this room. It differs from ordinary "meat for swing" primarily in its enormous amount of HP.
The HP of a mob in Kamaloka of lvl 43 is 209 thousand (which is quite comparable to the amount of HP of an average RB of the same level). The physical and magical protection of the mob is approximately equal to the analogous parameters of the RB of its level, but the physical attack is rather weak: in a number of instances, you can completely do without a doctor in the group. However, it should be remembered that in some Kamalokas, bosses can summon assistants, the number of which varies from 1 to 15, and which have various abilities, from healing the boss, to imposing sleep and paralysis.
In terms of the number of EXP, the mob also fully corresponds to RB, but at the same time it has one pleasant feature - the amount of accumulated Vitality (on RuOffe - Life Energy) affects the EXP received for each participant in the murder. the reward can actually be a whole 20+ experience level. Unfortunately, you can successfully kill a mob in Kamaloka no more than once a day.
In case of failure, or committing SoE during the "raid", a new attempt can be made immediately. It should be remembered that in the event that all members of the group died, then with a new entrance to Kamaloka, the monster will have a whole HP, and the kill time will also be reset. If at least one party member is still alive and is inside Kamaloka, then the rest of Kamaloka should quickly return and continue killing the mob, because the clock keeps ticking. If you died inside Kamaloka, you can go back with the help of the Captain.
And yet: how to get to Kamaloka? We answer. NPCs who teleport squad members to Kamaloka are located in different cities, with each of them corresponding to Kamaloka for players of a certain level:
Gludio, Captain Bathis - Kamaloki lvl 23 (players lvl 20-28) and lvl 26 (lvl 21-31 players)
Dion, Captain Lucas - Kamaloki lvl 33 (players lvl 28-38) and lvl 36 (lvl 31-41 players)
Heine, Captain Gosta - Kamaloki lvl 43 (players lvl 38-48) and lvl 46 (lvl 41-51 players)
Oren, Captain Mouen - Kamaloki lvl 53 (players lvl 48-58) and lvl 56 (lvl 51-61 players)
Schuttgart, Captain Vishotsky - Kamaloki lvl 63 (players lvl 58-68) and lvl 66 (lvl 61-71 players)
Rune, Captain Mathias - Kamaloka 73 lvl (players 68-78 lvl). Kamaloka for higher level characters does not exist today.
How do I find each of these NPCs? Very simple. To do this, just open the city map. Blue symbol marked with a text Guard capitan(on RuOffe - Captain of the Guards) is just the designation for the NPC teleporting to Kamaloka.
If the level of at least one member of the squad does not correspond to the level of the selected Kamaloka, the squad will not be allowed inside.
When entering Kamaloka, all buffs and debuffs are removed from all members of the squad, excluding those imposed by Newbie and Adventurer's Gude, so buffing is necessary already inside. At death, the character loses the usual amount of experience; when using SoE, paty - return and other teleporting abilities, it returns to the city from which he came to Kamaloka.
The drops from the mob are usually sharpenings, whole things and pieces. If possible, you should go to Kamaloka in the narrowest possible composition - after all, the experience is divided equally among all, and the number of these same monsters in Kamaloka is unlimited, i.e. it is better to let two parties of 3 people attend separately than one of 6 people.
You have 30 minutes to kill the monster; when the remaining time is 10, 5 or 1 minute, a corresponding warning is displayed on the screen. The exit from Kamaloka after killing the boss is carried out using SoE, or by restarting. To enter Kamaloka, the group should gather near the specified Captain, and its leader should select "Enter Kamaloka" in the dialogue, and then the desired Kamaloka. After that, the squad will be instantly transferred to its destination.
Kamaloka by level
Kamaloka 23: Kaneus - Tomlan Kamos
Here we are met by a wonderful monster with a surprisingly "attractive" appearance:
Nothing special. He just hits with a club, the only ability is a stun for 10-20 seconds. It is completely killed by a group of 2 or 3 people, without a healer, but under a Nubian buff. A group of 6 people with a tank and a doctor is destroyed even without a nipple.
Kamaloka 26: Kaneus - Ol Ariosh.
Not much different from his "colleague" from Kamaloka 23. The only distinctive feature- periodically summons a single minion to help him attack. The minion is killed very quickly. As a result, here, again, 2-4 people will be enough (but you can still take the healer, in order to avoid misunderstandings).
Kamaloka 33: Kaneus - Crimson Hatu Otis
This Kamaloka is inhabited by His Majesty the Bears. A bit pokotsany (the crossheads announced the hunt ...), but, nevertheless, evil as the devil. 
Killed in 2 gnomes + doctor (checked). Doesn't hit hard; however, his main weapon is a massive attack, which he periodically begins to cast, inflicting fairly high damage to everyone around him. However, it is easy to predict it from the animation, and simply move away for the duration of use - Medved will not pursue anyone.
Kamaloka 36: Kaneus - Seer Flaorus
Kills, again, in 2-4 fighters, even without a doctor. Nothing special - periodically summons minions, which are quickly killed, and therefore do not pose a significant threat. Magic -Drain Health and Aura Flare.
Kamaloka 43: Kaneus - Mutant Stakato
Low defense, low attack. At first it gives the impression of quite easy prey ... however, this delusion persists somewhere up to 60% of HP, when minions healing it, one by one, begin to appear from it. Their respawn rate is very high, and it is not possible to kill everyone. Therefore, in this Kamaloka, a healer or other magician with Sleep is strictly required. His task is not to attack the mob, and not to heal the party members (this is not required), but to constantly keep all the mobs in the slip. Up to 6-7 minions appear in the room at the same time.
Kamaloka 46: Kaneus - Dragon
It is much easier to kill him than the previous boss - this is done as part of a party of 4 people. The main skill of the boss is a kind of analogue of the Seal of Blocade, even more interesting - it is impossible to take any actions under it, but you cannot be attacked either. There is also a mass - Hydroblast. Killed by ordinary execution with periodic treatment of party members.
Kamaloka 53: Kaneus - Demon
An instance of medium difficulty is a demon with the ability of a Kamael to knock out weapons, Drain Health and minions that explode near death, causing damage of 500-600 (all the same and Critical Damage - as much as 3250, so do not forget that in the composition party required healer.
Kamaloka 56: Kaneus - Dark Knight
A fairly complex instance - a knight with a decent P. Def, and still summoning unkillable panthers (similar to Dark Avenger's panthers). Necessarily needed good tank, a healer (who will not switch to transform) and 3 DD. Killing tactics are as follows: Hate tank ‘it panthers and constantly runs in circles; at this time, DD is killing the boss.
Kamaloka 63: Kaneus - Venomous Storace
Quite a difficult boss. Constantly summons attacking minions, which commit suicide after 25 seconds, transferring all their remaining health to the boss. Therefore, a mage is required in the group, who must kill the minion before the end of these 25 seconds.
As a small summary, I will say that Kamaloka is one of those innovations that greatly simplify the life of novice players - after all, you do not need to fight with competitors for it, guard the resurrection of a monster and do such unpleasant and boring things. So good luck to you, gentlemen, and ... Stay tuned.
Solo Kamaloka on RuOffe
Solo Kamaloka (or Rim Kamaloka), also known as Kamaloka Outskirts, Hall of Nightmares, is a temporary zone that can only be entered by one player and no more than once every 14 hours and 30 minutes. Thus, if you are in a group or have already been in the Kamaloka Suburbs during the specified period of time, then access will be closed.
In Solo Kamaloka, the player will have to fight with big amount monsters. Often, a murder will be accompanied by the appearance of a particularly aggressive monster. The main task is to kill as many of the latter as possible. After 20 minutes, an NPC (Pathfinder) will appear in the center of the room, thanks to which, by the way, you get to Rome Kamaloka. This NPC will give the player a reward based on the result (from F to S, rank F - count NG, didn't really fill anything, there will be no reward), and will also present either the Tracker Equipment or the Essence of Kanabion. The amount of Kanabion Essence given out depends on the level of Kamaloka:
- Gludio: 20-30, 25-35;
- Dion: 20-30, 25-35, 30-40;
- Hein: 30-40, 35-45, 40-50;
- Oren: 35-45, 40-50, 45-55, 50-60;
- Stuttgart: 45-55, 50-60, 55-65, 60-70;
- Rune: 55-65, 60-70, 65-75, 70-80.
Essences of Kanabion cannot be sold, exchanged or thrown away, but they can be put into the Personal Warehouse or exchanged for a reward:
- 10 Essences - Ranger Reward D-Grade Scroll: Enchant Weapon B (EWB);
- 20 Essences - Pathfinder Reward C-Grade Scroll: Enchant Weapon A (EWA);
- 50 Essences - Ranger Reward B-Grade Scroll: Enchant Weapon S (EWS);
- 100 Essences - Ranger Reward A-Rank Fire / Water / Wind / Earth / Darkness / Holiness Stone;
- 200 Essences - Ranger Reward S-Grade Fire / Water / Wind / Earth / Dark / Holy Stone.
Before moving to Kamaloka Solo Districts, buffs for Novice, KX buffs, buffs from supports, self-buffs do not disappear, unlike Group Kamaloka, where everything disappears positive effects(except buffs for Newbies).
During the battle, it should be remembered that monsters will not drop adena, but the player will have the opportunity to get hold of scrolls of enchanting armor of various levels and tinctures that restore HP and MP, as well as giving short-term buffs, the duration of which is limited to five minutes. Also, do not forget that Dopplers and Hollows (improved versions of monsters in Rome Kamaloka) with low HP can use an ability similar to Orcs' "Madness". In case of killing a player, it is possible to enter Kamaloka again, only the time will not be reset.
Attention, to get to Solo Kamaloka on RuOffe you must have a premium account activated.
Kamaloka - Labyrinth of the Abyss (Kama Locarno - Abyssal Labyrinth)
This new instance is for download.
The new Kamaloka, which does not affect the rest.
Available Kamaloka Labyrinth at levels: 29, 39, 49, 59, 69, 78
Entry level limitation: + - 5 lvl
To access, you must meet the following conditions:
- NPC at the entrance: Captain of Guard. (Captain in the Russian version)
- Access from PC-cafe: no. (Does not apply to RuOoff)
- Consumption of PC-cafe points: no. (Does not apply to RuOoff)
- Number: 2-9 people in the party.
- Play style: kill the raid boss.
- Game time: 45 minutes.
- Restrictions: once a day.
- Initialization: 5 minutes after logging out all users.
* New days start at 6-30 am server time, and the instance is initialized.
* After killing a boss, "Kamaloka Essense" is credited
* Access to Kamaloka - Labyrinth of Abyss is limited depending on the character level:
* Gludio / Captain Bathis (levels 24-34)
* Dion / Captain Lucas (levels 34-44)
* Heine / Captain Gosta (levels 44-54)
* Oren / Captain Mouen (levels 54-64)
* Schuttgart / Captain Vishotsky (levels 64-74)
* Rune / Captain Mathias (levels 73-85)
The labyrinth itself consists of four floors (it is unrealistic to get lost there, despite the name):
On the ground floor, there is a crowd of thick, aggressive mobs. In terms of HP, something in between monsters x8 and weak RB. For killing mobs, they do not give experience, nothing falls from them either.
On the second floor there are 5 of the same fat mobs, probably magicians. They don't give anything for killing them.
On the third floor, there is one fat mob with a strong attack, for killing which they give experience.
And on the fourth is a full-fledged RB with security. It drops experience, things, guns, pieces and points, Vitality is restored.
You can leave the mobs on the lower floors without touching them, just walk around the wall or under the database, but there is an opinion that when the lower rooms are cleared, the characteristics of the RB drop and it is easier to kill it.
Publication date: 01.06.2016 16:01:05
Addition " Blood and Wine"Added a lot of new content to the game. There is really a lot of it. According to the developers, players will spend about 30 hours in the new DLC. If you are a perfectionist and love to complete games one hundred percent, then "Blood and Wine" will take even more of your time. Of course, there are a lot of new items in the expansion. Of particular value for players are traditionally sets of equipment that will not only protect Geralt from various evil spirits, but will also delight players with their appearance... In the new addition, you can equip your character with powerful armor and weapons. Naturally, all this equipment should be obtained first. We will try to explain how to do this in this guide. Get ready for the fact that the search for some sets will require a lot of game hours and effort from you, but, as is usually the case, difficult and long adventures end with a good reward.

Where to begin?
As mentioned above, new sets of equipment have appeared in the new expansion. Your Geralt needs them to deal with the monsters that inhabit the lands of Toussaint. If you think you can handle them without new armor, then we hasten to disappoint you, because the level of enemies in "Blood and Wine" has grown. Of course, if your hero is "pumped" for this expansion, then most likely you will not have problems with new opponents, at least on initial stages... In the new addition, another level of equipment has appeared, which is called " Grandmaster". To start your search for Grandmaster sets, you need to find a blacksmith.

Travel to Beauclair, the capital of Toussaint. You will find a blacksmith's shop in the southern part of the city, near the sign that indicates the Nilfgaard embassy. On game map this shop is marked with a sword and armor sign. When you find a shop, go inside and talk to its owner, who will tell you that he wants to become a grandmaster. A conversation with him will lead to the beginning of the "Master, Master, Master, Master!" Do not forget to ask him about the witchers who came to him earlier. The blacksmith will tell you how to find new kits. Now you need to successfully complete one of the treasure hunts. Once you do this, you can create grandmaster sets.
Griffon Grandmaster Kit
The Griffon School Grandmaster Kit is not a completely new set, as it is an update to an existing one. To get exactly the grandmaster version of the set, you must have at your disposal items from the Griffon School Master Set. In addition, you will, of course, need various ingredients. It is worth mentioning that your Geralt will be able to equip with the grandmaster set only if he has level 40.
First, you should head to Moncran Castle, which you can find if you go northwest of the city. Get ready to meet a large number of robbers who live in this area. You need to get to the destroyed tower. Once in the ruins, turn left and go straight. Near the tower you need to dispel the illusion, and then go down to the lower levels. Now you need to find a crystal on the table. You can do this with the help of your witcher instinct. In addition, this ability will help you find the button on the wall.

When you have the crystal, go down even lower, and then apply it near the far wall. Now open the portal using the Aard Sign. Naturally, you need to use this portal, behind which the golem will be waiting for you. He will try to kill you, but your abilities should not allow him to carry out his plan. Having dealt with the monster, take a good look around the whole room. In it you can find three blueprints that will help you craft a silver sword, armor and pants for the grandmaster of the Griffin school.

Of course, this is not a complete package. You just have to get a steel sword, gloves and boots. Leave the castle ruins and head south. Your goal is the ruins of the Ussar fort. In this area, you will come across a large number of monsters. If you want, then get your weapon and fight with them, but if you don't want to waste your time fighting these creatures, then get close to the ruins on the east side. Go to the stairs and opponents will not notice you. You will find a chest under the stairs, and inside are the three remaining blueprints.

Specifications
Like the master version of this set, the Griffon Grandmaster set is a medium armor class. This set is well suited for those players who rely on magic signs. Reaching level 40 and obtaining the Griffon set, you will strengthen the power of your signs and receive protection from all types of attacks. If your character is wearing at least three things from the set, then he will receive the ability to use one of the signs in standard mode, after using the sign in the standard mode, for which the energy was expended. If you equip your Geralt with six items from this set at once, then he will receive an even stronger bonus. Yrden's trap size will be increased by 40%. In addition, being inside the Yrden trap, Geralt will restore energy 5% faster, his sign power will increase by 100%, and his damage will decrease by 20%.
Grandmaster kit of the Cat school
The second set about which there will be a speech in our review, is the set of the Cat school. The first place you go will be the house of Bartholomew de Launay. You can find it in the north of Toussaint. When you find this house, you will immediately face a problem - the gate will be locked. Do not rush to return home, because you are a witcher! Is there any lock that can stop you?

From the gate, go to the right and make your way inside along the wall. You will come across robbers who will threaten the merchant's life. Your task is to kill the bandits and talk to the merchant. He won't tell you anything useful, so move on. Now find the red building that is to the left of the gate. Go inside and find a portrait of a man. Interact with him to make a blueprint grandmaster armor School Kota ended up in your inventory.

After obtaining the first part of the set, go for two more. This time we will look for boots and pants from this set. Reach the ruins of the Gallion Palace. Be prepared to meet with the robbers and the boss, if you have not previously liberated this territory. In any case, you need to find a chest, which will contain two blueprints. You can find him near the campfire.

Now let's find the blueprints for the gloves and both swords. Once you have obtained these three blueprints, you will fully assemble the Grandmaster Kit of the Kota School. Your starting point will be the Gallion Palace, to be more precise, its ruins. Head south and find the Stuffy Pits Cave. You will have to draw your sword again to fight your enemies. This time, they will be just weeds. In the cave, find a bed that will stand near the corner. In the same place, you will find three blueprints.

Specifications
Like the new Griffon School set, the Cat School Grandmaster Set will require you to level 40. This kit belongs to the class light armor... He will be an excellent choice for those who know how to skillfully handle weapons, perfectly parries and dodges enemy attacks. Equipping Geralt with the Grandmaster Set of the Cat School, you will maintain excellent speed and receive decent damage. Three pieces from this set will give you a bonus to quick attacks, but only after a successful strong attack. By collecting six items, you will significantly increase the damage from attacks that you will inflict on the enemy from behind. In addition, such attacks will overwhelm the target.
Bear School Grandmaster Kit
Your first target will be the village of Floviv, which you need to get to. Now find the destroyed building. Its fragments lie under the roof. Use the Aard Sign to clear the passage of the remains of the structure. Having done this, go downstairs and turn right. You will find a chest with three blueprints inside. They will help you craft a silver sword, armor and gloves of the Bear's school.

You can get three other blueprints of this set in the cave, which is located near the vineyards. We will again use the aforementioned village of Floviv as a starting point. Move north from the settlement and find this cave.

Inside, you will stumble upon a warning. Now use your instinct to discover the marks that will lead you to the dead witcher. Search him and take the remaining blueprints. Of course, inside the cave you can meet monsters who will not be very happy about your visit. Using the blueprints, you will be able to create a steel sword, pants, and boots from this set.

Specifications
The Bear School Grandmaster Kit is heavy armor. If you decide to use such a set, then be prepared for the fact that your energy will recover slowly, however, you will receive a solid bonus to defense, so your enemies will have to work hard to kill you. You will be protected from most types of attacks. Plus, the Bear School Kit will help you gain adrenaline points faster. The bonuses of this set are associated with the Quen sign. You will receive the most powerful bonus if you collect six pieces of the Bear School Grandmaster Kit. In this case, the damage from all the abilities of the Sign of Quen will increase by 200%.
Wolf School Grandmaster Kit
To get the blueprints for the Wolf's school grandmaster kit, you do not need to travel for a long time, since all parts of this set can be found in one play area. Go to the camp, which is located near the Gelenser farm. Your task is to find Isabelle Duchamp's diary. When you have done this, head to the crypt ruins. To enter the ruins, you will need to remove the barrier. This can be done with the help of a crystal, which you can pick up from a skeleton located near the entrance.

When you go inside the crypt, go to the first fork and turn left. Run over the ghost. Once in the room with the beast, break through the far wall with a normal attack. Go to the cave. Now get to the far end. On your way, there will again be a wall that can be destroyed with a normal attack or the Aard Sign. Then turn left. Deal with enemies who will attack you. The remains of the witcher lie under the rubble. Search them for three blueprints that will allow you to create a silver sword, steel sword, and gloves.

Three other blueprints for the Wolf School Grandmaster set can be found in the same crypt. The blueprints are in a bag in one of the rooms.

Specifications
As with other grandmaster sets, the Wolf school set will have to be crafted from a blacksmith. Do not forget that your character must be at least level 40. The Wolf School kits have always been popular with the players, and it should be said that they deserve it. The Grandmaster version is the best option for those looking to balance their offensive and defensive skills. This kit will help you gain adrenaline points faster, increase resistance to piercing, blunt, cutting, damage from monsters and elements. Putting on Geralt three pieces from the Grandmaster's set of the Wolf school, you will be able to apply up to three oils to your sword at the same time. If you become the owner of a full set, you can throw bombs without delay.
Manticore School Grandmaster Kit
Unlike all the previous sets that we described in this guide, the Manticore school grandmaster kit is a completely new outfit. If you are a die-hard fan of the Witcher series of adventures, then most likely you will remember that the same set was present in original game which came out almost nine years ago. Another feature that makes the Manticore set stand out is its search. This may not take too long for some players, but you better be prepared for the fact that you will have to work hard to become the owners of the desired set.
First, we will try to find the blueprint for the sword. First, you should go to the destroyed prison Bastoy. You can find it in the northwest of the capital of Toussaint. Now look for a dilapidated tower. Climb onto it and the first blueprint for the Manticore School Grandmaster Kit will be yours.

You can find the drawing of the armor in the cave, which is located east of Beauclair. In the cave, find a wall with a bunch of paper sheets - one of them is the blueprint you need.

Now go in search of blueprints for boots and pants. You need to get to the Swan Sanctuary. You can find this structure in the northern part of Toussaint. Go inside the sanctuary and get to the wall, which you should hit with the Aard Sign.

In the sanctuary, a ghost will attack you. Kill him and find a small chest. Inside, besides the blueprints for the boots and pants, you will find the following clue.

Not tired yet? Then let's find a drawing silver sword... Use Beauclair again as a starting point. Get to the cave, which is located in the southwest. Get ready to meet several monsters there. Go straight. When you come across beggars, give them some money.

Soon you will see the ghost of the prophet and the chest, inside which will be the desired blueprint for the silver sword.
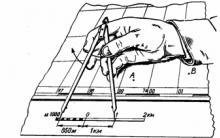


: methods of orienting the map (scheme), the procedure for identifying landmarks, determining your location, comparing the map (scheme) with the terrain")
 Satellite map of Yanao high resolution")


Satellite map of Polotsk Villages of the Polotsk district of the Vitebsk region
Gulrypsh - a summer cottage for celebrities
Old topographic maps of the Tula province
Working bots for the game slammer Download bots for slammer for damage
Mods for Minecraft PE Also included in the Redstone assembly are such blocks as