Somehow they are sitting in a bar with a glass of beer a longtime fellow with a svobodovist ... Stalker anecdote ...
Before starting directly, I would like to make a small introduction. Firstly, regarding the technical part. Always play only with the patch itself latest version... If you have a dual or more core processor, and the game "still slows down", google the CPUControl program, start the game, minimize it, start CPUControl and assign the required number of processors to the xrEngine.exe process. Update your drivers.
Secondly. Save often. Not only for the fast one, but also for a separate slot. This will help. Trust my experience.
Thirdly, and this is the most important thing, given passage based on the game with the modification Meceniy (Strelok) Solynks v1.0.5. I recommend going through with this modification, or with its later version (at least, with any other modification, more or less global).
I strongly implore you against using "naked" original game... Of course, "the taste and color of the bloodsucker is not your friend," but the taste in this case will be very perverted, in my opinion.
Many fans of the game "Stalker" were faced with the problem of the impossibility of game world carry a lot of weight: the default weight limit is 60 kilograms, which, of course, is not enough and causes a lot of inconvenience. After all, the player would like to collect so much swag! But I just can't take it.
Of course, 60 kilos is a considerable burden, and even a huge one, and therefore the developers focused on realism, not allowing to carry more weight, except with the help of an exoskeleton. but it comes about gaming reality, and computer game That is, there is a game that in it you can always find a way to get away from realism, which means - increase the maximum allowable weight which is allowed to be carried.
How to Increase Your Maximum Carrying Weight
First, find the folder where the game is installed; it has one more attachment - the "gamedata" folder. Open it. There you will find another folder - "configs", open it and you will see the folder "creatures". It is in her that you will find desired file called "actor.ltx". As a result, your path to the required file will look like this: folder with "Stalker" Stalker \ gamedata \ configs \ creatures \ actor.ltx. You can open a file with the .ltx extension (not only actor.ltx, which we need, but others as well) with an ordinary notepad built into the Windows system by default.
When you open the file, you will find the line max_walk_weight = 60 The number 60, as you already understood, means the maximum allowable weight that the protagonist can lift and carry without assistance (if you use the "services" of the exoskeleton, this parameter increases significantly). Of course, you need to replace 60 with whatever number you want. You can stick, for example, 100 or more. Then save the text file (press the key combination Ctrl + S) and close it. Hooray! Weight problem resolved.
Now you need to take up the correction of the critical mass at which game character begins to abruptly and quickly lose strength during jumping and other movements. Find the file in the following path: gamedata \ configs \ system.ltx. When you open the system.ltx file with notepad, look for the line max_weight = 50... It is 50 kilograms, by default, that is the critical weight. With him on his back, main character begins to wear out rapidly. You act in the same way: change the value of 50 to the number that you consider appropriate for yourself, then the document is saved, closed - everything is ready for you.
Works in all versions of the game Stalker - Shadow of Chernobyl, Call of Pripyat and Clear Sky!
Run the game and make sure all your fixes work. It should be noted that the above manual is applicable for all variants and series of the game "Stalker" - this is Shadow of Chernobyl, Clear Sky, Call of Pripyat... In addition, it is relevant for various mods, in each of which you can adjust the parameters of the critical and maximum allowable weight at your discretion. Now your opportunities are significantly increased, that is, you can fulfill your needs and collect as much swag as you want or how much you can get. The main thing is to calculate the parameters correctly and do not overdo it. Good luck and good booty!
The second part of the series of thrilling shooters "Stalker". If you have already gone through the plot of the first part of the series, then you probably remember that its main character is a stalker named Scar. You can download the game Stalker Clear Sky for free and find out how this hero ended up in restricted area... The development of the plot begins in 2011. Scar acts as a guide for a group of scientists and tries to lead them to the center of the restricted area.
As a result of the release of energy, the entire expedition dies and Scar himself comes to life on the basis of the "Clear Sky" group. Further, a whole chain of exciting events awaits the hero. He has to solve many secrets, complete various quests, but the most important task will be the destruction of the Shooter. Whether it will be possible to fulfill it or not depends only on you. First you need Stalker Clear Sky torrent download for free. You won't get bored with this game. There is no doubt about it.
Game screenshots S.T.A.L.K.E.R
Video review Stalker Clear Sky
Stalker: Clear Sky (S.T.A.L.K.E.R .: Clear sky) released in 2008, according to the plot is the prehistory of the beloved Stalker Shadow of Chernobyl (S.T.A.L.K.E.R .: Shadow of Chernobyl).
The storyline tells the story of a mercenary nicknamed Scar, apparently a guide who, leading a group of scientists through the swamps, unexpectedly falls into a powerful release, but fortunately survives. After the story of Lebedev, the commander of the Clear Sky detachment, about the cause of the emissions in the zone, he is tasked to urgently kill the Strelka, since he penetrated the territory of the brain burner and the zone, making an attempt to destroy it, will soon destroy all life around, otherwise and the whole world.
The last official version of Stalker: Clear Sky 1.5.10 was released on July 6, 2009. It is on the basis of this version that this article was written in order to help gamers make life easier for themselves in the zone.
The game world of Clear Sky consists of 12 locations:
- Swamps,
- Cordon,
- Dump,
- Research Institute "Agroprom",
- Dungeons of the Research Institute "Agroprom",
- Dark Valley
- Amber,
- Red forest,
- Military warehouses,
- Limansk,
- Abandoned hospital
- and, in fact, the Chernobyl nuclear power plant.
On the territory of which several groups are diligently, tirelessly working and fighting for domination over the zone:
- Clear sky,
- Neutral stalkers,
- Military,
- Renegades,
- Bandits,
- Mercenaries,
- Liberty,
- Duty,
- Scientists,
- Monolith.
The passage of the Clear Sky Stalker does not cause any particular difficulties for the player, but for a more comfortable game we will reveal some of its secrets.
How to increase your weight carrying capacity in Stalker: Clear Sky
In order to increase the carried weight in Stalker: Clear Sky, there is no need to install additional mods on it. This can be done in the game folder. You only need to edit, using notepad, the ACTOR.LTX files located in the GAMEDATA / CONFINGS / CREATURES folder and SYSTEM.LTX located in the GAMEDATA / CONFIGS folder.
To increase the transferred weight in these files, we change the following parameters:
In ACTOR.LTX:
- max_item_mass - the maximum carried weight at which the Scar can Run (set the value to 5000)
- max_walk_weight - the maximum weight at which the Scar can move (set the value to 6000)
IN SYSTEM.LTX:
- max_weight - maximum weight to be carried (set to 5000)
The values can be set at your discretion. Just be sure to change them in two files at once.
If there is no GAMEDATA folder in the game folder, do not despair. It just isn't unpacked. It can be unpacked using a special unpacker, which is a bit dreary, or you can download it below and add it to the game folder.
Also, in these files, you can change the basic parameters of the character, such as general health, speed of wound healing, jump strength, running speed, tolerance to radiation, explosions, bullet wounds, psi radiation, and so on. Or even the characteristics of the weapon: accuracy, destructive power, clip capacity, and so on.
How to add money to Stalker: Clear Sky
As such, cheats for money, like any other, were not provided for Clear Sky, so you cannot do without third-party programs such as Artmani. But there are a few tricks that attentive gamers have spotted.
1. For example, in the "Red Forest", from the forester, you will receive the task to pick up the artifact "Compass" from the Banites. After you take it away, give it to the Forester, after completing the task, and he will give you a rifle. Then immediately exit the dialogue without asking the next question. Next, talk to him again and he will again give you a rifle. And as many times as you want. Well, I don't think it's worth explaining how to sell.
2. The second bug in the swamps, at the very beginning of the game. You need to go into minus money, into debt. You have 200 rubles of money, from weapons only PM. Exploit it as best you can, spoil it, break it. After that you carry it to the local Kulibin and improve it. Then you press "fix" and you have -200 rubles of money. And buy anything. The money won't run out.
Selling nothing, in order to remain with a negative balance, reach the point in which the bandits take absolutely everything from you - it is in the junkyard, in the basement, or give it to the roof at the entrance to the location. And the balance goes very much a plus.
Unique weapon in Stalker: Clear Sky
There are an abundance of weapons in the zone, of all kinds, for every taste. It makes no sense to describe each barrel separately, so we will only talk about unique weapon, which can be obtained either with difficulty or by accident.
- Nominal PM can be obtained by completing the quest of one of the neutral stalkers at the Garbage;
- Modified barrel 45 caliber can be taken from the leader of the bandits named "Yoga";
- Tank machine gun can be found in the hatch of the tank, in the Red Forest location, by taking the task to search for it;
- Gangster Chaser 13 can be obtained by completing the quest of one of the bandits;
- Ripper Shotgun give for completing the task of a long-term worker at Agroprom.
The rest of the weapon does not need a description. It is quite simply acquired in the course of the game's plot.

After the launch of the campaign, you will wake up in the apartments of "Clear Sky" - a group around which the plot begins to twist.
Lebedev, who is the leader of this association, will speak to you and explain how you got here. Next, you need to talk with the bartender, who is located in a building nearby.
First task

The bartender will not detain you for a long time and will send you to Lebedev. To fight off the checkpoint, which was attacked by monsters, you need to take equipment from the warehouse.
Lebedev will hand you medicines and a sawn-off shotgun - now you can go to the "highway", for which you need to report to the soldier of the "Clear Sky".
Swamp

Move carefully in the swamps, as anomalies are scattered everywhere. On hard difficulty they can kill you instantly, so stay alert and use a bolt that should be thrown in front of you.
After the first bridge, pass the anomalies and listen to Lebedev's advice on local dangers and treasures. The latter, artifacts, can be found using the detector (key "O"), and right now you can pick up your first treasure - Medusa, which will appear nearby.

By themselves, artifacts have various negative and useful characteristics, which is why it sometimes makes sense to attach them to the belt of a suit in order to activate bonuses. V this moment your suit does not have matching slots.
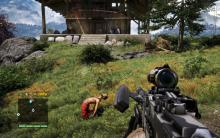
At your destination, you will stumble upon dead bodies and a watchtower. Here, examine the carriage for cartridges, and then get ready for battle - boars will attack you.
It is necessary to quickly deal with them (shoot in the face) so that there is time to collect the swag from the fallen comrades, and then hide from the outburst that has begun.
B aza "Clear Sky"

On the basis of "CHN" report to Suslov to receive a reward. Then look into the house next to where the handyman "Kulibin" is sitting - this person will give you a new task. At the tower, you have already found the flash drive that he needs, so pass the find to get a reward.
After that, go to Lebedev, who will hand over the next quest to cleanse the Swamps. Go outside and find the stalker "Nimble" if you want to get a briefing.

The guy will teach you the basics of survival in the Zone, tell you about your PDA and, if you toss him a coin, he will point out the location of three caches with valuables. When ready, ask your guide to guide you.
Big swamps

During this mission, you have to fight for the territory of the Swamp. Once here, prepare yourself to be attacked by a flock of flesh. By the way, if you do not make unnecessary movements, you can get around them.
On the spot, you will stumble upon Renegades, with whom you will have to fight anyway. Search their bodies and then move on.
You are required to provide assistance to the members of the "Clear Sky", the groupings of which are awaiting your appearance at various points (marked on the map). If you yourself participate in the attacks, you will get more money.

Explore the area in parallel. If you search, in the area you will definitely find a couple of caches with valuable items.
So, near the Fisherman's Farm there is a watchtower, at the top of which is PSO-1 (sight). When all the tasks of the same type for capturing points are completed, Lebedev will contact you.

At the base, talk to the commander, who will give you a new task to destroy the Renegades and seize the passage that leads to Cordon.
For artifacts

You will receive the largest amount of money from artifacts, which are innumerable in the Zone. In STALKER Clear Sky, in contrast to the first part, a special device was added - a detector, which allows you to find artifacts faster.
In general, if you want to find such a treasure (artifact), then first you need to find an anomaly. Sometimes you will stumble upon especially fertile fields - clusters of anomalies, called like "Grasping Hands", "Symbiont" and so on.

Specifically, there are no large clusters in the Swamps, but here you can find the improved Veles anomaly detector. It is located in the northwest of the location, in a cave near the fallen bridge (look under the mattress).
Renegades base

Before heading out to the renegades, it makes sense to complete some business. So, you may not have collected all the flash drives for Kulibin yet.
In the process of your search, explore all the houses and camps where you can find additional loot. Also, if you have saved up money, you should improve your favorite weapon in order to increase the damage.
Additional finances can also be brought by ordinary stalkers who need help. Some guys will need ammunition, others will need medicine.
On the basis of "CHN" you can get a couple of unique tasks to find personalized things - their completion will increase your reputation in the "Clear Sky" group (if you have already decided that you will join them).

Finally, head to the Renegades base. Together with your comrades from the "ChN" move to the northeast of Bolot, to a place called "Machine operator's yard". Get ready for a very hot meeting and a difficult battle in general, as there are an incredible number of bandits sitting there.
Keep in mind that your comrades can easily die, but this will not affect your reputation in any way. On the contrary, after the battle, you can loot the corpses of the fallen in order to collect good suits of ChN2, as well as good weapons like the AKM-74.
After completing the assignment, Lebedev will thank you. Now that you have chopped off all the tails, go to Cordon.
K ordon

Fresh stalker blood lives on the Cordon, Sidorovich, the military and other acquaintances with whom the player had a chance to meet in the first part.
When entering the location, Sidorovich will immediately contact you. A little further, you will go out on a wave of the military, who will indicate their intentions about all those approaching - to shoot to kill.
Open the map in order to understand your location: in the south of you there is a base of warriors, above - a base with Sidorovich. You need to bypass the military patrolling the territory and get to the beginners' base.
The problem of the military in Cordon is especially painful, since these guys are endowed with incredibly keen eyes. The machine-gun point of the military will notice you hundreds of meters away and begin to shoot very accurately at you, so be careful.

Use your binoculars to find the checkpoint and decide how to move around to get past them. Most likely, you will be noticed, so you will have to move under fire, running from stone to stone, from tree to tree, all the way to the fence.
After that, you will go down the slope, and then they will stop shooting at you. Pass the fence and step to the left, heading straight to the camp with stalkers.

On the spot, you can talk with fresh blood and take several secondary quests (one of them will give the already familiar "Wolf" to the players). To advance on the main storyline go to Sidorovich.
S. idorovich

The good-natured and husky huckster Sidorovich, if you didn't know, is one of the most iconic figures in the first part of the series ("Shadows of Chernobyl").
Sidorovich will not answer your questions about Strelka - first you must do him a favor. You have to find a swag for him, but first you will have to visit the stalker Valerian. The neutral leader is at his own base.

Before going to Valerian, you can make a visit to the military, who made you dance under the machine-gun fire. This time you can go in from behind and deal with the machine gunner, but, again, the work will still not be easy, since there are a lot of soldiers at that checkpoint.
Through the embankment

It is not long to go to the railway embankment - less than a kilometer from Sidorovich. On the way, turn off the road down (as viewed from the entrance to the beginners' camp) and go to the bridge under which the military is located.
Imagine, this guy will not shoot at you, moreover, he will even give you a task. It is not necessary to render him a service, and the task is not unusual - the standard "go and find".

On your way to the embankment, you will come across stalkers fighting the military. Help the first, and then ransack the bodies of the slain. You will see the base of neutrals shortly. Here, by the way, you can complete the same military mission, if you have one.
On the bridge you will find the "Teleport" anomaly, which will throw you into the right side of Cordon. Take all the items and the quest item in the tunnel, then return.
B aza of neutrals

The neutrals settled down very well: here you have two barracks, and walls, and a cozy view. In the first barrack you will find a huckster and a mechanic, in the second - Valerian himself, who runs the entire base.
Talk to the latter to find out about a very bad situation: the military, it turns out, hand over the whereabouts of the stalkers to the bandits, after which the latter ambush them. Next, it is necessary to interrogate Khaletsky - a major who may know about the very same swag of Sidorovich.

After a failed conversation, talk to Valerian again, who will ask you to deal with Khaletsky's comrades. The latter can be found at the ATP, which can be reached through the Elevator. Kill all the opponents on the ATP and collect valuable items (AKM-74 \ 2U is also here).
Help stalkers

When the battle is over, return to Khaletsky at the neutral base. When the major finds out that his comrades have died, he will immediately give you all the information about the swag.
Before leaving, you can help Khaletsky, but this, again, is not necessary. The help consists in transferring a pistol to the military, for which in return you will receive a tip to the cache behind the beginners' camp.

After learning about the whereabouts of the swag, take the things and return to Sidorovich. On the way, visit the soldier under the bridge to give him the discovered PDA. As a reward, you will receive the most common first aid kit.
Having assisted the neutrals, you got the opportunity to join their group. In general, in "STALKER: Clear Sky", like the original, there are many associations that you can join.

If you agree to become one of the neutrals, you will receive the Bear detector, which is significantly superior to the standard device, but at the same time inferior to Veles (you could find it in the Swamps), as well as five antiradiins.
A mechanic nicknamed "Van" will hand you a quest to find flash drives, and the huckster Shilov will help unload your backpack. Apart from the unique additional assignments, from neutrals you can also take quests to clear the Cordon from monsters (tasks are paid very well).

After exploring the Cordon and having dealt with all the cases (as well as having reported to Sidorovich), go to the Garbage Dump. You can get to the new location in two ways: through the pass in the northwest or through the checkpoint in the north.
Dump

Where do cockroaches live? Right in the trash. And the bandits? Of course, at the Garbage Dump! In the STALKER series, one cannot exist without the other, so get ready for frequent attacks from the "lads".
The first bandits will meet you immediately at the beginning of the location, however, fighting them is not necessary if you do not want to play a kind or neutral guy.

If you are not going to join the ranks of the gopniks, then in this case you should not shoot, but you should not approach the lads either, since they will immediately try to "gop" you.
The bandits are guaranteed to take all your money and leave them almost in their underpants, so either attack them immediately from afar, or go around.
When talking, the bandit will go to you and speak. Remove the cannon, if you are not afraid to lose money (or they simply do not exist), and give them all the currency.

If you refuse to give money, just step back, and then carefully step to the side of the hill (the bandits will not shoot now, since the corresponding script is still running). Then you can safely pass their outpost and go forward without firing.
Finally, there is an option that the lads will not be at the entrance at all - neutrals will appear here who will fight the bandits.
In this case, do not get caught in the crossfire and just wait to collect things from the corpses after the battle.
The dead stalkers sometimes have IL-86, TRs-301 and other good guns. When joining neutrals, just kill the gopniks.
Follow the main task to the indicated place. You will find him on one of the Dump hills, heaped up and surrounded by barrels.
D iggers

At the excavation site, examine the corpses of diggers who harvest resources here. At one of them, you will find a PDA with information, from which it follows that the fallen worked for a certain Vasyan. You will find the latter on the right side of the location, where he will fight off the Blind Dogs.

Save before approaching Vasyan, as during the battle the dogs can devour him. When the battle is over, the stalker will inform you about the location of your target - she is already in the Dark Valley.
Also, Vasyan, for a nominal fee, can show you several caches scattered throughout the location.
With talkers and bandits

Before leaving for the Valley, investigate the Junkyard for artifacts. Be sure to visit the Depot cellars and the Old Technology Cemetery, where a lot of resistance and very valuable loot await you.
If you want to join the ranks of the bandits, you need to not attack them during the entire passage. At the moment, if you have not killed a single gopnik and have not joined another faction, you can become one of them. To do this, go to their base and talk to their leader, nicknamed Yoga.

Also at the base, you can take a standard quest from a mechanic to find flash drives. And also Yoga will give you a unique task, distinguished by meanness and deceit.
It is worth noting that the "Seva" armor can only be pumped to the end by a bandit technician. A strange combination of high technology and lads in "adidas", but the fact remains.
Gopniks also have interesting task on shooting crows, the organizer of which is located near the bar. You can practice with him, or shoot for a while or for money.
Dark valley

Walkthrough STALKER Clear Sky has reached halfway, and now you have already reached Of the Dark Valley... You can get to this location in two ways: from below through the Garbage, choosing the path in the southeast of the latter, or from above through the same Garbage, choosing the path in the north-east of the latter.
In the first case, you will stumble upon bandits with whom you have to fight. Not far from the entrance, the lads' base is located directly, but personally you need to go upstairs to the Checkpoint.

In the second case, you will immediately find yourself at the checkpoint. Remove the cannon, as the commander of the group will approach you. He will talk to you about the Fang you are looking for and let you go in peace. Next, go to the Freedom base, which is located in the north of the Dark Valley.
Liberty

They just won't let you into the Freedom base, so first you must talk to Commandant Shchukin. It is necessary to complete an assignment for him, which consists in killing a psi-dog.
Before sending, buy cartridges and dump unnecessary cargo from a huckster named Ashot. The guy from Transcaucasia will help you empty your wallet in a friendly way and wish you good luck.

Go to the point on the map where you last saw a dangerous dog. The psi dog can be spotted from a distance, and for this you have to stop early and use binoculars.
If you have a powerful sniper, then you can immediately finish it off with an accurate shot. Otherwise, you will have to fight for a long time with it, since the psi-dog copies itself.
Having dealt with the mutant, return to Shchukin for a new task. This time you will have to get to the Freedom grouping, which is patrolling the area. Take supplies from Ashot and go to the destination.

On the spot, alas, you will only come across corpses, one of which has a PDA in the pocket. Take it to Chekhov, the leader of Svoboda, who resides in the main building of the base. In a conversation with the leader, it turns out that the commandant is to blame for the death of the soldier, whom you have to find and punish.
To the commander

Use the services of a guide to quickly travel to your destination. With the help of the latter, you will find yourself half way to the goal, but then you will have to stomp on foot. Soon you will hear the sounds of shooting - there svobodovtsy are fighting with mercenaries, and you need to help the first.
After shooting everyone, finish off the commandant and pick up the PDA from his body. After that, return to Chekhov and report your success.

As a reward, in addition to currency, the Freedom leader will tell you more information about the Fang. Also, Chekhov will give you several secondary quests, which are optional if you are not going to become a svoboda.
Before leaving the location, explore its corners for valuable resources. Technician Yar, as follows all the techniques in STALKER Clear Sky, will give you a task to collect flash drives on the map, so it makes sense to complete it. The bartender and Chekhov can tell you about the whereabouts of the caches.
Even if you complete all the Freedom tasks that are available now, Chekhov will not accept you into the ranks of his organization. But don't worry - the opportunity to become a svoboda will appear a little later in the story. If you have finished all the business in the Dark Valley, go to the Junkyard.
From the roll (part 2)

Here you have already learned most locations, so now you need to visit the Flea Market. Until that moment, there was a closed door to the basement, but it finally opened.
An ambush awaits you deep in the building, so if you don't want to lose loot and then look for it, hide your belongings on the second floor of the building in a blue box where neutral stalkers are located. You cannot add money, so you will lose it in any case.

In the basement, you run into a stretcher and disconnect, after which the bandits will take all your belongings. When you wake up, take the pistol and the detector, and then return to the blue cache and take all the things if you decide to hide them.
Open the map and find the whereabouts of the lads. Those will be in their camp, where you must go from the rear to solve them all without a trace. After the battle, you just have to collect loot and return your things. Move forward in the direction of the Agroprom Research Institute.
N II "Agroprom"

The Research Institute occupies most of the location, however, around the complex itself there is an open area, where many anomalies and artifacts are scattered. At the start of the location, contact the person at the checkpoint to find out about the Duty squad.
This group is also here, and it went to the same point where you want. Follow them to make your way easier and fend off snorks and other critters you meet.

In the middle of the location, you will find a base of neutrals, led by a man named Orestes. He is accompanied by the mechanic Aydar and the huckster Drozd, who will offer you a standard set of tasks, as well as tips on caches.
Before leaving, search the complex, on the second and third floors of which there are electrical artifacts. Immediately find the medium-sized tanks, near which there is a hatch.
The latter will lead you to the sewers, where a strange stalker named the Hermit lives - you can buy improved weapons from him.
On the left side of the location there is a swamp, where the quest for neutral stalkers begins. The guys are moving towards Amber - help them in the fight against mutants in order to get the improved Zarya suit.

Duty's shelter is located below and to the left of the location, where the squad will go.
Inside you will find many interesting things: an aviary with monsters, which is a kind of cabinet of curiosities in the Zone, which should have been added back in the "Shadow of Chernobyl", but it was cut out at the last moment; the shooting gallery, which is a mini-game you are already familiar with (like shooting crows) and headed by Major Zvyagintsev; as well as a bar run by the bartender Kolobok, a repair shop headed by Gromov, and a shop whose huckster is the unsociable Mityai.
You will find the head of the Debt faction on the top floor of the main building. To him, Krylov, you must eventually go to continue the main plot.
P land of the Research Institute "Agroprom"

Your questions about how you can get into the dungeon of the scientific complex will not go unanswered. Krylov will tell you about the only way - a big hole, which was, as you might guess, created by mutants.
Inside, the snorks have founded a whole nest, which poses a huge danger to others. Before letting go, Krylov will ask you to destroy this nest for ten thousand currency.

It's time to visit the nest of snorks, where you shouldn't go without equipped. Collect armor-piercing cartridges, buy first-aid kits and go to the group of Dolgovtsy led by Nalivaiko, which is located near the hill. Together with them, you must deal with the snorks if you want to get a tip for a good stash.

Move forward to the dungeons. You will find yourself in an extensive corridor full of hot anomalies. Go to the opposite side of the dungeon, while dealing with snorks.
As a result, you need to get to the stairs upward, which will lead you to a small room with boxes. Collect the swag and continue through the outhouse, dotted with Kisel (anomaly).
After a while, you will be stunned, the level of mental impact will rise and you will begin to lose control - these signs will mark the appearance of a controller.

If you are confident in your abilities, then it makes sense to close the distance with the monster as quickly as possible, since he is not able to fight in close combat, and then nail him down with a sawed-off or knife.
In the next room, a pump control panel awaits you. Be sure to save before activating the valve that will let water into the dungeons. After that, turn the mechanism and run behind the bars, without stopping for a second.

Pass the spiral staircase and the corridor, run past the jerboas and reach the stairs that will lead you outside. As soon as you are free, the corresponding cut-scene will start - the whole dungeon will be flooded.
Now you need to go through the upper level of the complex, where the gopota settled. Deal with the opponents and find the Shooter's Cache, which is located in the same place on the "Shadow of Chernobyl".
If you have not played the first part, then in the corridor look for a ventilation entrance in the wall - it is he who will lead you to a cache of useful information. Having studied the PDA, you will understand that you need to go to Amber.
On the way to the exit, you will encounter fiery poltergeists - kill them by shooting exactly in the center. Finally, all you have to do is visit Krylov to receive your reward. After that, go to the northwest of the location, from where you can get to Amber.

From this point on, you can choose one of two main factions: Debt or Freedom. The first group will present you with a PS5-M suit and a Thunder-s14 cannon. The second - with a suit "Guardian of Freedom" and a cannon "SGI-5k +" (plus three first-aid kits).
It is not necessary to take sides, moreover, the choice of a faction will instantly make you the sworn enemy of the opposite, so you will have to fight with it on Yantar. Neutrality is the safest option.
I am ntar

A dry lake will appear before you Amber, the bottom of which was chosen by the scientific station, headed by the scientist Sakharov.
Before visiting the professor, you will have to deal with the zombies, while moving very carefully. Keep in mind that small oases on the lake (not dry areas) have a high radioactive background, so they should be avoided.

Fight zombies with firearms- a wasteful undertaking, since these guys are very clumsy and slow, but at the same time they have a lot of health. If there is no risk of being surrounded by several ghouls, just go around one of them and plug it with a knife.
When you have dealt with all the zombies, scientists will let you into the bunker. During the conversation, Sakharov will give you a task to find the PDA. Here you can also get secondary tasks from stalkers acting as bunker guards.
Get to the destination and kill all the blind dogs. Examine the bodies of the fallen stalkers, pick up the PDA and return to Sakharov.
Restarting the psi installation

After a painstaking study of information from the CCP, Sakharov will identify the cause of the strong psi emissions. The point is the installation, which is located next to the bunker, and you will have to turn it off.
First of all, visit Lefty, who is waiting for you near the factory. Together with him, go inside and climb up the hangar. When you turn off the installation, you have to fight the zombies.

Now that the task is completed, report to Sakharov and go to the Red Forest, the path in which lies in the northwest of the location.
Red forest

At the entrance to the location, you will suddenly find the Shooter - the very elusive avenger from the first part that you are hunting for. He will run away from you, so go in pursuit. At the bridge you will be stopped by his neutral comrades-in-arms, so get ready for battle.
After the battle, you will learn that the Shooter ran into the tunnel and blew up the entrance. Next, Lebedev will contact you, who will tell you about another route to the Chernobyl nuclear power plant, which passes through Limansk.

One problem is that the bridge to the city is defended by the Renegades, so you will have to use the help of other stalkers, for example, the legendary Forester.
Forest

When neutrals start losing to you, they will surrender, so you can interrogate them. One will agree to take you to the Forester in exchange for his own life - a great deal, isn't it?
After a while, the guide will stop near the group of stalkers, refusing to go further. Here you will receive an SOS signal, however, when you arrive at the place, you will find only corpses.
Pick up the Red Forest map from the corpse, which shows a unique spatial anomaly - it is through it that you can get into the Forester's domain.
At the destination, you will stumble upon a group of loners - talk to their leader in an exoskeleton, who will ask you to lead his guys through the tunnel for an excellent reward - an artifact.

One way or another, but you still better agree, because a pseudo-giant awaits you behind the tunnel, and additional fire will come in handy anyway.
A flock of snorks awaits you in the tunnel - throw a couple of grenades inside to smoke them. A little further you will stumble upon the Symbiote anomaly, and then - on the pseudo-giant. If you want to receive a reward for escorting lonely, then at least one of them must survive.

After passing the tunnel, go to the anomaly. You will find it right above the tank hatch, deep in the forest. Deal with a couple of monsters from afar to clear the path, and then jump up and go through the portal.
As a result, you will find yourself near the hut of the Forester, who will tell you many amusing stories and give you the task of finding the missing group of stalkers.
Army warehouses 1

You can get to this part of the location from the north of the Forester's hut. On the spot, you will stumble upon Svoboda members, and even further - on mercenaries who settled in the village.
They are headed by a guy in exo nicknamed Hog - it is from him that you will receive information about the disappeared stalkers.
Go to the destination where the looped anomaly mentioned by Hog is located. You must get to the tower, where the signal will be amplified. Next, deal with all the mutants and return to the Forester.
Compass

The forester figured out how to help the missing guys - with the help of the Compass artifact. To find the last one, step down from the Forester's hut, past the gate, and then head west.
Soon you will reach the hill, beyond which the sounds of the battle will be heard. Reach the entrance to the mine and kill all the renegades.
Before leaving, it makes sense to deal with the poltergeists at the entrance to the mine, since there is also a hole in the dungeon hidden by boards. Inside you will find even more poltergeists, which you can be sure will be difficult to fight. There you will find the desired artifact and a grenade launcher.

For returning the Compass to the Forester, you will receive an upgraded VS Vintar sniper to the limit. Now visit the warehouses again to contact the disappeared stalkers.
Army warehouses 2

Hog and his guys will not agree to go deep into the military base with you, however, the leader will note that the Svoboda people will definitely go, since in the past the base belonged to them. Together with svobodovtsy clear the base, killing all the military. Now all that remains is to climb onto the tower and send a message.
M ost to Limansk

You will be contacted by Lebedev, who will tell you about the upcoming mess near the bridge. Get to the point and get ready for battle. After a while, the Leshy's group will approach the bridge, but you will have to cover them while they lower the bridge.
Basically, you will have to watch the hill, since the renegade snipers crawl out from there. When the bridge is lowered, go to the other side and finish off the remaining opponents. You can now continue chasing the Gunslinger.

Talk to Leshim before leaving to receive your reward. "Clear Sky" wants to thank you in the same way, so visit their base if you want to get fifty thousand rubles and a powerful rifle "FT200M".
From the moment you enter Limansk, the final part of the STALKER Clear Sky campaign will begin. That is why spend all your money and buy ammunition and medicine to the maximum, since it will be impossible to return back.
L imansk

Examine the tunnel that is near the bridge. Once in Limansk, follow the CHN fighters until you find a wounded bandit. If you give him a first aid kit, then his comrade will agree to ambush you.
It turns out that in front, near the cars, there is a stretcher (in fact, it is far from alone there). When you get to the first stretch, a gopota will attack you.
Deal with the first ambush and move on. Soon you will stumble upon a battle between monoliths and bandits - here you need to destroy the machine-gun point located in the house. After that, you must deal with the Monolith's minions.
M onoliths

Act quickly and do not sit in one place, as they will try to smoke you out with grenades. By the way, the monoliths are equipped with an exoskeleton, so it is worth shooting at them with armor-piercing cartridges and exactly in the head.

Continue towards the bridge. From the intersection, reach the anomalies and turn east towards the arch to be passed. From the playground, head east until you reach the hill, behind which there is a staircase. Go into the house and get out through the rooms from the opposite side.
Below you will find the leader of the ChN, who will give a new task - to move to the other side of the canal, where the military has settled. This task lies only with you, since the CHN fighters at this time will distract the fighter for themselves. Run over the bridge and get to the two-story building where the machine gun point is located.
C triple site

After clearing the territory, leave the house on the other side and move west to the bridge. On the road to the site are scattered spatial anomalies so you have to go a certain way (they always return to the beginning of the road).
First, go around the first anomaly from the east, then go through the stairs and go down the path; after that, get to the bus and climb inside the car on the side of the box to get out on the other side; finally, reach another bus opposite and go around it on the left.

On the horizon from the traversed road, you will find a half-empty building where the Monolithians have settled. You will have to fight them methodically, as the guys love to knock you out with one bullet in the head.
After the fight, get to the last floor and go out to the other side of the roof, from where you can get down. Thus, you will get to the construction site - go to the fence leading into the hole.
About the edge of the city

After the fence, you will meet friends from CHN, with whom you will have to fight against fanatics. Next, you run into an electric fence - you need to cut off the voltage by finding a generator. The latter is in the back, where you met the CHN fighters.
From that place, go to the buildings near the fence and find an attic in one of them. Get out through the attic onto the roof and go to the next house, and then, using the pipe, go to the next one.

Finish off the monolith on the spot and get to the room with a staircase that leads to a new platform. Finally, jump to the left and break the boxes to get into the room with the coveted generator. Chop it off and go past the fence. You'll get new task- get to the dungeons of Pripyat.
Hospital

Once there was a military medical center, but now there is only one emptiness. At the SOS signal, jump into the hole and go past the tunnel to enter the building.
Climb up the stairs and find the ChN fighters there who want to get to the nuclear power plant. They are interfered with by a fanatic sniper, and it is you who will have to end him.

Go to the east of the hospital, at the same time fighting off the attacks of the Monolith. Go through the broken wall and continue east as you go up and down.
Here the machine gunner will interfere with you - the allies will distract him so that you can pass. Go into the next room and kill a couple of fanatics, then go over the pieces of wood to another house.
Helicopter

After that, you will need to return on the boards to the CHN fighters. Near the group, you will find a crevice in the wall - go there and pass the tunnel. At the exit, quickly hide, as fire from the helicopter will fall on you. Use the machine gun to blow up the bird.
After that, the CHN will blow up all approaches so that the fanatics can no longer receive reinforcements. Finally, you just have to get to the Chernobyl nuclear power plant while your friends are fighting the Monolith.
Ch NPP

V new location you will be taken directly to the center of the Zone, to the nuclear power plant itself. Here Lebedev will contact you to explain how you can destroy the Strelka. First, you have to turn off its protection from psi-radiation - for this, attack the enemy with the help of EM-1.

The shooter will fight not only with you, but also with fanatics, which will greatly simplify your task. If the enemy will elude you, then chase him through the portals that allow you to close the distance.

Ultimately, Strelka's defense will be cut out, as Lebedev will inform you about. But then the Zone will start to go crazy, after which a powerful release will occur.

The final video will give more questions than answers to what happened to the main characters in the game. This completes the passage of "STALKER Clear Sky".
Video: walkthrough S.T.A.L.K.E.R. Clear sky
Like, if useful


Crosswords for children 6 years old online
Educational games Games for the little ones find a pair
Learning to play minecraft
Games for account Countdown from 10 in the game
Find an extra item games for 7 years