Prices for making layouts
- With a circulation of more than 5000 cards, layout development - AS A GIFT!
- With a circulation of less than 5000 cards, the development of a layout costs from 2000 to 3500 rubles.
- Modification of the layout costs from 500 to 2000 rubles.
The design of a plastic card should be bright and memorable. After all, your client will simply lose a card with an ordinary design among dozens of the same offers.
- it is better to immediately create a layout that is suitable for printing on professional equipment;
- in design it is necessary to create a visual connection with your company - it can be a logo;
- special emphasis should be placed on the purpose of the card - you can select the amount of the discount with certain tools;
A plastic card layout is the design and construction of a card model, which is produced using the most modern graphic editors.
The following programs for working with graphics are used to create a layout: the most popular systems are Adobe Photoshop and Corel Draw, you can also use Adobe Illustrator.
The file must be divided into layers: background, image, text. Plus, when submitting the layout, attach the images and fonts that you used to create the layout to the archive.
Parameters for creating a layout of a plastic card
- The drawing or plot of the map must necessarily fit into the size 86x54 mm. These are the internal parameters that the plastic card possesses, the external ones are slightly larger - 90x57, so this includes backgrounds and various additional elements, which are subsequently pruned.
- The scale of the layout should be 1: 1.
- Real dimensions of the card: length - 86 mm and width -54 mm (discrepancies between dimensions of 2 mm are provided for the card cutting process).
- The fonts used in the layout should be converted to curves, but if it is not possible to fulfill this requirement, then it is advisable to provide a separate folder with the fonts that will need to be adjusted.
- Suitable versions of the plastic card layout are Adobe Illustrator, Photoshop and CorelDRAW;
- The resolution of the layout elements must be at least 300 dpi. In this case, raster elements must be made in raster formats (tif), and vector ones - in vector (eps).
- It is best to use one color system to create a layout, the best option is CMYK;
- It is undesirable to use RGB format and Custom Color Palette;
Download the mockup for our technologists to verify compliance with the technical requirements and, if necessary, make recommendations. We will also calculate the manufacturing cost at the same time.
If you do not have time to create a map layout yourself, our designers will help you.
The Dom Card company can offer professional production of a layout for your plastic cards.
Making business cards is quick and easy!
A handy program for quickly creating and printing business cards. The purchase of the full version is made through the most reliable online stores. Delivery on CD is possible throughout Russia.
A very clear and convenient program for creating business cards. Before that I tried different ways to design business cards and badges, but it was either too difficult or too few possibilities. But "Master of Business Cards" is exactly what I need!
Mikhail Morozov, Moscow
Great program! It really allows you to create a beautiful business card in a couple of minutes. The secret of success is to create your own versions of business cards based on existing templates. Special thanks for the prompt technical support.
Natalia Metelskaya, Yekaterinburg
Convenient program for discount cards
Discount cards are a great way to attract new customers, as well as reward and retain old ones. If you have just decided to introduce discount cards into business, then immediately think about their design. Of course, you can contact a specialist for this, who will develop and provide you with several options to choose from. But it's best to make the layout yourself. This can be done in the program for discount cards.
Beginning of work

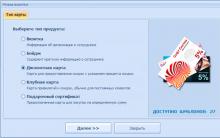
Choosing a card type
Next, you have to adjust the size of the discount card. Choose one of the suggested options or enter all parameters manually. Do not forget to bleed them if you intend to bring the cards to the printer later.

Setting the map size
At the next step, the software will prompt you to enter information about the organization. It is not necessary to do this, the required columns can be filled in later in the editor. Let's move on to customizing the card design. The program contains about a dozen ready-made options for the design of discount cards.

Design selection
Select a card and click "Apply". The template will immediately appear in the editor. You can make edits to it, adjusting the layout as much as possible to your taste.

Main work menu
Editing maps
The loyalty card program provides users with a rich arsenal of tools to choose from to create a decent design. So, for example, you can customize the background of the map. It can be an arbitrary color, gradient, texture from a catalog, a full-fledged image from the collection of the program or from your computer.

Replacing the background
Also, the discount card can be decorated with a variety of cliparts or shapes. Place the elements where you want on the layout and adjust their size.

Adding Clipart
"Play" with fonts: choose the optimal size, color and style of the inscriptions.

Setting the font
Do not forget to pay attention to the design of the back of the card. To do this, click on the line "Create a back side" in the menu on the right and select your preferred design.

Creating the second side of the map
On the second side of the discount card, you can place, for example, the rules of use and your organization's address. You can also add a QR code that will help potential customers quickly find information about you on the Internet.

QR code add function
Save and print
With the program for discount cards, you will always quickly develop high-quality layouts of any cards. At the end of the work, the software allows you to immediately display the required number of finished copies on paper. Just click on the printer icon and set up the printing process.

Built-in print module
Summing up
"Master of Business Cards" is a universal program for designing badges, discount, club and gift cards, as well as software for creating business cards. By installing this application on your computer, you can prepare an original design for cards within the walls of your own home and save money on paying for designer services.
Download the "Master of Business Cards" program right now!
The plastic card editor will allow you to quickly create your own card design using the functionality of the editor.
The editor has several zones, divided by semantic meaning.
1) Top panel the editor contains buttons for adding design elements to a plastic card (background, pictures, text, bar and QR codes, magnetic tape markup, embossing elements). Adding each element is intuitive and will not be described in detail.
2) Left panel contains auxiliary elements:
- The button "base" contains a drop-down menu with the colors of the base of the plastic card. You can choose the color you want to view the design elements in the color you want.
Note. If you do not see any changes when changing the base, then you have a background fill. Click the background edit button on the top panel and set the fill background to transparent. - Question mark button calls this help.
- The trash can icon at the bottom of the left panel allows you to remove design elements from the map. Just drag the item to be deleted onto the trash can icon and confirm the deletion.
Note. The background image and the magnetic tape must be removed from the edit window of the corresponding element. they cannot move and do not respond to mouse movement.
3) Bottom panel, consisting of two buttons "front side" and "back side" allows you to switch between editing the front and back sides of the card.
4) Central part layout editor for layout design elements.
Dotted areas indicate acceptable areas for placing design elements:
- The area with a green dotted border (5 mm from the edge) is the minimum recommended area for placing significant design elements (text, bar and QR codes). For embossing elements this is the maximum required placement area, the editor will not allow you to place the embossing element closer to the edge than indicated by the green dashed line.
- The area with a red dotted border (3 mm from the edge) is the minimum required area for placing significant design elements (text, bar codes and QR codes). The editor will prevent you from placing these elements closer to the edge than indicated by the green red line.
- Pictures and backgrounds can be placed anywhere on the map.
- A magnetic stripe is a fixed element that is applied over all elements. Make sure that significant design elements are not covered by the magnetic stripe.
- Do not place embossing elements too close to the magnetic stripe to avoid possible problems with the readers.
Application. Download our


")
")

Passage of the game Crystalux How to play "Crystals" in Russian
Loyalty: Knights and Princesses game: location maps with descriptions
Antique world maps in high resolution - Antique world maps HQ
Western Eurasia map. Eurasia on the map. Which statement is correct
How to remove black bars on the sides in videos