When watching video on widescreen monitors, many users face the problem of black bars at the edges of the image. These stripes can be either vertical or horizontal. The main problem is that the screen size does not match the aspect ratio of the video being played. For example, viewing a 4: 3 video on a 16: 9 screen will inevitably end up with stripes on the sides of the image.
Watch this lesson and find out how to remove black bars in a video in a few minutes in the VideoMASTER program:

In order to cope with this problem, we will use the VideoMASTER program. The product allows you to set the size and position of the visible area of \u200b\u200bthe image, that is, to crop the video. Thus, you can remove black bars in the video by following a few simple steps.
Step 1. Install the VideoMASTER program.
VideoMASTER is a versatile video converter. In addition, the program is equipped with an extensive range of useful options for editing video fragments. In particular, it can be used to remove black bars in the video. from the official website of the program. Install the program on your computer and run it for the first time.
Step 2. Add video files.

At this stage, you need to load into the program those videos in which you want to remove black bars in the video. To do this, press the button Add, which is located on the left side panel of the program. Files can be uploaded one by one or a whole folder with video. You can get detailed information about uploaded videos by opening the section Information.
Step 3. How to remove black bars from video?

Open the menu section Effects\u003e Crop. With the crop operation, you can change size and proportions video images. You can also select the cropping area manually - using the mouse. Set the desired settings and click Apply. Thus, the program allows you to get rid of black bars in just a few clicks. It remains only to start the conversion procedure. To do this, press the button Convert in the lower right corner of the program. At the end of the encoding process, you can immediately view the prepared video.
As a rule, some players have a problem that is somehow related to black stripes. They appear on the sides and very much interfere with direct play. Not all players know how to fix this. That is why we wrote an article about it, how to remove black bars in CS 1.6... So let's go. There are several ways that we will now look at it.
The first way to remove black bars
After opening the game, you need to go to Options (Settings). After that, go to the Video tab. In the item called Display mode, select the Widescreen parameter. Also, a little higher, you need to select the required resolution. The highest resolution is usually chosen.
Second way to remove black bars
For Steam version:Open Steam. Right click on CS 1.6 in the Steam games library and select properties. Click on Set launch parameters, where we enter the required width. -width *** (instead of stars, you must enter the width).

1. We go to the desktop.
2. Click on CS 1.6 with the right mouse button and select the property item.
3. In the field called the object, add the screen width: -width *** (instead of stars, write the width). Click on the OK button.

The third way to remove black bars
For Steam version:We go to Staem and repeat the already familiar procedure. Now instead of -width *** we write -stretchaspect.
For Non-Steam (pirated version):
We perform the same action with the Non-Steam version. That is, we go to the properties of the COP, where we click on the object and where we directly write the same command -stretchaspect.
After all the actions taken, the black stripes will be removed in any case and will never appear again. We hope you succeed remove black bars in CS 1.6... Now we would like to say goodbye to you. Good luck to everyone and see you soon.
Black bars on the sides of the screen are a common problem for those who like to play on laptops and rectangular monitors. It's ugly, inconvenient and distracting. But, fortunately, the problem can always be removed. Let's figure out how to stretch 4: 3 to full screen on a laptop.
What will stretching the image give?
The settings of the game itself allow you to make a widescreen image. But it just adds a viewing angle, although it removes the black stripes on the sides. For real traders, this is not the most profitable option.
Therefore, you can use another method - stretching. What are its advantages:
- easier to aim - the enemy visually becomes wider due to deformation of the image;
- the mouse begins to move faster to the side, while maintaining vertical speed;
- aesthetic pleasure - black bars do not distract, the entire screen area is involved.
If this is what you need - then let's start analyzing how to stretch an image in CS GO!
Game and video card settings
How do I stretch 4: 3 to full screen so it doesn't get 16: 9? Easy. But for this you have to go beyond the game settings. Now we will learn how to make 4: 3 in the form of a rectangle. Even on awkward Windows 10.
First you have to set the settings that are necessary to stretch the game. This is a 4: 3 (square) format with a resolution of 1024x768 pixels, the display mode is full screen. All methods work with such a base. After saving the settings, you must close the CS GO.
Then you will have to open the Game Library on Steam and find CS GO among the list. Then right-click on it and open "Properties". Here we need the "Launch Options" section.
A window will appear with a line into which you need to copy two commands:
-window -noborder
With their help, the game will start in a window, but without frames. After that, you will have to tinker a little with the settings of the video card itself. In this case, the image outside the game will also be stretched. So, if this option does not suit you on an ongoing basis, you can either reconfigure each time before playing, or try other methods.
So, in most laptops, in addition to an NVidia or AMD video card, an Intel chip is installed. We will work through him. It is necessary:
- Select the line "Graphic characteristics";
- In the new window, click on the square with the inscription "Display";
- Set a resolution similar to the game (1024x768);
- At the bottom, find the "Scaling" section and put a tick on the "Zoom to full screen" item;
- Save settings and close the panel.
After that, the image will change. You can safely go into the game and enjoy the enlarged models. The result is a standard 4: 3 stretched over a rectangular monitor. In some cases, especially on Windows 10, there will be no effect.
For NVidia and AMD
Video card drivers allow you to separately adjust the game stretch. Therefore, you can work through them. But first, we set the standard parameters in the game (4: 3 and 1024x768). Then we proceed directly to stretching CS GO 4: 3.
- Right-click on the desktop;
- Select "NVidia Control Panel";
- Find "Adjust the size and position of the desktop";
- Set the parameter "Full screen";
- Save settings.
Attention! If there is no such item, you need to reinstall the drivers for the video card. The reduced functionality of the control panel is the problem of crookedly installed drivers.
- Similarly, right-click on the desktop;
- Select "Graphics Properties" from AMD;
- In the window that opens, click on the "Games" tab;
- Find CS GO in the list;
- Click on "Profile parameters";
- Select "Display scaling" and mark "Full panel";
Hello everyone! Today I would like to talk with you about how to remove black bars on the sides of the screen in the game .
Where do the black bars on the sides of the screen come from in CS 1.6.
Sometimes, after playing with the settings of KS 1.6, the player can see the picture shown in the screenshot above: the game started to start with some unknown parameters and black bars appeared on the sides of the screen. Also likecanarisethen, whenyour old favorite "square" monitor has died and went to the landfill, and youthe same have acquirednew widescreen monitor.These black bars interfere with the game, “steal” the useful area of \u200b\u200bthe screen and do not look aesthetically pleasing.If you can't fix it yourself, then our article will help youfigure it out and fix it.
Removeblack stripes in several ways, and the method depends on which game client you have installed: Steam(license) or Non-Steam (pirate). But let's talk about everything in order.
Removing black bars in CS 1.6 through game settings
I would like to note right away that this method is suitable for both Steam and Non-Steam versions of the game. Start the game, open menu "Settings" and go to the "Video" tab... Before you will be presented with all the possible settings with which you can change the parameters of the display of the game on your monitor.To take awayblack stripes needed on this tab parameter Switch "Display Mode" to "Wide (16: 9)"... Next, you need to set the "Resolution". The optimal solution would be choose permissionse, close to the resolution of your desktop. After all the manipulations required to pushbutton "OK".
Removing black bars by changing game launch options
Ifyou the game does not start or runs in such a resolution that you cannot enter the settings or do not see the "Video" tab, then remove stripes and fix it all at once can be done by changing the launch parameters of the game In this case, the sequence of actions differs depending on which version of the game you have installed on Steam or Non-Steam.Non-Steam version
To begin with you need to find a shortcutwith which you start the Counter Strike 1.6 game, then nright-click on it and select "Properties". In the opened window in the line "Object" the path to your COP will be shown. Go to the very endthis line, press space and write the command -stretchaspect, which will remove black bars from the screen. After the changes do not forget to click the "OK" button.
Instead of the -stretchaspect command, you can write the following commands: -width<ширина экрана>, -nofbo, w<ширина экрана>.
Steam version
Start and login to Steam. Then click on CS 1.6 in the list of games ("Library" tab) right click, select properties.In the opened window in the "General" tab, at the bottom there will be a button "Set launch parameters ...". Click herthen in opened window"Launch parameters" enter the screen width you need with the -width command<ширина экрана>e.g. –width 1366 (optimal for laptops) and confirm the changes with the "OK" button.
As well as for the non-steam version of the game, instead of the -width command, you can writethe following commands: -nofbo, -stretchaspect, -w<ширина экрана>.
We hope that you no longer have any questions about how to remove black bars, and that you will be able to do it. We wish you that there are as few "black bars" as possible in your life!
The monitor is an essential component for any computer. All work on the device is not complete without the display itself. Modern technologies have presented us with the highest quality screens on which the picture looks very rich and realistic. Unfortunately, no user is immune from problems when working with such devices. How do I remove the black bar on the monitor? How do I set it up? Perhaps the point is in the video card drivers or image output settings. To solve the problem that appears, you can use different methods of elimination. Let's talk today about all the nuances of customizing this familiar invention.
Settings for the Windows 7 operating system
To solve the long-standing problem with black bars, you can try to follow the following instructions:
- Turn on your device and wait for the Windows operating system to load. Make sure the display is connected to the computer system unit.
- After downloading, left-click on the "Start" icon and go to the "Control Panel" section.
- You will see a context menu with a huge number of icons responsible for different actions. You need to go to the "Display" tab.
- Now you need to go to the option “Adjust screen resolution”. You will see a dialog box in which you need to select the "Advanced settings" setting.
- It remains to go to "Graphic characteristics" and select "Zoom to full screen" in the zoom settings.
Most often, the manipulations described above help to remove black bars on the monitor on the sides, top and bottom. If after all the actions nothing has changed, then you will have to resort to other methods of fixing the problem.
Important! The stripes come in other colors, and depending on how they manifest themselves, you can recognize the reason for their appearance. This may not be a critical issue. In any case, you need to figure it out in time so as not to cause a complete system failure with the loss of all your data.
We have devoted a separate post to this topic.
Installing new drivers on the video card
It is possible that this defect is caused by problems with the version of your video card drivers.
Important! Some display devices do not return to normal operation even after setting the correct resolution. The image simply stops stretching across the entire screen, leaving unfortunate streaks on both sides.
In order to get rid of this, you can try the following method:
- First you need to go to the official website of the publisher of your video card.
- Sites of all manufacturers have a similar principle of operation, so you need to go to support and select the "Drivers" section.
- After that, you need to fill in the empty fields, you need to enter the data of your personal computer and the model of the video processing chip.
- You should be redirected to the site with the latest drivers, from where you should download and install them.
- After these steps, you need to go to the settings menu and set the maximum allowable resolution for the model of your device.
Important! To avoid confusion about compatibility, check the box next to the last item in the scaling options in the settings.
In the settings, you need to find a line with the name “Scaling Settings” and move the slider on the item “Compressed Scan - Stretched Scan” so that the picture fills the entire display.
Important! It is also worth making sure that the picture is calibrated and positioned exactly in the center.
How to remove black borders on the monitor if the above does not work?

Setting the correct frame rate
- Right-click an empty area of \u200b\u200bdesktop space.
- A context menu will open, in which you need to select the "resolution" section of your laptop or computer screen.
- You will see a window in front of you with four different tabs, you need to go to the "Monitor" tab.
- Find “Monitor settings” and set a different frame rate, higher or lower.
These manipulations can help you solve the problem.
"Roasting" a video card
There is a possibility that the chip moves away from the video card a little, which causes artifacts in the form of annoying stripes. The vidyuha is "repaired" as follows:
- Disassemble the system unit using a Phillips screwdriver and disconnect the video card from the motherboard.
- Cooling must be removed from the extracted circuit. We take the device in hand and go to the kitchen stove.
- Turn on the hotplate and hold the part higher over the fire with tweezers. The chipset must settle on the entire structure.
- We cool down the component and check. You can also use an editing hair dryer for this method.
Important! Many problems with PC screens arise for the simple reason that they are wiped with anything - ordinary dust rags, alcohol, washing gels. To prevent this from happening to you, be sure to read about.


")
")

Passage of the game Crystalux How to play "Crystals" in Russian
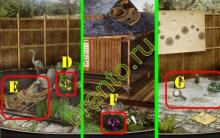
Loyalty: Knights and Princesses game: location maps with descriptions
Antique world maps in high resolution - Antique world maps HQ
Western Eurasia map. Eurasia on the map. Which statement is correct
How to remove black bars on the sides in videos