At first glance, what can be useful to an ordinary person from the assortment of army gadgets and equipment? It is clear that military equipment associated with field conditions will always come in handy for a tourist, fisherman or hunter. But not only it can interest the civilian buyer. You just need to navigate the huge sea of proposals in order to be able to choose things that are useful and necessary in the household, as well as what can be useful in professional activities.
First of all, it is necessary to understand that only in reputable online military trade agencies you can purchase a quality one. Despite the seeming simplicity of many products, they require the manufacture of certain materials, an illiterate replacement or deliberate substitution of which can turn into a big disappointment for the buyer. Therefore, it is not recommended to buy such things in the markets of spontaneous or dubious sellers, to put it mildly. So what does a buyer who is not experienced in military equipment usually pass by?
Those who have to constantly work at height and insure themselves with the help of a special belt, it is well known that the necessary tools and various devices with consumables should always be at hand. Well known to fishermen who like to fish in the reeds, standing up to their waist in water, the Lif-A unloading system is ideal for high-altitude work. It takes up space only on the chest, providing the owner with 3 main vertical compartments and 4 smaller pockets, 2 on each side. The compartments and pockets are covered with flaps, which are fastened with hinged bosses. Items are usually made of tarpaulin. More modern models are made of polyester and can have up to 12 pockets and pouches.
Military equipment, convenient both at the construction site and in the personal plot, - unloading vests of various designs. They can be with a fixed number of pockets and pouches, supplied only with PALS loops for the MOLLE interface, or made in combination. They are sewn using polyester and nylon cordura. The MOLLE interface allows you to attach removable unified pouches of various sizes in places most convenient for use. Durable materials used in sewing allow you to carry a very heavy equipment and tool.
There is also such military equipment, which is comfortable to wear on the belt, and which can withstand a lot of weight. It also belongs to the category of military pouches and is called a bag for dropping magazines. When disassembling any mechanism in a confined space, one often has to face the problem of where to place its removable parts. And these bags are perfect for this purpose. By design, they resemble a fishing cage. Everything that is pushed there passes without problems, but the contents of the bag can no longer accidentally fall out. The bags are made of nylon cordura, and their service life is very long.
1. Close the food bag
Most long-term food packages are not intended to be resealed. Use duct tape to extend the shelf life of these foods.
2. Make a rope
If you're locked in a tall house, roll the tape into a spiral. Such a rope (multilayer if necessary) will help to survive.
3. Use as a bandage
Medical use: Apply sterile cotton wool or tissue to the wound and press down on top with duct tape.
4. Make a spear
If you are out in the wilderness in a survival situation, simply attach your knife to a straight shaft, the result is a spear, dart, arrow, harpoon.
5. Use as a kindling
Scotch tape cut into strips is an excellent waterproof kindler.
6. Keep the glass from breaking
Apply duct tape to windows and glass products, especially in areas of armed conflict and before natural disasters.
7. Fix your shoes
If your shoe has a hole from a multi-day hike, place a piece of cloth on the inside of the gap and tape the inside of it with duct tape.
8. Signal for help
If you get lost and have multiple rolls of different colors, use the contrast of shapes over a large surface area to increase visibility.
9. Fix your glasses
Adhesive tape will return your glasses in case you need diopters or sun protection, but the temples or glasses have become unusable (broken, broken).
10. Repair the water tanks
Duct tape will seal the bottle and other containers.
11. Make shoe laces
To do this, roll the tape into a tube. If necessary, halve it lengthwise so that the improvised laces go through the eyelet in the shoe.
12. Close the hood of the car.
If the hood lock is broken, use the scotch tape to get to the maintenance station.
13. Fix the car mirror
This is done in the same way as fixing glasses or a water bottle.
14. Make animal traps
Scotch tape is suitable as a binding material or as a weaving for a net and net (like laces).
15. Support your ankles
Just wrap the ankle tape over your naked body in several layers.
16. Make the handcuffs
Scotch tape is a durable material for tying up opponents and game.
17. Make a belt out of duct tape
Fold the tape in half and pass it through the loops of the trousers.
18.Use scotch tape for dropsy on your feet
Wrap the soles of your feet in advance if you think you can rub them on a long hike.
19. Keep your tools together
Tools can be tied with tape.
20. Scotch tape as a label
Use scotch tape to attach to desired locations or mark details.
21. Adhesive tape for waterproofing documents
If you have a card, put tape on it. This will ensure its water resistance in the event of an emergency (falling into water, sweat, rain).
22. Keep your shoes warm
Use duct tape inside the shoe for extra insulation.
23. If the tire is flat
If there is no exit, duct tape will help you get to the maintenance station. This is true for a bicycle, a motorcycle, or a car.
24. Scotch tape for boats
The tape will help localize the breakdown of the rubber boat.
25. Use camouflage
Camouflage tape will help reduce the visibility of your tent or equipment. To do this, use the materials at hand - branches, grass, etc.
26. Mark the route
To do this, attach the tape to trees and bushes (small pieces of duct tape).
27. Remove the splinter
If the splinter rises above the skin, attach tape to it and jerk it sharply.
28. Fix your hand
The injured limb can be fixed with tape.
29. Fix your clothes
Scotch tape allows you to patch holes in clothing and equipment.
30. Make a cup
You can use duct tape to make a water cup.
31. Protect your elbows and knees
If you need to crawl, tape can be used as a protector instead of elbow pads and knee pads.
32. Make a bag
You can make a bag out of duct tape. You can use it to make a bag out of cloth or large leaves.
33. Protect your knife
Just apply tape to the blade.
Of course, these are just a few of the methods for using duct tape. In fact, its use in a campaign, in everyday life and in survival is counted in hundreds and, probably, thousands of options. As always, it only remains to add that our capabilities are limited only by our knowledge, skills, ingenuity and level of imaginative thinking.
Greetings, commanders!
Today there will be a speech about equipment in the game, the rules of war, or rather about the best equipment for an attack and, to be more precise, about epic equipment of order IV for attacking troops.
The types of equipment that improve attack include:
- Ammunition (those for the attack.)
- Gloves
- Weapon
- Shoes
Note that for the Mercenary, we can install two equipment with the ammunition type in the slots, as a result of which we can use 5 slots for the attack.
Moving on to the fun part….
In the game of the rules of war, the epic consumable of the 4th order of the ammunition type is the Nuclear battery consumable.
As mentioned earlier, we can install this type of equipment in two slots.
The attack rate of the Nuclear Battery consumable ranges from 4% to 5%. Upgrading to the maximum level by spending 226,800 fragments, you will receive an attack equal to from 11.5% to 12.5%. Since this type of equipment can be installed in two slots, it turns out that you can have a maximum of 25% amplification from the ammunition slots and spend 453,600 fragments.
The next type is Gloves. Tier IV epic gloves include the Emperor's Fist.

Fist of the Emperor improves attack rate from 5% to 6%. With the maximum improvement, the attack rate will be equal to from 15% to 16%, at the cost of 226800 fragments.
Tier IV epic weapons include the Plasma Annihilator.

Equipment Plasma Annihilator gives an amplifier from 8% to 9%. And the maximum improvement will give a gain from 20.5% to 21.5%, with the cost of 226800 fragments for improvement.
And the final attack gear is the shoe. Tier IV epic footwear includes the Fenrir Boots.

Which gives out 5% to 6% gain by default. At maximum level improving the attack rate will be from 15% to 16%, all the same 226800 fragments will be spent.
To summarize, having in all slots the maximum epic equipment of the IV order, we will receive an attack boost by 78.5%, and we will spend 1,134,000 fragments.
Now let's roughly calculate how many dismantles we have to do to get 1,134,000 fragments. We will read that from each location we are poured the usual equipment of the IV order, which, when disassembled, gives 480 fragments.
1134000/480 = 2362.5 round up to 2362
It turns out that we need to break through 2362 locations in order to collect the required number of fragments. Yes, friends in the game Rules of War, you will have to expand 2362 locations in order to collect the required number of fragments.
If I made a mistake somewhere in the calculations, correct it in the comments….
Now let's talk about the time we will spend on dismantling the equipment. We know very well that regular Tier IV equipment breaks in 1 hour. It turns out that 2362 hours will be broken, we translate into days and it will turn out to be about 98 days, continuous breakdown.
The full upgrade time for each Tier IV epic equipment takes 60 hours to max. Since we have 5 slots, we get 60 * 5 = 300 hours or 12 and a half days.
Tips and instructions
You can extend the life of your Petzl equipment by observing simple rules its use and storage. Monitor your equipment and, if necessary, follow the simple guidelines for its maintenance. The frequency of service depends on the intensity of use, external factors, storage and transportation conditions, etc.
Here is a list of Petzl equipment maintenance measures.
Basic principles
 Keep track of your equipment. Do not leave your equipment unattended. Do not drop equipment on the ground.
Read and understand the instruction manual before use. Instructions for all Petzl products are available at www.petzl.ru.
All personal protective equipment (PPE) falls into three categories:
- Category 1 - Protection against minor hazards, solar radiation (goggles, gloves).
- Category 2 - Protection against serious hazards (ventilated helmets, crampons, etc.).
- Category 3 - Protection against lethal hazards (harnesses, carabiners, launching devices, ice tools, etc.).
Service life of Petzl equipment
- The maximum service life of plastic and textile products is 10 years from the date of manufacture.
- The service life of metal products is not limited.
- WARNING: in extreme cases, the service life of the product can be reduced up to a single use, for example, when working with aggressive chemicals, at extreme temperatures, in contact with sharp edges, after strong jerks or heavy loads, etc.
How do I know the age of my Petzl equipment?
All Petzl Personal Protective Equipment (PPE) has a serial number. Serial number can be applied different ways: laser, textile label, engraving, etc. The serial number allows the equipment to be identified.
Transportation
- Petzl recommends storing and transporting your equipment in dedicated protective bags.
- When carrying in a backpack or bag, make sure that ropes, loops, harnesses and other textiles are protected from contact with the sharp edges of ice screws, crampons, etc.
- When transported on trains, planes and cars, equipment may be exposed to high temperatures. Do not leave textiles and helmets under the glass of a car or in a closed container where the temperature may exceed 80 ° C.
- Take care of your equipment during transport in the trunk of your car. Avoid contact with car batteries (contain acid), gasoline and oil cans, cleaning agents, etc. Any chemical attack reduces the strength of the PPE. Discard your equipment if you suspect that your equipment has been exposed to aggressive chemicals.
Storage
- Store his equipment in a well-ventilated area, away from direct sunlight.
- Allocate a separate storage area for your gear. ATTENTION: Avoid any contact with aggressive substances (acids). Discard your equipment if you suspect that your equipment has been exposed to aggressive chemicals.
- When storing PPE, avoid humid places where mold can form (basements, damp cabinets, plastic bags with moisture inside, etc.).

Repair
Any changes to the product design, or additions or repairs not authorized by Petzl are not permissible, since there is a risk of impairing the safety level of the equipment. Only the replacement of those elements that are supplied as spare parts for equipment is allowed. For a list of spare parts, visit the website or your Petzl dealer.
Washing
Drying
- Dry your gear after use. Do not put wet gear in storage cases.
- Dry your gear outdoors or in a well-ventilated area away from direct sunlight.
- Avoid contact of the equipment with a direct heat source (central heating battery, fire, gas burner, etc.). High temperatures can reduce the strength of the products.

Service
When used in recreational sports, Petzl equipment (other than metal equipment) does not require any special maintenance other than cleaning. Servicing of metal products is described in the items Belay and release devices, Carbines, Blocks, Clamps, Ice tools, crampons, ice screws.
Service
- You can put information about yourself on the helmet (name, address, blood type, etc.).
- The marking can only be applied to those parts of the helmet that do not affect safety (comfort elements, linings). You can use tape or attach the tag with a tie. Do not use paint! Per additional information see instructions or your Petzl dealer.
- Some helmets have a dedicated spot for clear or reflective stickers. Use only stickers supplied by Petzl. They are supplied as spare parts.
- In hot conditions or when you sweat heavily, it is recommended to wear a bandana to protect the inside of the helmet.
- Do not squeeze the helmet when transporting it in a backpack.
- Don't sit on your helmet.

Care of helmets
- Rinse the helmet in clean running water after use in salty conditions (e.g. seaside).
- Use neutral detergent and warm water (up to 30 ° C) to clean the helmet.
- Do not use aggressive detergents, solvents, stain removers, degreasers, etc. for cleaning. All of these products are incompatible with polycarbonate, polyester and nylon, which are used in the manufacture of helmets. The use of harsh detergents will reduce the strength of the helmet.
- The shells of ABS helmets can be cleaned with a soft cloth slightly dampened with alcohol. ATTENTION! Do not immerse the helmet in a container with alcohol or spray alcohol on the helmet.


Repair
You can replace the clips for attaching the headlamp and the buckle on the belt yourself. Removable soft pads are available as spare parts.

Strapping

Protect your harness from paints, solvents, acids, oils and other corrosive substances. Protect the harness during
the time of painting and other works using aggressive substances. Use capes or
protective overalls worn over the harness. It is necessary to cut a hole in the overalls or
a cape for attaching a lanyard.

Service
Loops, belay belts and shock absorbers
 When marking hinges and belay belts, keep in mind that the chemicals in tape, duct tape, markers and paints may not work with nylon. Such markings can reduce the strength of hinges and lanyards. For your safety, do not use felt-tip pens, markers, duct tape, etc. for marking. Marking is allowed only on the label sewn into the loop.
For shock absorbers, markings can be applied to the protective shell or by inserting a label with information inside.
Some elements can be replaced on GRILLON lanyards. The rope has a shorter lifespan than metal self-belaying elements. Rope can
replace when worn. For more information, refer to the instructions for use.
Ropes


Static ropes:
Soak the static rope in cold water for 24 hours before using it for the first time. Wetting improves the bond between the sheath and the core of the rope and helps wash away any residual lubricant used in rope manufacturing.
Dry the rope in a dark room. After drying, the rope will lose about 5% of its length (5 meters by 100 meters) / Take into account the drying out of the rope when buying and calculating the required length. The rope can stretch up to 5% during use.
Rope care
- Rinse the rope in clean running water after using in salty conditions (e.g. seaside).
- Use a neutral detergent and warm running water (up to 30 ° C) to wash the rope.
- The rope is machine washable. Use a delicate wash cycle with a water temperature of 30 ° C without spinning.
- Do not use aggressive detergents, solvents, stain removers, degreasers, etc. for cleaning. All of these are incompatible with nylon and can reduce the strength of the rope.
- Do not use a pressure washer.
Metal equipment
Marking
Petzl gear made of metal is laser-engraved, labeled or printed. The marking indicates the model, serial number and other information.
Usage
Metal equipment marking:
- Petzl does not recommend custom engraving, as mechanical stress can reduce the strength of the carabiner. It is forbidden to apply stamps and impressions by impact method. Impact greatly reduces the strength of the carabiner.
- It is allowed to engrave with an electric tool on the body of the product next to the serial number. The engraving depth should not exceed 0.1 mm.
- It is allowed to mark metal products with a small amount of paint. Do not immerse your equipment in paint! Apply paint using a fine brush or paint marker.
- Do not spray paint on the work surface of the equipment (clamp cams, rollers, rope contact area, etc.). Individual markings should not overlap the manufacturer's markings (serial number, information on standards, etc.).
- It is forbidden to mark the plastic parts of the equipment (or textile guy loops, etc.).
- The chemical components of the paint can damage the plastic parts of the equipment.
- Petzl recommends using metal paint for marking. We cannot test all commercially available paints.
- Electrical tape or tape should only be used on those metal pieces of equipment that do not come into contact with the rope during use.


Service

Launching and belay devices
Maintenance
In the process of using belay and descender devices, the rope wipes the body of the device. This is normal wear and tear on the equipment. We recommend discarding all devices that have worn down to 1 mm. Equipment must be discarded if sharp edges, deformations or traces of severe wear appear on the hull.
You can manually sand the sharp edges with fine sandpaper to extend the lifespan of your descenders and belay devices. It is prohibited to grind more than 1 mm of metal.


Spare rollers are available for STOP and SIMPLE descenders. The rollers can be replaced as they wear out.


Carbines
 Maintenance
- Lubricate the spring in the carabiner latch regularly.
- Wipe off excess grease with a soft cloth to avoid getting grease on the rope.
- Use a small soft brush to remove dirt from the carabiners.
- Do not use WD-40 based fluids.
- Do not use pressure washers.


Blocks
Maintenance
- The blocks do not require any special maintenance during normal use. In case of intensive use of the blocks (for example, in rope parks) or after getting into water, use a liquid lubricant (machine oil) to lubricate the bushings.
- Do not use WD-40 based fluids as they will dissolve the grease. This can lead to increased bearing wear and block failure.
- Do not use pressure washers. High pressure water enters the bearing and flushes out the grease. This increases wear and leads to premature roller aging.
Clamps
Maintenance
Use a brush to remove dirt. The teeth on the cam must be clean for the unit to function properly.

Ice axes, cats, ice screws
 Recommendations
- Wipe ice tools and crampons with a soft cloth after use.
- Dry the lines on the crampons after use.
- Remove the protective caps from the ice screws. Dry the ice screws completely.
- To protect threads and cutting edges, use an ice screw protector (ICEFLUTE).
Maintenance
Rust marks

Service
Sharpening ice axes and crampons


Sharpening ice screws
- Use a small flat file and a round file no more than 3 mm in diameter. If you use a large file, there is a high probability of damage to the teeth of the ice auger.
- Secure the ice screw in a soft-cheeked vise.
- Sharpen the cutting edges of the ice screw carefully.

 Spare parts for ice tools and crampons

Lanterns
Read the instruction manual before use. Always check the compatibility of the flashlight and the type of batteries or accumulators for it.
Usage
- To protect the lenses of the flashlights from scratches, use special containers for storing and carrying flashlights.
- Some lights have a lock function against accidental activation. Always use this function to protect against accidental activation and premature discharge of batteries.
Rechargeable flashlights
- Fully charge the battery before first use.
- Do not immerse the battery in water.
- Remove and dry the battery for fresh air after use in wet conditions. Do not leave the battery in direct sunlight. Avoid
- contact of the battery with heat sources (fire, radiator, gas burner, etc.).
- If you do not plan to use the flashlight for a long time, remove the battery and store it separately. Store batteries in a dry, well-ventilated area, away from direct sunlight.
 Lithium ion batteries
- Petzl warrants its lithium-ion batteries for one year or 300 charge cycles. After 300 recharging cycles, the batteries retain about 70% of their original capacity.
- Lithium-ion batteries lose 10% of their capacity every year. This loss is independent of battery usage.
- The battery must be charged at temperatures between 0 ° C and +40 ° C.
- Do not charge the battery in closed places where the temperature may exceed + 40 ° C (for example, under the glass of a car, in closed boxes, etc.).
- Lithium-ion batteries should be stored and used at temperatures between -30 ° C and + 50 ° C.
- Explosion-proof ATEX flashlights must be stored and used at temperatures between -30 ° C and + 40 ° C.
- Ideal temperature for charging, storing and using lithium ion batteries about 20 ° C.
- Battery life decreases in subzero temperatures. This is a temporary phenomenon. The battery recovers its properties when heated to normal temperature.
- Frequent use of the battery at elevated temperatures (over 50 ° C) will damage the battery. Do not leave your rechargeable torch under a car glass or in other places where the temperature may exceed 50 ° C.

 Nickel-cadmium (Ni-Cd) and nickel-metal hydride (Ni-MH) batteries
- Petzl Ni-MH batteries can be charged up to 500 times.
- ATTENTION! Fully discharging Ni-MH batteries can damage the battery and cause leakage toxic waste... Charge the batteries in time to ensure that they are not completely discharged. Charge the batteries if they have not been used for two weeks.
- Nickel-based batteries discharge during storage. They lose about 10% of their capacity on the first day of storage and about 20% of their capacity per month when not in use.
- Nickel-based batteries must be charged at temperatures between 10 ° C and 40 ° C.
- Nickel-based batteries can be used in temperatures between -20 ° C and + 60 ° C.
- Nickel-based batteries must be stored at temperatures between -20 ° C and + 35 ° C.
Maintenance
- Rinse the body of the flashlight in clean running water after using it in salty conditions (for example, at the seaside).
- Remove the battery from the battery compartment to dry.
- Dry the flashlight with the battery compartment open.
- Never close the battery cover with moisture inside.
- Wash the body of the flashlight using neutral detergents and warm water (up to 30 ° C).
- Wipe the lens of the flashlight with a soft cloth. Do not use abrasive products to avoid damaging the lens.
- Avoid prolonged contact of the flashlight lens with grease and oils. If dirty, wipe the lens with a dry soft cloth and rinse with water.
- The elastic strap is machine washable. Use delicate mode at temperatures no higher than 30 ° C. Do not use spin and dry mode. Elastic straps and some other items are available as spare parts. They can be easily replaced if needed.
Maintenance and repair
Do not disassemble the flashlight! Only replacement of spare parts that fit the lamp is allowed (the list of spare parts can be found in the instructions for use or on the website). Any other change in the design of the lamp is not allowed.
Decommissioning of lanterns
For your safety, discard flashlights in the following cases:
- The lantern was released more than 10 years ago and is made of textiles and / or plastic.
- The flashlight has been severely dropped and / or bumped.
- If defects are detected during regular inspection of the flashlight.
- The flashlight is not stable.
- You do not know the origin of the lantern and the history of its use (you found a lantern, bought a used lantern).
- The flashlight is outdated and does not comply with new safety standards or legislation.
Disposal
Discard any equipment immediately if:
- The equipment did not meet the requirements of the inspection (inspection carried out before or during use and careful periodic inspection).
- The equipment was subjected to a strong jerk or heavy load.
- You do not know full story its application.
- The equipment is over 10 years old and is made of plastic or textiles.
- You have doubts about its integrity.
- The equipment is morally outdated and no longer meets modern standards and / or laws.
To avoid using discarded equipment, it should be destroyed. ATTENTION! Destroy the equipment you have discarded. Do not transfer the decommissioned equipment to third parties, do not allow further use of the decommissioned equipment. Hand over metal products for recycling. Use separate garbage collection.
Based on materials from the website www.petzl.com.
PADDED JACKET / DOWN JACKET
If you consider yourself frost-resistant or do not plan to climb above the snow zone, then you can get by with a warm vest from the list of basic things. But remember that in the mountains they saw frostbitten ones, but no cooked ones.
It will come in handy in the evening, thrown over a windbreaker on halts, while anxiously waiting for partners at the station.
Because most spends time in a backpack, the weight of such a jacket is important. Of synthetic insulation, Primaloft is now the most optimal. You can take it from the down, but remember that if the puff gets wet (rain / sleet), it will no longer retain heat at all, and it is difficult to dry it.
LEGGINGS
It is better if attached around the leg, they will be not only Velcro, but also a zipper. They protect not only from snow getting into boots, but also from small stones when moving along the talus.
In stores you will find membrane gaiters, they cost three to four times more expensive than usual. Newbies don't need them. If you decide to seriously go hiking, you are sure that you will not tear your leggings with cats on the first exit, then such leggings should be bought. When you walk, your feet get sweaty, and under normal gaiters by the end of the day you will find wet pants or frost, and the membrane will bring that moisture out.
Pay attention to the material and construction of the cable under the boot - how long it will survive rubbing against stones and how difficult it will be to fix it. There are shoe covers with metal cables, but they don't last long either.
GLOVES
Any gloves will work, but it is best to have multiple pairs.
- windproof warm from windstoper fleece. They are good for everyone, except that it is a pity to knock them with rope and stones. The fleece also melts and burns your hand if you pickle the rope when you rip off your partner.
- gloves for working with a rope. Special expensive gloves for working with rope are sold in stores, but everyone uses ordinary work gloves. After the hike, you can throw them in the trash or burn them without harming your pocket or nature.
The threat of frostbite of the hands or partial loss of mobility can lead to tragic consequences. Therefore, on the ascent, you need to have several pairs, suddenly one will be lost.
Sometimes mittens with a folding part that expose the fingers (mitts) are also convenient. I wrote in more detail about my set of mittens and gloves here.
GLASSES
The picture shows rather pretentious ones, with curtains on the sides, but in general, ordinary ones will do, those with which you went to the sea, the main thing is that they have a degree of protection from ultraviolet radiation of at least 3, and even better 4.
Another obligatory attribute of glasses for mountains should be an elastic band or rope that prevents glasses from falling to the ground. If on a glacier in clear weather you lose your glasses, you risk severely burning your eyes and temporarily losing your eyesight. Extra glasses are a must in the group medicine cabinet.
Special mountain equipment
HELMET

It is clear why you need it. In the mountains, stones fall more often than you think. People also fall. Brains are value. There is nothing more to add here.
Choose any. To match the color of the jacket, eyes or ice ax :) Some helmets are made on purpose so that you can easily thread the tail of your hair in the back! Unless black helmets will bask in the sun and not so protect the head from overheating.
If the model is light, then the plastic parts in it are replaced with delicate foam. This does not affect reliability, but such a helmet will keep a slightly less pleasant appearance. Although I go to the Petzl Meteor 3, made partly of soft material, which is normal for a year.
INSURANCE SYSTEM (gazebo)

Maybe those who will lead you on your first mountain hike will assure you that in addition to what is in the picture, you need to add an upper harness. Let them do this. I still consider it an anachronism and not a supporter of forcing people to walk in it on new routes. There is argumentation for this, but it is in a separate article.
Choose the system by size, measure it in the store and hang in it (in good stores there is an opportunity for this. Pay attention to the possibility of adjusting the leg loops - this will allow you to wear thick pants if necessary. See where the discharge loops are. Do they interfere with carrying a backpack when the equipment is hung on them, do you reach for the equipment at the same time? Domestic straps will not kill you, but their secondary functions (for example, detachable unloading loops) can make you regret the money spent. Singing Rock harnesses have a cool feature - buckles that can be unfastened. This will allow you to dress / undress or go to the toilet without completely removing the harness.
MUSTACHE

A mustache is what you (more precisely, your system) tie to a safety station, your thread of life :)
I'd like to add that a lanyard made from the main rope attached to you with a knot (for example, a semi-grabbing knot) will satisfy most instructors. In the article it is called “ideologically safe self-insurance”. She is also shown in the picture above.
CARABINES

Carbines are clutch and non-clutch.
If you are a poor student who is completely strapped for funds, then buy 3 muffled carbines (two for the mustache, one for the central ring of the gazebo), this is the required minimum. If funds allow, then buy 5 pieces of coupling and one non-coupling. There are never too many carbines. At first, take carbines of the same shape as in the picture, and then you will understand what you need for what.
Carabiners with automatic clutch are not recommended for mountaineering. Sand / ice can get into the automatic clutch, and it will stop closing itself, to which a person is accustomed. And people who are accustomed to automatic clutch often do not clutch conventional carabiners. For they have not developed a habit.
ICE CUTTER

Freudian symbol of your "TRUEness" as a mountain conqueror :)
You need to take the classic ice ax, as in the picture, with a straight shaft, beak, bayonet and blade. Excessively curved models with an "aggressive" beak will be needed on difficult ice-climbing routes that beginners will not encounter, and for the versatility of such tools is lower than the classic ones.
The length of the ice ax is chosen as follows: stand straight, hold the ice ax by the head (by the crosshair) in an outstretched hand. The ice ax's bayonet should be at the level of the ankle (protruding bone). In short, it's not scary, just like a cane nowadays very few people use an ice ax, and it will be more convenient to climb. If it is longer, it will be inconvenient to climb with it.
Be sure to come up with a lanyard for your ice ax. The lanyard can be a repscord tied into the head of the ice ax, with a loop at the end where you insert your hand. The lanyard should allow you to hold the ice ax both by the crosshair (head) and by the bottom of the shaft at the bayonet.
Consider also self-belaying your ice ax. It can be either a separate cord, the other end of which is attached to the harness, or, for example, your long mustache.
Cats

Take only steel. The aluminum that comes across on the market, buying with its lightness, will break quickly when entering the rocks and quickly become dull.
The number of teeth ranges from 10 to 14. The traditional 12.10 is easier and I have not heard anyone scold them. 14 - you know you live in a world ruled by marketers?
Mountings. I titled this article “Personal Mountain Trekking Equipment basic level and not difficult mountaineering ”, therefore I will advise you crampons with soft mounts, they are shown in the picture. For crampons with a rigid or semi-rigid mount, you will need to select special boots that are expensive.
All cats need boots with rigid, non-bending soles.
Zhumar
For fans of the old school jYumar :)

Rope clip for climbing.
Available for right-handers and left-handers.
The most popular models are produced by Petzl and Vento.
Vento is often scolded and needs to be locked with a karabiner to the rope at the top hole for lack of a piece to prevent the toothed cam from breaking up when jerking.
Perhaps the Vento has been redesigned now, but I haven't seen it yet. Remember that a zhumar is one of those devices on which your life depends.
SPUSKOVUHA (Safety device)


On the left is the most popular "figure eight" device, on the right is a "basket". Both those and others come in different models and manufacturers.
They both serve for descending (rappelling) and belaying a partner, but they have their pros and cons.
Eight:
Is cheaper
Suitable for all ropes, including ice-covered ropes
- with a rappelling, letting go of your hand below the figure eight, you will fly down like a stone, so it is prohibited on some climbing walls.
Basket:
Lighter than eight
Slightly safer (if, while rappelling, you completely release the rope below the belay device, then you will not fly down with a stone, but smoothly descend)
Convenient for organizing pulley blocks during rescue operations.
Extremely uncomfortable on ropes thicker than 9mm. descent occurs in jerks (which is not very safe), belay with force for etching.
REPSHNUR

diameter 6-7 mm,
get yourself two. One 1.5 meters for the grasping knot. The second one is 5 meters, it can be used for many purposes - to make a pedal for a zhumar, an additional mustache, grasping knots for rescue operations, etc. Good cords are suitable for creating belay stations.
TRACKING STICKS

They help to go uphill, are useful on the descent for those who have knee pain (and if you walk a lot without sticks, they will definitely get sick), are extremely useful when crossing the ford of rivers.
Of course, there are people who think that this is overweight and useless, but as a rule, they change their minds when they get into the mountains. Get yourself at least one stick.
LEDOBUR

It is the most reliable means of organizing insurance on ice. At first glance, it may seem that the ice screw belongs to group equipment, but on a closed glacier, every participant must have this thing.
When buying an ice screw, the main thing is to discard patriotism and fork out for a product from Petzl or BlackDiamond. The pleasure of using them cannot be compared with domestic, especially old, Boers.
If there is an opportunity to buy a drill with a handle for quick twisting, take it without hesitation. This is very convenient and offers a variety of benefits in certain situations.
Boers vary in length. Buy long and medium sizes.
SUNSCREEN

Best of all, at least 50 units. In general, how much your skin reacts to high ultraviolet light, you know better or will find out .. But when going to the mountains for the first time, take a more powerful cream.
What's even better to take:
- hygienic lipstick. Some people have very dry lips in the dry mountain air. Some, like me, have never felt the need for this. But if you are going to the mountains for the first time, take it just in case.
- soluble vitamins. In the mountains, people drink practically distilled water, which is not very beneficial for the body and does not quench thirst so much. Mg + (read "magnesium plus") is widely accepted, but not easy to find. Basically, any effervescent vitamins will do. The best option "for the heart": B6-B9-B12, potassium magnesium.
The group where I post my hiking plans to join.


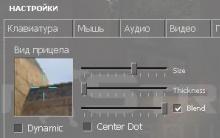


The command to reduce the sight in cs 1
Online store of unique things All patches for cs 1 6
Cs starts up. CS: GO launch options. Launch options for cs go pro players
Civil defense Role-playing game rules, basic concepts
Crossfire models for ks 1